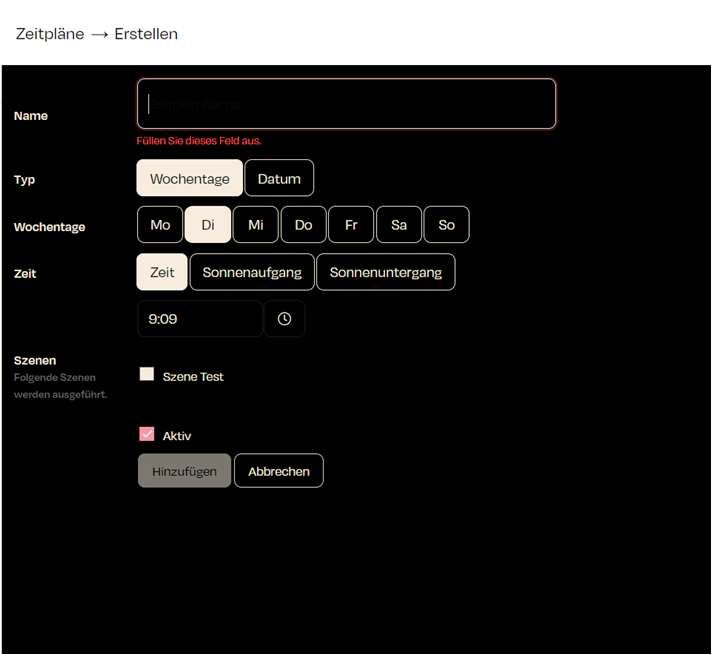

Create Schedule – Step by Step
Schedule Name
- The "Name" field is mandatory. Enter a descriptive name for the schedule that reflects its purpose, such as “Morning Lighting” or “Turn Off Heating in the Afternoon.”
Select Type
- There are two types of schedules:
- Weekdays: Choose specific days of the week (e.g., Mon, Tue, Wed) on which the schedule should run.
- Date: For one-time events, select a specific date on which the schedule should execute.
- There are two types of schedules:
Select Time
- You can define the time at which the schedule should trigger in various ways:
- Fixed Time: Enter an exact time (e.g., 9:09 AM) when the action should occur.
- Sunrise or Sunset: Set the schedule to trigger at sunrise or sunset, with the time adjusting automatically based on natural events.
- You can define the time at which the schedule should trigger in various ways:
Assign Scenes
- Assign one or more scenes to the schedule that will be activated when the schedule runs. Simply check the box next to the desired scene, e.g., “Test Scene”
- The scenes are shown in several columns; with many scenes the list scrolls. Selected scenes are highlighted.
- Use the Search field to filter the list by scene name, e.g. “Light”.
- Show selected only hides all unchecked scenes, so when editing you can see at a glance which scenes the schedule triggers.
- A counter in the top right shows how many scenes are selected (e.g. “3 selected”).
Activation Status
- Ensure that the "Active" checkbox is selected so that the schedule is enabled after creation.