nomos system AG
WebseiteAccount
Integrators (EN)
Integrators (EN)
  • Welcome
    • Notes
    • System Requirements
    • Updates
  • First Steps
    • 1. Language Setting
    • 2. Country Selection
    • 3. Terms and Conditions
    • 4. Licensing
    • 5. Setup
    • 6. Network Settings
    • 7. Controller Name
    • 8. Administrator Account
    • 9. Remote Access
    • 10. Location
    • 11. Time Zone
    • 12. Diagnostic and Usage Data
    • 13. Completion of Setup
  • Login
  • Dashboard
  • Navigation Bar
  • Rooms
    • Create Room
    • Assign Devices to a Room
    • Overview of Rooms and Devices
    • Room Visualization (Visu)
    • Positioning Devices in a Room
  • Zones
    • Create New Zone
    • Manage Zones
    • Assign Rooms to a Zone
  • Automations
    • Create Automation
    • Define Trigger
    • Define Condition
    • Test Automation Example
  • Schedules
    • Create Schedule – Step by Step
  • Variables
    • Create Variable
  • Scenes
    • Create Scene
  • Skills
    • Addons
      • Add Device from the Online Library
      • Overview of Integrated Addons
    • Apple Remote
      • Adding an Apple Remote Device
      • Apple Settings
    • free@home
    • HAP (Apple HomeKit)
    • Home Connect
    • Husqvarna
    • KNX
      • Overview of the KNX Dashboard
      • Adding a KNX Device
      • KNX Address Management
      • KNX Settings
    • Lutron
    • Miele
    • MQTT
    • Netatmo
    • Nuki
    • Philips Hue
    • Ping
    • Sonos
    • Spotify
    • tado
    • Wiser by Feller
      • Add Wiser devices
      • Dashboard – Overview of Connected Devices
      • Connected Devices – More Options
    • Zeptrion
    • ZigBee
      • ZigBee Settings
    • Z-Wave
  • Notifications
    • Create Notification - Step by Step
  • Cameras
  • Links
  • Cloud
  • Fernzugriff
  • Log
  • Administration
    • Settings
    • Network
    • Users
      • Adding a User – Step-by-Step
    • Mobile Devices
    • Advanced
      • Node-RED
      • Project Editor
      • Internal Service
      • Integrator Info
      • Licensing
    • Support VPN
    • VPN
    • Security
    • Configuration
    • Software Update
Bereitgestellt von GitBook
LogoLogo

© nomos system AG 2025

Auf dieser Seite
  • Cameras Overview
  • Add Camera
Als PDF exportieren

Cameras

VorherigeCreate Notification - Step by StepNächsteLinks

Zuletzt aktualisiert vor 18 Tagen

Cameras can be added and managed to improve monitoring and security in your system.

Cameras Overview

  • The dashboard currently does not show any cameras because none have been added. To add a camera, click the "Add" button.

Add Camera

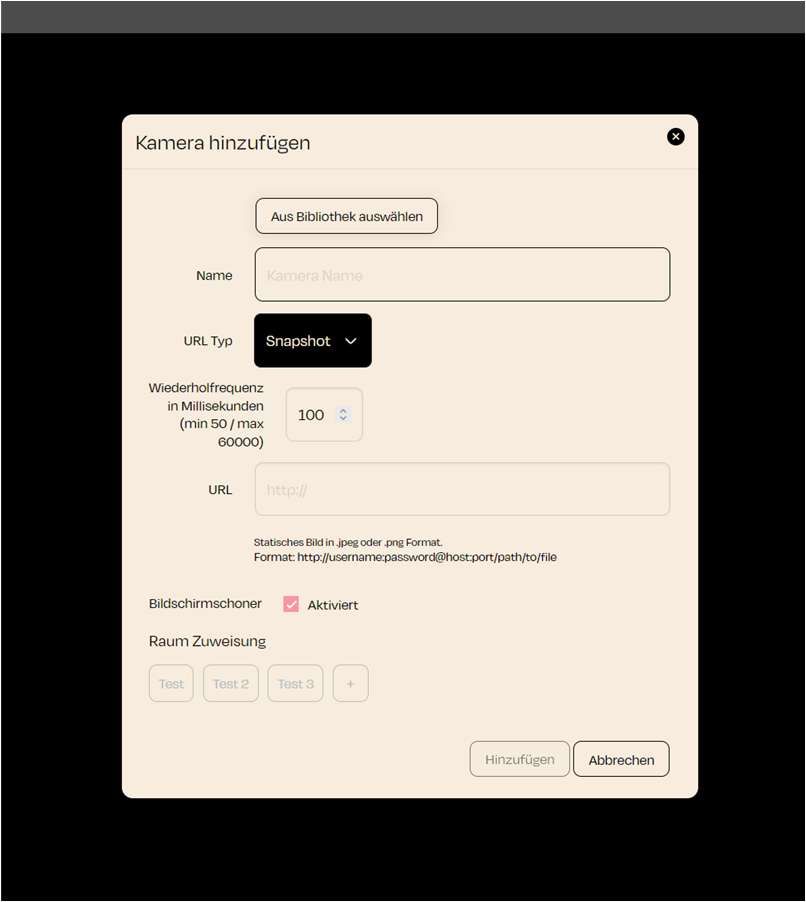
  • When you click the "Add" button, a new window will open where you can enter the information for the new camera.

  1. Select from Library

    • If you want to add a camera that is already known in the system, you can click the "Select from Library" button. Otherwise, you can enter the data manually..

  2. Camera Name

    • Give the camera a unique name that describes its location or function. For example, "Front Door Camera" or "Office Surveillance".

  3. URL Type

    Select the URL type for the camera:

    • Snapshot: For a still image.

    • MJPEG or RTSP can also be selected depending on the camera type, if supported.

  4. Refresh Rate (for Snapshots)

    • Set the refresh rate in milliseconds. This determines how often the camera's image is updated. The range is between 50 and 60,000 milliseconds.

  5. URL

    • Insert the URL for the camera stream or for the snapshot. The format for a snapshot must be in static image format as .jpeg or .png. If a username and password are required, use the following format: http://username:password@host:port/path/to/file

  6. Screensaver

    • Option to display the camera in screen saver mode.

  7. Room Assignment

    • Assign the camera to a specific room to make organization and management easier.