Loading...
Loading...
Loading...
Loading...
Loading...
Loading...
Loading...
Loading...
Loading...
Loading...
Loading...
Loading...
Loading...
Loading...
Loading...
Loading...
Loading...
Loading...
Loading...
Loading...
Loading...
Loading...
Loading...
Loading...
Loading...
Loading...
Loading...
Loading...
Loading...
Loading...
Loading...
Loading...
Loading...
Loading...
Loading...
Loading...
Loading...
Loading...
Loading...
Loading...
Loading...
Loading...
Loading...
Loading...
Loading...
Loading...
Loading...
Loading...
Loading...
Loading...
Loading...
Loading...
Loading...
Loading...
Loading...
Loading...
Loading...
Loading...
Loading...
Loading...
Loading...
Loading...
Loading...
Loading...
Loading...
Loading...
Loading...
Loading...
Loading...
Loading...
Loading...
Loading...
Loading...
Loading...
Loading...
Loading...
Loading...
Loading...
Loading...
Loading...
Loading...
Loading...
Loading...
Loading...
Loading...
Loading...
Loading...
Loading...
Loading...
Loading...
Loading...
Loading...
Loading...
Loading...
Loading...
Loading...
Loading...
Loading...
Loading...
Loading...
Updates resolve technical issues (bug fixes) and close potential security vulnerabilities. Once your nomos Controller is connected to the internet, it becomes susceptible to hacker attacks. Since attack methods are constantly evolving, regular updates are necessary to ensure long-term protection of your nomos Controller. Regularly check your Controller to see if new updates for the nomos Controller firmware are available (Administration > Software Update).
Please note that Nomos System AG assumes no legal responsibility or liability for any disadvantages or damages that may arise from either an outdated or updated firmware.
Important Note: Create a backup before updating the firmware!
Be sure to back up your nomos Controller data before performing a firmware update (Administration > Configuration).
To successfully install and operate the nomos Controller, please ensure that the following system requirements are met:
Power Supply: A reliable power source is required to continuously power the Controller and ensure uninterrupted operation
Network Connection: A stable LAN connection is essential for the operation of the nomos Controller. It is important that the router is set up by a qualified professional to ensure that it is optimally adapted to your specific network structure. This careful setup is crucial to ensure reliable communication and effective integration of all connected devices.
Router: The router used must support DHCP without exception.
Checked systems and documentation : All deployed systems must be fully tested and handed over in working condition. Necessary documentation, such as for KNX, should be available and up to date to ensure smooth integration and maintenance.
Meeting these requirements ensures that your nomos Controller operates at its best and delivers a seamless smart home experience.
nomos Controller: The Comprehensive Hub for your connected home
The nomos Controller is your solution for a seamless and user-friendly smart home experience. As a versatile smart home hub, it offers you the freedom to integrate and control a wide range of peripheral devices. The nomos Controller supports a broad spectrum of technologies and brands, including KNX, Wiser by Feller, Zeptrion Air, Lutron, Miele, Husqvarna, free@home, Home Connect, and many more. This ensures that all your systems are unified within a single, intuitive user interface.
With the nomos Controller, you gain complete control over your entire smart home system — both locally and remotely. Our custom-developed app not only provides a clear and simple visualization but also enables convenient remote access from anywhere in the world. The true strength of the nomos Controller lies in its ability to bridge diverse technologies and protocols. It supports platforms such as Somfy, MQTT, Netatmo, Nuki, Philips Hue, Sonos, Tado, Z-Wave, ZigBee, and many others. This range of integration makes the nomos Controller the central platform that brings all your devices together in one seamless interface.
In addition, the nomos Controller offers full integration with all major voice assistants and home apps, including Google Home, Alexa, and Siri. This allows for easy voice control and flexible automations to further enhance your smart home experience. Beyond standard device integration, the nomos Controller provides advanced features such as message management, scheduling, and camera integration. These capabilities ensure that your home is not only smarter but also more secure.
Discover a new dimension of building connectivity with the nomos Controller — one that combines flexibility, user-friendliness, and performance to deliver tailored solutions for your individual needs.
Establishing a Connection to the Controller
As soon as you supply power to the nomos Controller and establish an Ethernet connection to your network, your modem/router will assign an IP address to the nomos Controller.
Open a web browser (Google Chrome is recommended) on your computer or tablet.
Use a tool or check directly via your router to determine the IP address of the nomos Controller.
Now, use the browser and the IP address to connect directly to your nomos Controller.
You have now established a direct network connection to your nomos Controller. If the controller has already been set up by your integrator, you will immediately see the overview display of your nomos Controller.
If the controller has not yet been configured, you will be guided through the first 13 setup steps.
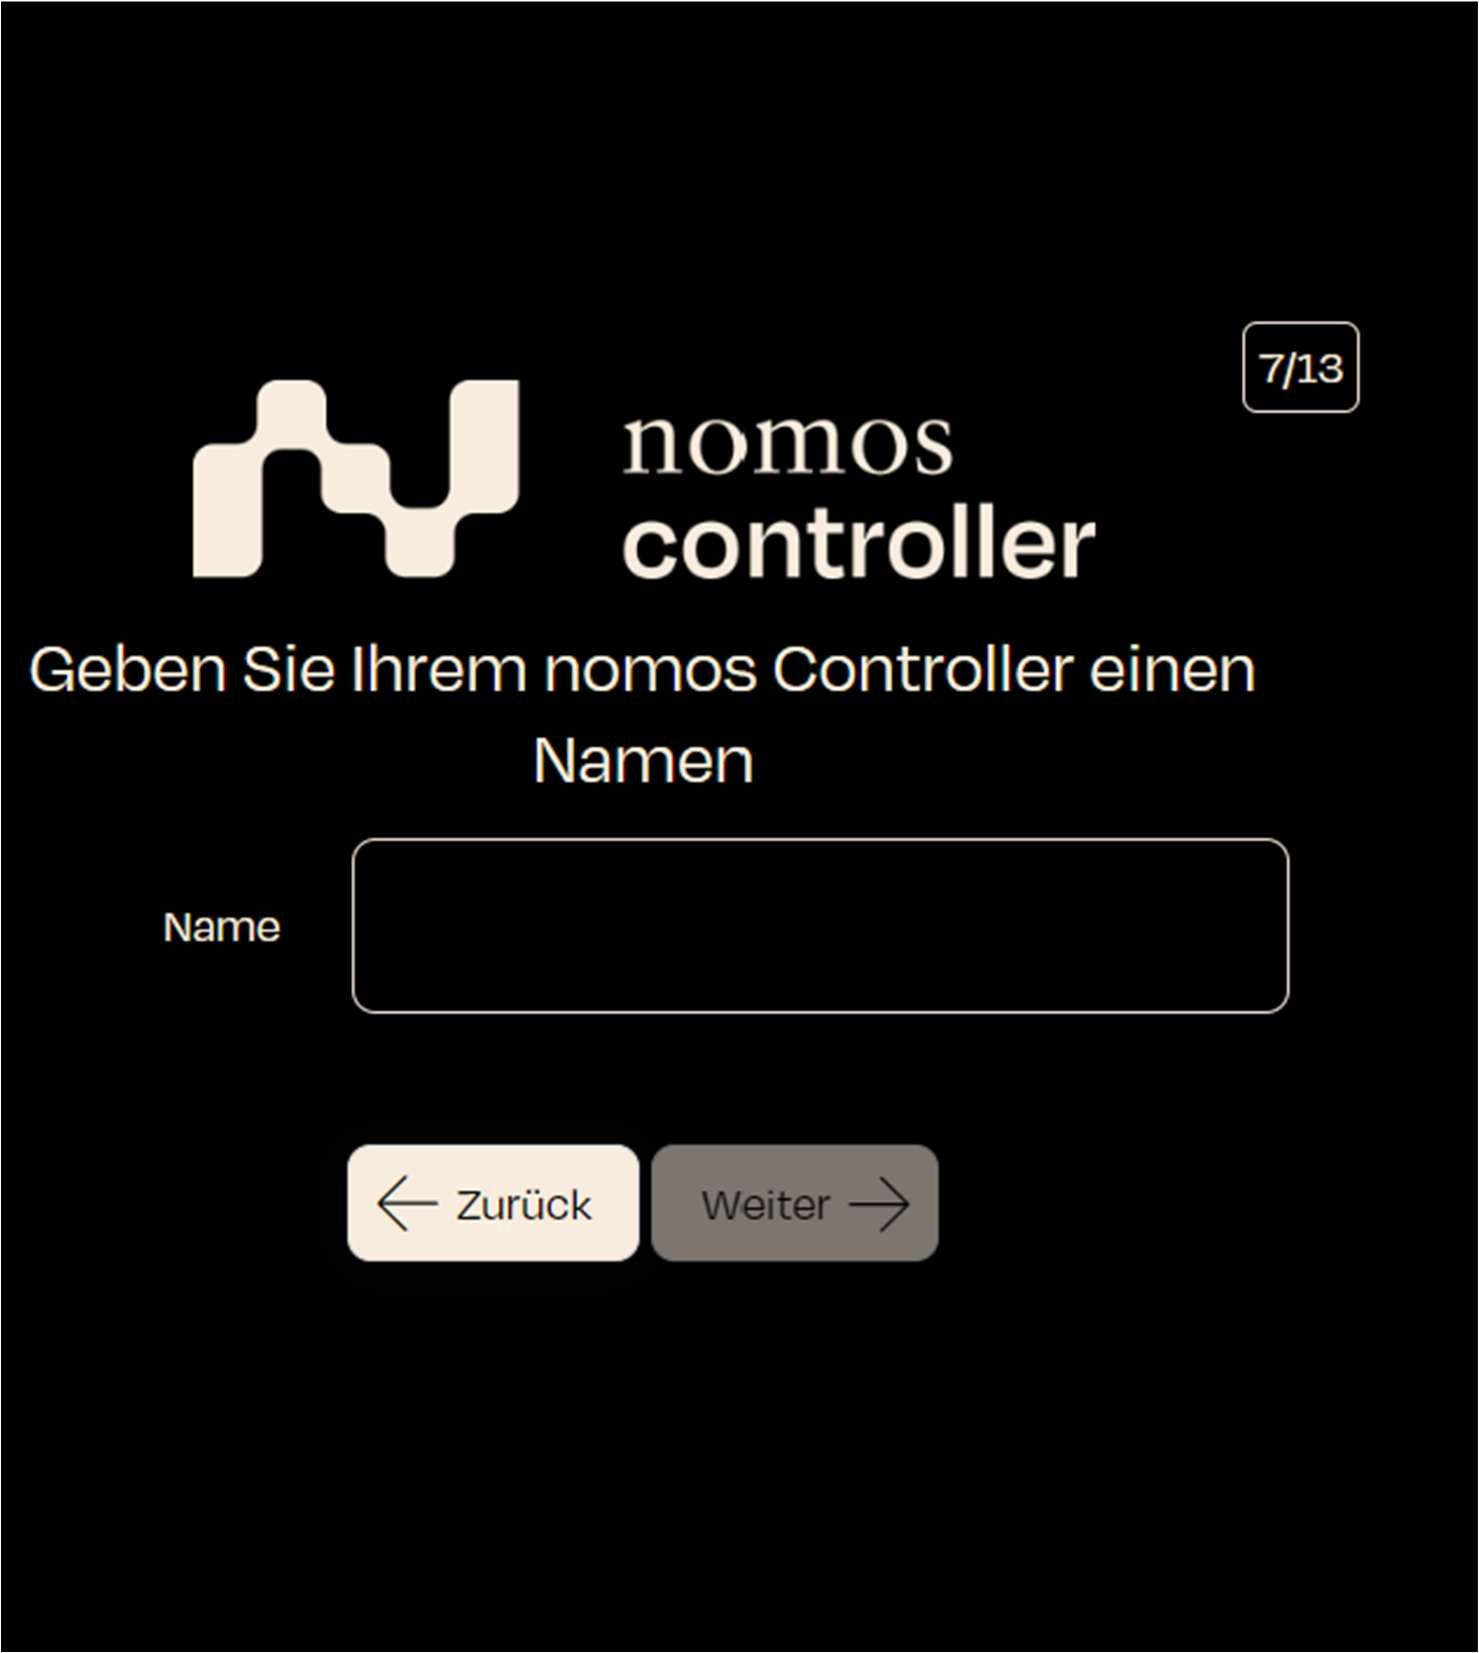
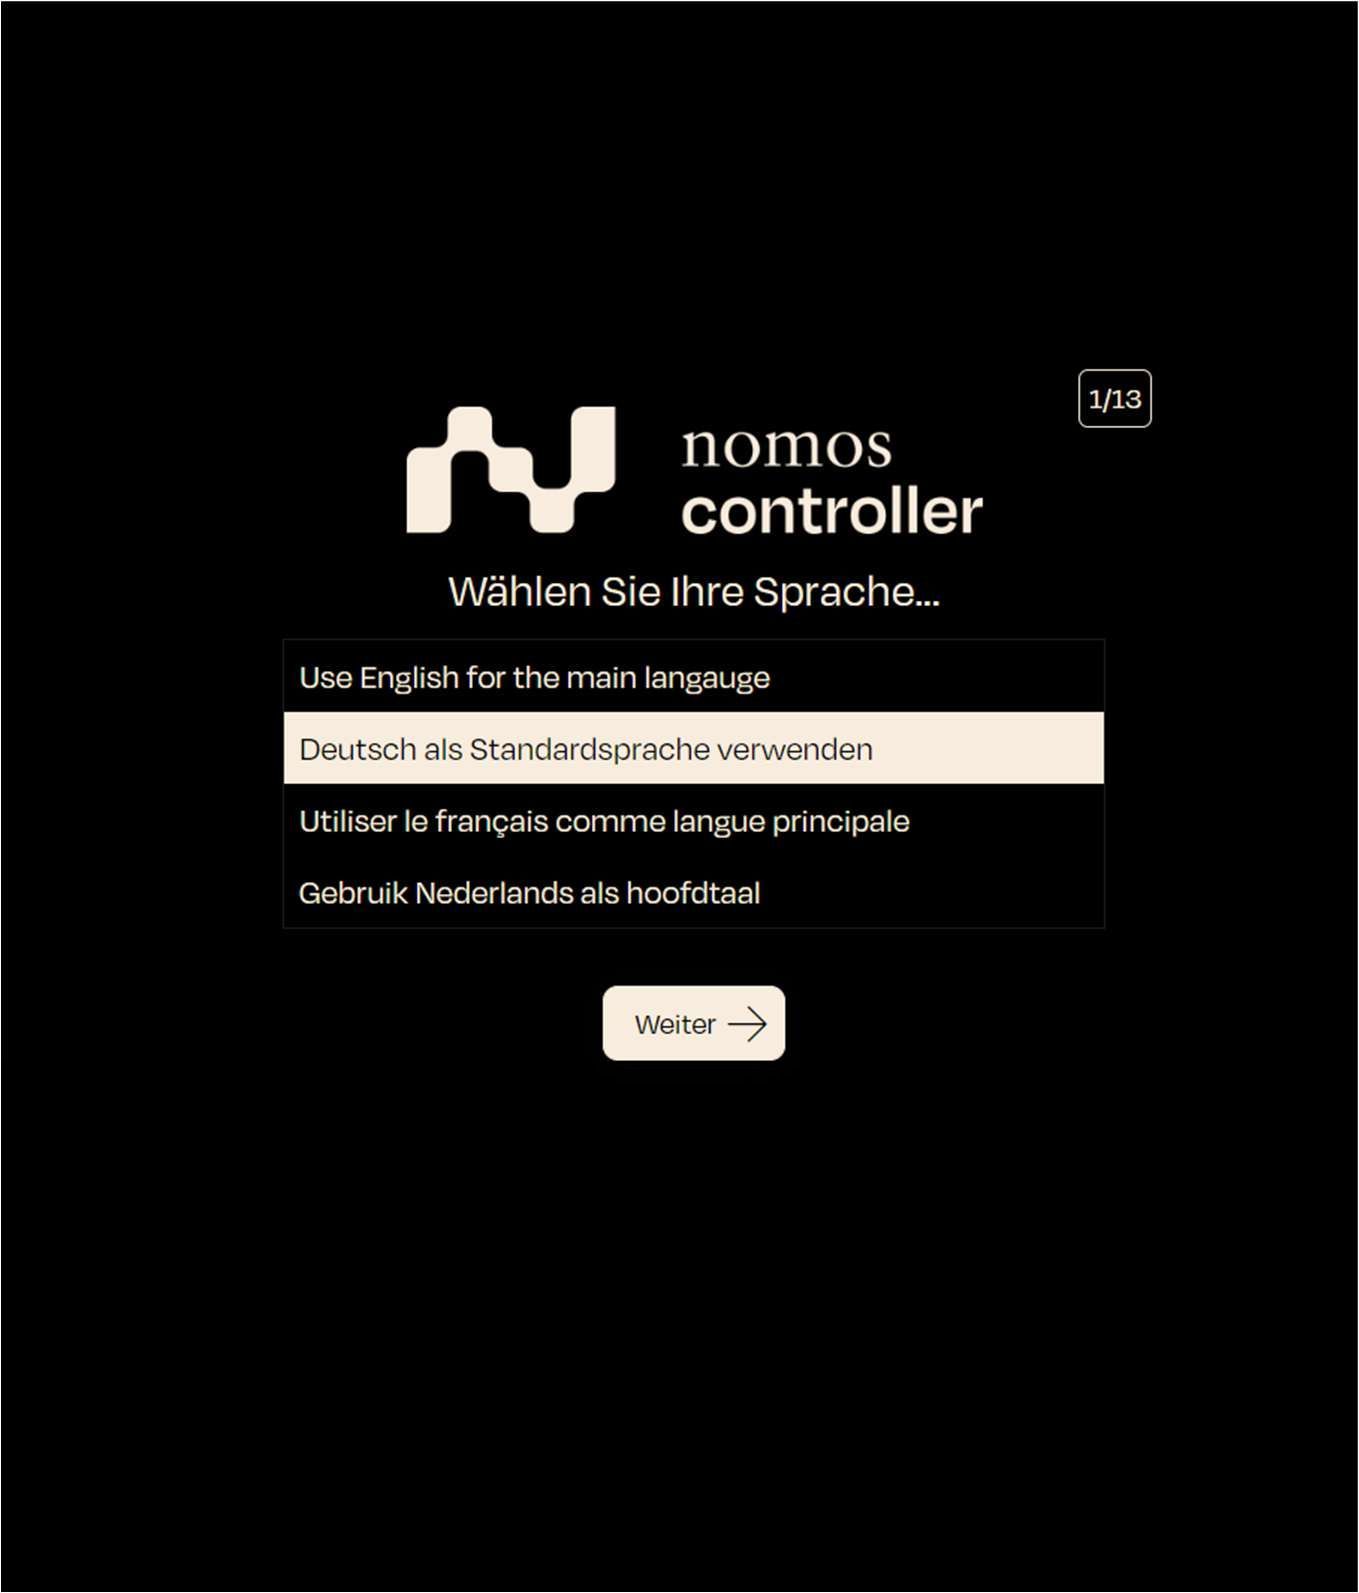
When starting the nomos Controller, the user is prompted to select their preferred language.
Screen display: Choose your language from a list of options:
Use English for the main language (Englisch)
Deutsch als Standardsprache verwenden (Deutsch)
Utiliser le français comme langue principale (Französisch)
Gebruik Nederlands als hoofdtaal (Niederländisch)
Step: Select your preferred language by clicking on the appropriate option. In this example, we will choose “Deutsch als Standardsprache verwenden” (Use German as the default language).
Next step: Click “Continue” to proceed.
To complete the installation and setup of the nomos Controller, you must accept the terms and conditions.
Screen Display: The Terms and Conditions (T&C) are shown.
The use of the controller and its related services is subject to these T&C.
Step: Please read the terms carefully. Scroll through the text to read all details.
In the next step, you will set up the administrator account.
Screen Display: The user must set a password for the admin account and provide an email address for the account.
Password: Enter a secure password.
Confirm Password: Repeat the password to confirm.
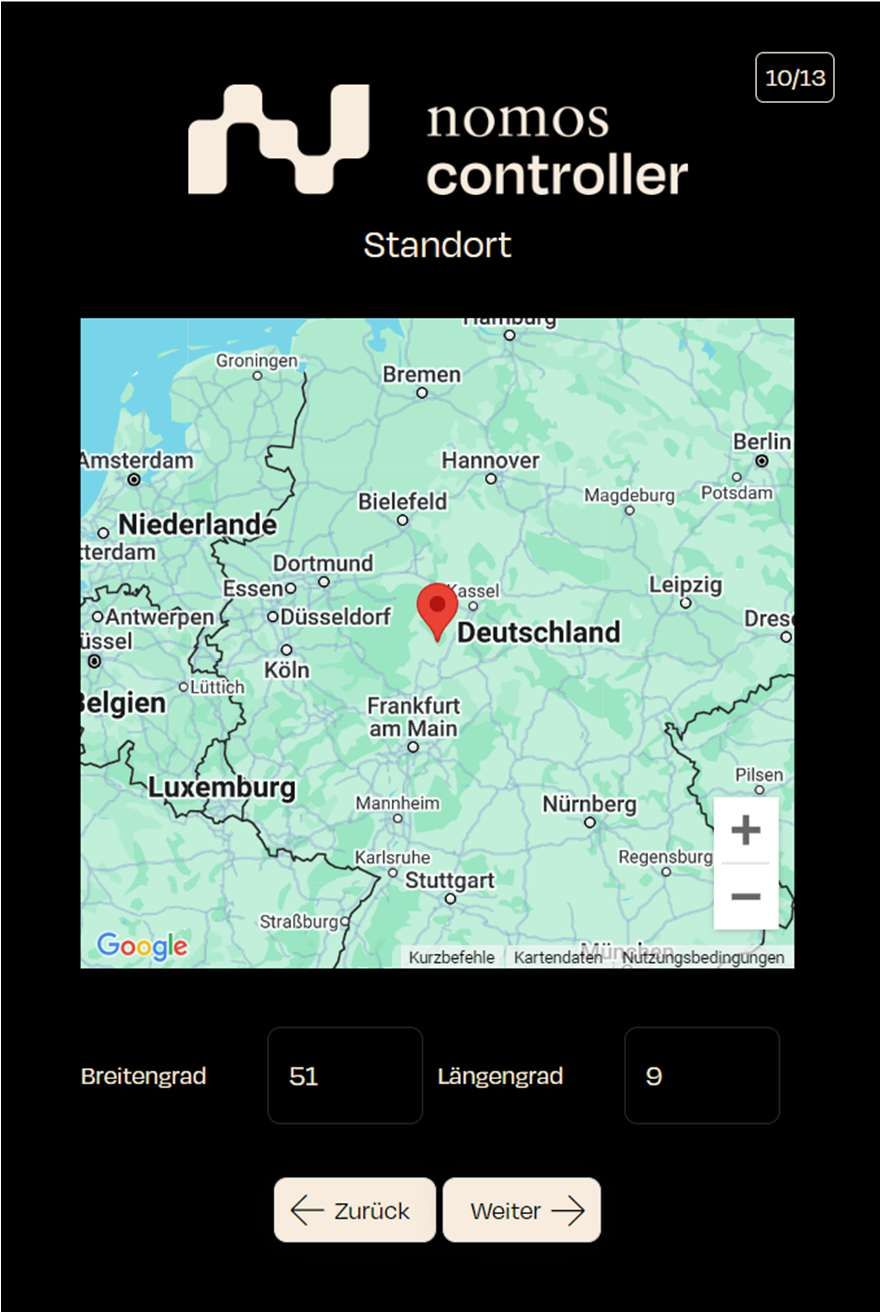
After setting the location, the next step is to define the time zone.
Screen Display: A dropdown menu allows the user to select a time zone.
Example: Europe/Zurich
Step: Choose the appropriate time zone for the controller's location.
To better organize devices and functions within the nomos Controller, you can add new rooms. This allows for a structured overview and simplifies the management of automations and devices.
Adding a New Room:
Clicking the "New Room" button opens a dialog window where you can enter the name for the new room.
Steps to Create a Room:
Room Name:
In the nomos Controller, you can move devices between different rooms to ensure structured organization and control. This function allows you to assign each device to the appropriate room, simplifying management.
Manage Devices:
List of Available Devices:
In the "Manage Devices in [Room Name]" window, a list of devices currently not assigned to any room is displayed.
To create a new variable in the nomos Controller, follow these steps:
ID: This is automatically generated when the variable is saved.
Name: Enter a unique name for the variable. This name is used in automations and other areas to reference this variable.
Default Value: Set the initial value for the variable. This value is used when the variable is reset or at the start of a process.
In this step, the user can choose the type of setup.
Screen Display: Three options are available:
Setup as a new nomos Controller
Restore from backup file
After creating a new zone in the nomos Controller, you can assign rooms to this zone to establish a clear structure. This is particularly helpful for organizing large installations or complex buildings.
Managing Rooms within a Zone:
Add Rooms to a Zone:
Click the "Manage Rooms" button next to a zone to open a dialog window displaying all available rooms.
In this view, you can manage the integration of the Apple Remote with your system. The Apple Remote Skill allows you to control Apple devices, like Apple TVs, through your Smart Home system.
View Explanations:
Click the on/off switch to enable or disable the control of the Apple Remote.
Once activated, you can use your nomos Controller to include and manage various Apple devices, such as Apple TVs, in your automations or scenes.
In this view, you can create, manage, and use variables for automation purposes. A variable is a custom unit that can be used in automations to store states or values.
Variable Overview:
Name: Displays the name of the variable.
Last updated: Shows the date when the variable was last edited.
In this view, the nomos Controller starts searching for connected Apple devices in the network. Once you have activated the Apple Remote skill, you can add an Apple device for control from this view.
Explanation of the View:
Loading Icon: As soon as you execute the command to add a device, the system looks for compatible Apple devices on your network.
Next Button: Once a device is found, the "Next" button becomes active. You can then proceed to the next step to configure the device.
To create a new scene in the nomos Controller, follow these steps:
Name: Enter the desired name for the scene.
Add your first Action: Add the desired devices, functions, or states to the scene
Select Platform: Use the dropdown menu to select the platform on which the action should be executed.
To facilitate the organization of larger installations, you can add new zones in the nomos Controller. Zones allow you to group rooms into logical units, such as floors or building wings.
Add Zone:
New Zone:
Clicking the "New Zone" button opens a dialog where you can enter the name of the new zone.
Next Step: Click on "Accept" to agree to the terms and continue with the installation.
Email: Enter a valid email address (optional).
Step: Fill in all fields to configure the admin account. Ensure that the password is secure and the email address is entered correctly.
Next Step: Click "Next" to continue.
Next Step: Click "Next" to proceed.
A text field appears prompting you to name the room. Enter the desired room name here.
Once the name is entered, click the "Create" button to add the room.
The newly created room will now appear in the room list and is ready for you to assign the desired devices/objects.
Rooms help you organize devices and automations. Each room can contain specific automations and scenes that apply to the devices assigned to it.
For example, the following devices might be available:
Jalousie Test (Window Shading)
Lampe Test (Lighting)
RTH Test (Thermostats)
Steckdose Test (Lighting)
Select Devices:
Each device has a checkbox on the right. By checking the box, you can assign the device to the current room.
Search Devices:
A search bar is available to help you find specific devices, especially useful when the list of available devices is long.
Current Value: Displays the current value of the variable if it is already in use.
After filling in all fields, click Add to create the variable. To cancel the process, click Cancel.
Note:
Important: This tool is intended exclusively for integrators who have experience with automation and programming processes. Careless handling can lead to malfunctions.
Migrate from another system via local network
Step: Choose the option that fits your situation. For a new installation, select "Setup as a new nomos Controller."
Next Step: Click "Next" to continue with the configuration.
Each room not yet assigned to a zone will appear in this list.
Select Available Rooms:
In the list, you'll see the available rooms that can be assigned to the zone. Each room has a checkbox on the right.
Step: Check the boxes next to the rooms you want to add to the zone.
Confirm Selection:
After selecting the desired rooms, click "Done" to complete the assignment.
The selected rooms will then be assigned to the zone and can be further organized through zone management.
Edit (Pencil Icon): Allows you to edit the selected variable.
Delete (Trash Can Icon): Deletes the variable.
Additionally, new variables can be added using the "Create" button at the top right.
How to Use:
Press the ON button to activate the Apple Remote function.
Click on Add Device to start searching for devices.
If the system finds the device, click Next to complete the setup.
Available Devices: A list of available devices will be displayed, which can be used in the action. In this example, various blinds, lamps, thermostats, and sockets are listed.
Multiple Selection: You have the option to select multiple actions by activating the "Multiple Selection" option.
After selecting the desired devices or actions, the scene can be finalized and saved.
Step: Enter a descriptive name for the new zone, e.g., "Ground Floor," "1st Floor," "West Wing," or "Administration Area."
Create:
After entering the name, click the "Create" button to create the new zone.
The newly created zone will then appear in the zone list and is ready to receive rooms or further configurations.
Cancel:
If you wish to cancel the process, click "Cancel" to return to the previous screen without creating a new zone.
In this penultimate step, you are asked whether you would like to send diagnostic and usage data to improve the nomos Controller.
Screen Display: Two options are presented:
Send diagnostic and usage data to Nomos System AG: This data may include the controller's location.
Share crash data with Nomos System AG: Helps developers to fix software issues.
Step: Enable or disable the checkboxes according to your preferences.
Next Step: Click "Finish" to complete the setup.
The Scenes feature allows you to save and configure individual settings and states for your smart home devices. These predefined scenarios can then be activated with a single tap via the app (Scene Button).
Optimize efficiency and comfort in your home by automating routine processes or device states, simplifying them through a single operation.
Name: Displays the name of the respective scene.
Order: Indicates the sequence in which scenes are listed in the app view.
Enabled: Shows whether the scene is currently active.
Last updated: Indicates when the scene was last changed.
Actions: The actions column contains several buttons:
Test: Allows you to test the scene directly.
Edit: Enables editing of the scene.
Delete: Deletes the scene.
This overview offers a simple way to manage the created scenes and to edit or test them if needed.
Schedules allow you to automate actions based on predefined times. This is particularly useful for controlling systems like lighting, heating, or blinds at specific times.
The schedules overview displays all created schedules. Each row in the table contains the following columns:
Name: The name of the schedule, describing the automation goal.
Last updated: The time of the last change to the schedule.
Actions: Available actions you can perform with a schedule (Edit, Delete, etc.).
If no schedules are present, a message will appear: "No items found."
To create a new schedule, click the "Create" button at the top right of the view.
You will be directed to a menu where you can set details such as the schedule's name, times, and the devices to be controlled.
Ensure all relevant options are configured so the schedule executes correctly.
For each schedule, several actions are accessible via buttons:
Edit: You can modify existing schedules by clicking the edit icon.
Delete: If a schedule is no longer needed, you can remove it by clicking the red "Delete" icon.
Schedule Name
The "Name" field is mandatory. Enter a descriptive name for the schedule that reflects its purpose, such as “Morning Lighting” or “Turn Off Heating in the Afternoon.”
Select Type
There are two types of schedules:
Weekdays: Choose specific days of the week (e.g., Mon, Tue, Wed) on which the schedule should run.
Date: For one-time events, select a specific date on which the schedule should execute.
Select Time
You can define the time at which the schedule should trigger in various ways:
Fixed Time: Enter an exact time (e.g., 9:09 AM) when the action should occur.
Sunrise or Sunset: Set the schedule to trigger at sunrise or sunset, with the time adjusting automatically based on natural events.
Assign Scenes
Assign one or more scenes to the schedule that will be activated when the schedule runs. Simply check the box next to the desired scene, e.g., “Test Scene”
Activation Status
Ensure that the "Active" checkbox is selected so that the schedule is enabled after creation.
The visualization function (Visu) in the nomos Controller offers a way to graphically represent and personalize the structure of a room. This feature allows you to upload an image to better visualize the devices within the room.
Steps to Use the Visualization
Visu Button:
To start the visualization, click the "Visu" button next to the room you wish to visualize.
This opens the visualization mode for the selected room.
Upload Image:
In visualization mode, you'll see the "Upload Image" option. This allows you to upload an image, such as a floor plan or room view, to begin the visualization.
Step: Click "Upload Image" to select and upload an image from your device.
Manage Devices:
After uploading an image, you can visually position the devices within the room on the uploaded graphic.
Use the "Manage Devices" button to add or remove devices and arrange them accordingly on the image.
Save:
Once you've placed the devices and set up the visualization, click "Save" to secure the changes. This visualization will then be saved and can be adjusted at any time.
Note:
The visualization function provides a user-friendly method to graphically represent the arrangement and placement of devices in a room. It's particularly useful for large installations.
This view lists all the addons that are already integrated into your system. These addons can be used to extend the functionality of your system, especially when official APIs are not available. They are specific extensions that should be used carefully since they may rely on unofficial interfaces.
Column Explanations:
Name: Displays the name of the installed addon currently in use, for example, mqtt_windowcovering.
Version: Indicates the current version of the addon, in this case, version 1.2.
Manufacturer: Shows the manufacturer of the addon. In this case, the addon was developed by nomos system AG.
Model: Describes the specific model or functionality of the addon, such as MQTT Window Covering Profile.
Actions:
Create Device: Allows you to create a new device based on the selected addon and integrate it into your system.
Delete (X): Removes the addon from the list and the system if it is no longer needed.
Usage:
To use an addon in your system, click on "Create Device" and follow the instructions to integrate the device based on this addon into your network.
Be cautious when using addons, especially if they rely on unofficial APIs, as they may not offer the same stability as officially supported integrations.
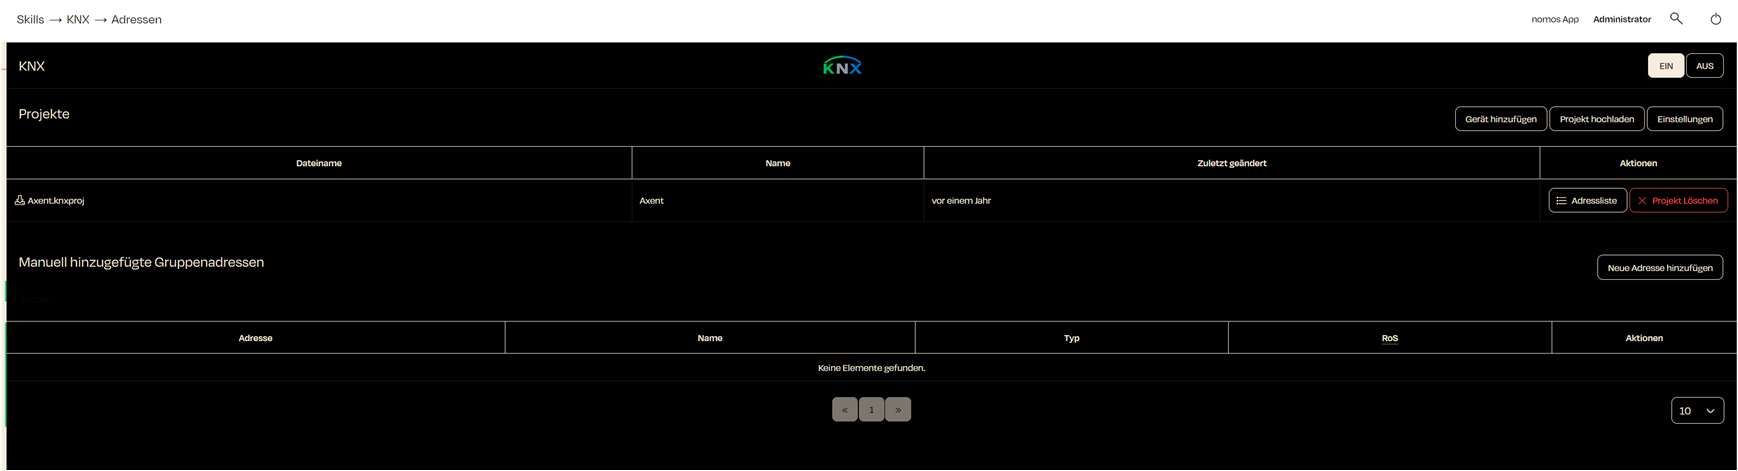
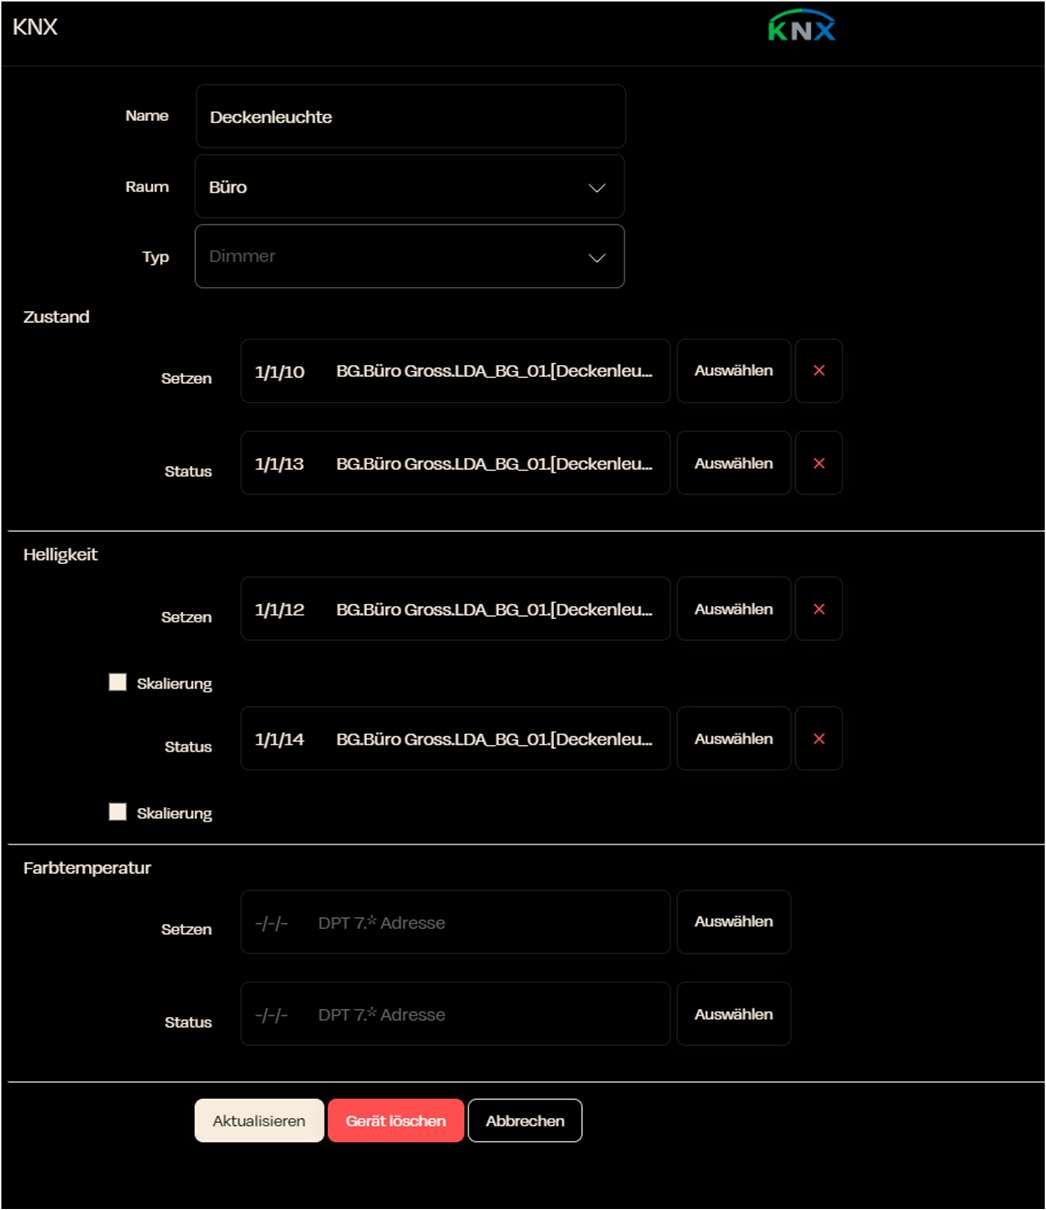
With the KNX integration, you can manage and control all your KNX-based devices through the nomos Controller.
Getting Statred:
Upload Prompt:
You will see the message: "Please upload your KNX This is necessary to import the KNX configuration you created in your ETS tool into the nomos Controller.
Upload KNX Project:
Click on the "Upload KNX Project" button to select and upload the relevant KNX project file (.knxproj) from your computer.
This file contains all the important KNX information that needs to be integrated into the system.
Skip Step:
If you want to upload the KNX project later, you can click "Skip" and complete this step at a later time.
Important Notes:
It is important that you have correctly exported your KNX project (data type, etc.) before uploading it here. Otherwise, important information may be missing in the nomos integration.
After uploading, the system will automatically analyze the configuration file and integrate the KNX group addresses according to your configuration.
With the Sonos integration, you can control your Sonos speakers through the nomos Controller and include them in automations.
Steps to Set Up:
Activate Sonos Integration:
Click the on button to enable the Sonos integration.
The nomos Controller will then search for existing Sonos devices on your network.
Add Device:
Click the "Add Device" button to add a new Sonos device.
Note: You need to set up your Sonos speakers in the official Sonos app first, before they can be recognized and added by the nomos Controller.
Conrol Sonos Devices:
Once the Sonos devices are added, you can control them directly through the nomos app. This includes basic controls like Play/Pause, volume adjustment, or selecting playlists.
Use Sonos in Automations:
In the nomos app, you can include Sonos speakers in your automations. For example, you can create an automation that plays music as soon as you get home or when a specific scene is activated.
Notes:
Make sure that the Sonos devices are properly set up in the Sonos app before integrating them into nomos.
If no devices are found, ensure they are connected to the same network as your nomos Controller.
The Skills feature lists various integrations that can be connected to the nomos Controller to enable additional functions or compatibilities.
These Skills allow you to integrate a wide range of smart home devices and services, managing them centrally through the nomos user interface.
All communication protocols listed in the Skills are fully compatible with nomos.
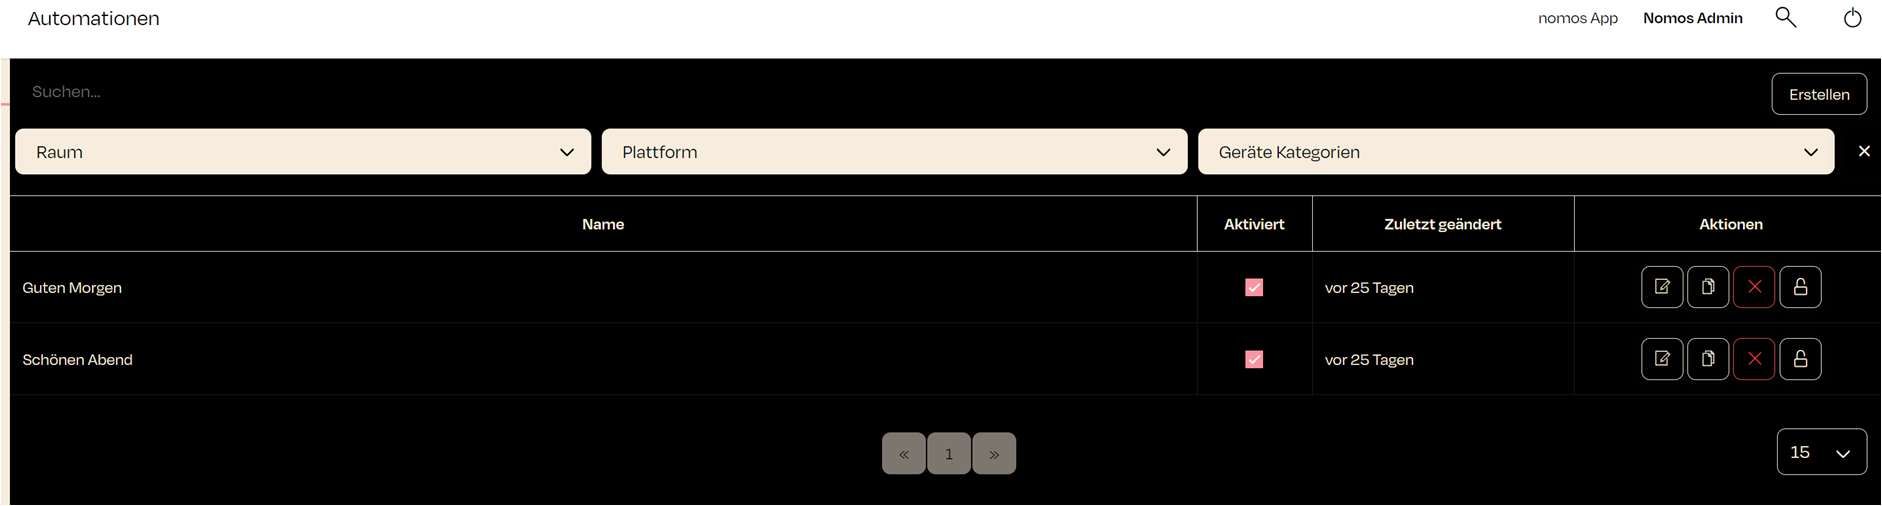
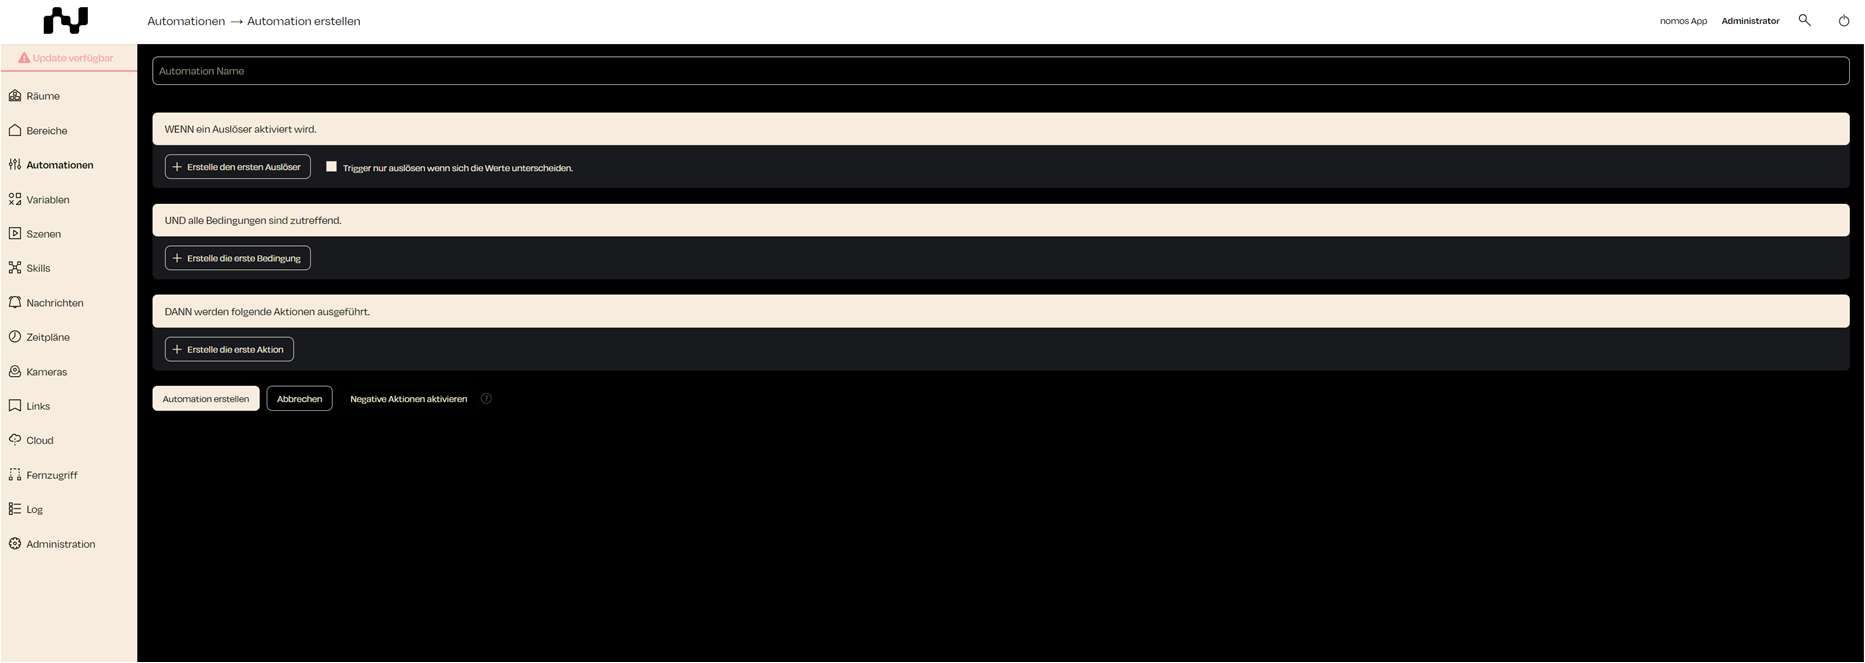
In the nomos Controller, you can create a new automation that responds to specific conditions and triggers. Automations allow you to automatically control devices or scenes based on predefined rules.
Steps to Create an Automation:
Automation Name:
Enter a unique name for the automation so you can easily identify it later.
Example: "Turn on lights at sunset."
Add Trigger:
Click "Add your first trigger" to define a trigger.
A trigger is an event that starts the automation, such as reaching a specific time, turning on a device, or detecting motion.
Set Conditions:
Optionally, click "Add your first condition" to add conditions that must be met before the automation is executed.
A condition could be, for example, that the automation only triggers at night or only when no one is home.
Define Actions:
Click "Add your first action" to define the actions to be executed when the conditions are met.
An action could be, for example, turning on the lights or sending a message.
Enable Negative Actions:
Optionally, you can also define negative actions that, for example, undo a specific action when the conditions are no longer met.
Save Automation:
After all triggers, conditions, and actions have been defined, click "Add" to activate the automation.
The automation is now displayed in the list of automations and is ready to run.
Cancel:
If you wish to cancel the process, click “Cancel” to stop creating the automation and return to the previous screen.
With the Husqvarna integration, you can control Husqvarna devices (like Automower or other smart devices) through the nomos Controller.
Steps to Set Up:
Activate the Husqvarna Connection:
Make sure the switch is set to ON to activate the Husqvarna feature.
Log in with Your Husqvarna Account:
Click on the button Sign in with your Husqvarna account to start the login process.
You will be redirected to a Husqvarna login page where you need to enter your Husqvarna credentials.
Connect Devices:
Once you are logged in, the nomos Controller will automatically search for all Husqvarna devices linked to your account.
These devices will then be displayed in the system and can be controlled directly through nomos.
Note:
Make sure your Husqvarna devices are connected to your Husqvarna account before integrating them into your nomos controller.
Gardena Smart Home devices can also be connected to the nomos controller through the Husqvarna skill.
This example demonstrates an automation divided into three main components:
WHEN a trigger is activated:
A daily time trigger is set for 6:00 PM. This means the automation is triggered every day at 6:00 PM.
AND all conditions are met:
The condition pertains to the status of the "Blind Test 2." The automation will only execute if the blind is in a specific position (100%).
THEN the following actions are executed:
The action specified is to turn on the "Lamp Test 2"
Optional Features:
OR conditions can be added if you want the automation to trigger under alternative conditions.
Enable negative actions: This allows you to define actions for negative cases, such as when a condition is not met.
Here you can connect and manage your Philips Hue lamps and lighting systems with the nomos controller.
Steps to Set Up:
Connect Hue Bridge:
To integrate Philips Hue devices, the Philips Hue Bridge must be set up and connected to your network.
On the nomos controller, you can start the Philips Hue integration by clicking the “On” button.
Search for Devices:
After activation, nomos will look for all available Philips Hue lights and groups connected to the Bridge.
The found devices will then be displayed on this page and can be used for scenes, automations, and other smart home controls.
Control Philips Hue Devices:
After integration, you can control the Hue lamps through nomos. You can change colors, adjust brightness, and turn the lamps on and off directly in the nomos app.
You can also create automations to manage your lights based on schedules or other events.
Notes:
Important step: Make sure that the Philips Hue Bridge is connected to your network and that all lamps and devices are correctly configured in the Philips Hue app before starting the nomos integration.
Below are the settings available for the ZigBee controller:
Debug Mode:
With the "Debug" option, you can activate the debugging function. This feature is useful when you need detailed logs for troubleshooting.
Channel Settings:
You can select the ZigBee channel that the network will operate on here.
By default, channel 25 is set. This is often a good channel to avoid interference with other wireless networks.
Important Note: Changing the channel requires you to re-pair all ZigBee devices!
Port Selection:
The ZigBee port is set to "Auto" by default, meaning the correct port will be selected automatically.
Notes:
Make sure that the ZigBee hardware is correctly set up and that the nomos controller has access to it in order to manage the ZigBee devices successfully.
If the hardware is not connected yet, check if the ZigBee Gateway is properly installed and active.
The "Reset" option should only be used if problems occur or if you want to create the entire configuration from scratch.
In this step, the nomos Controller setup is finalized.
Screen Display: A progress bar indicates the setup progress.
Text: "Your nomos Controller is being set up..."
Step: Wait until the setup is complete.
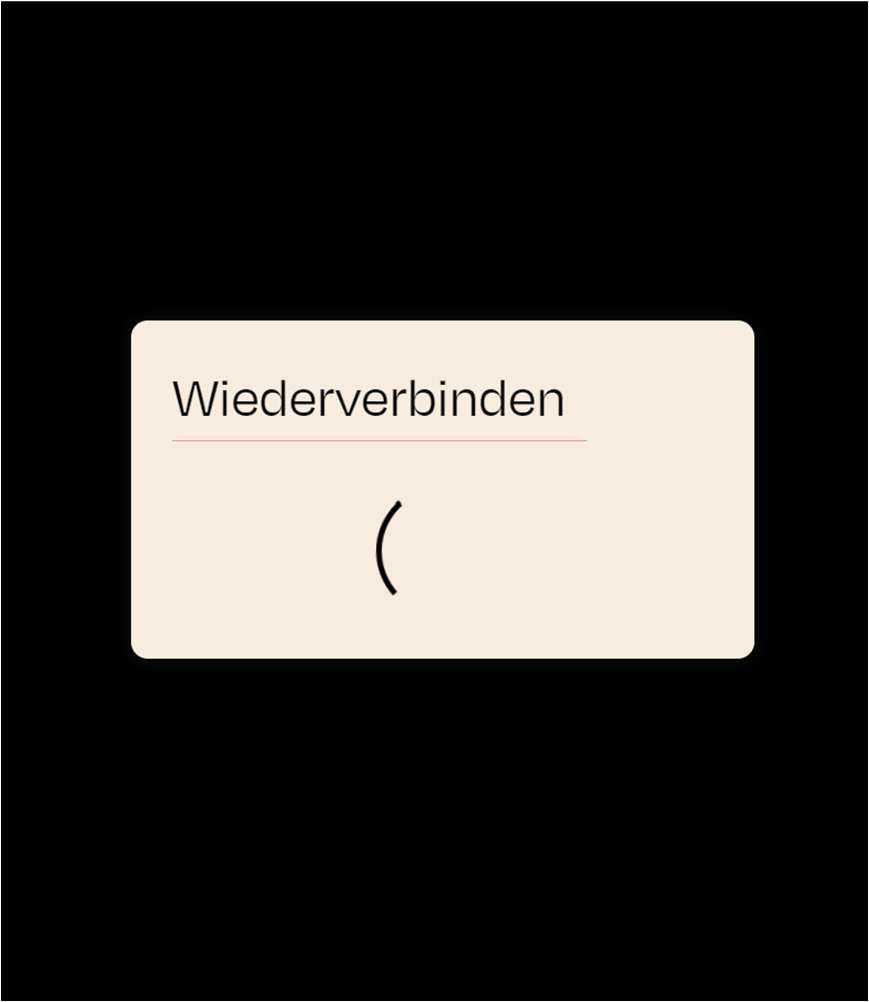
If there is a connection interruption during the setup, a message will appear. Once the nomos Controller reconnects to the network, you can log in to the controller via its IP address.
Screen Display: A window appears with the message "Reconnecting."
Wait until the connection is restored. The setup of the nomos Controller is now complete. You can now access the controller via your browser and the assigned IP address.
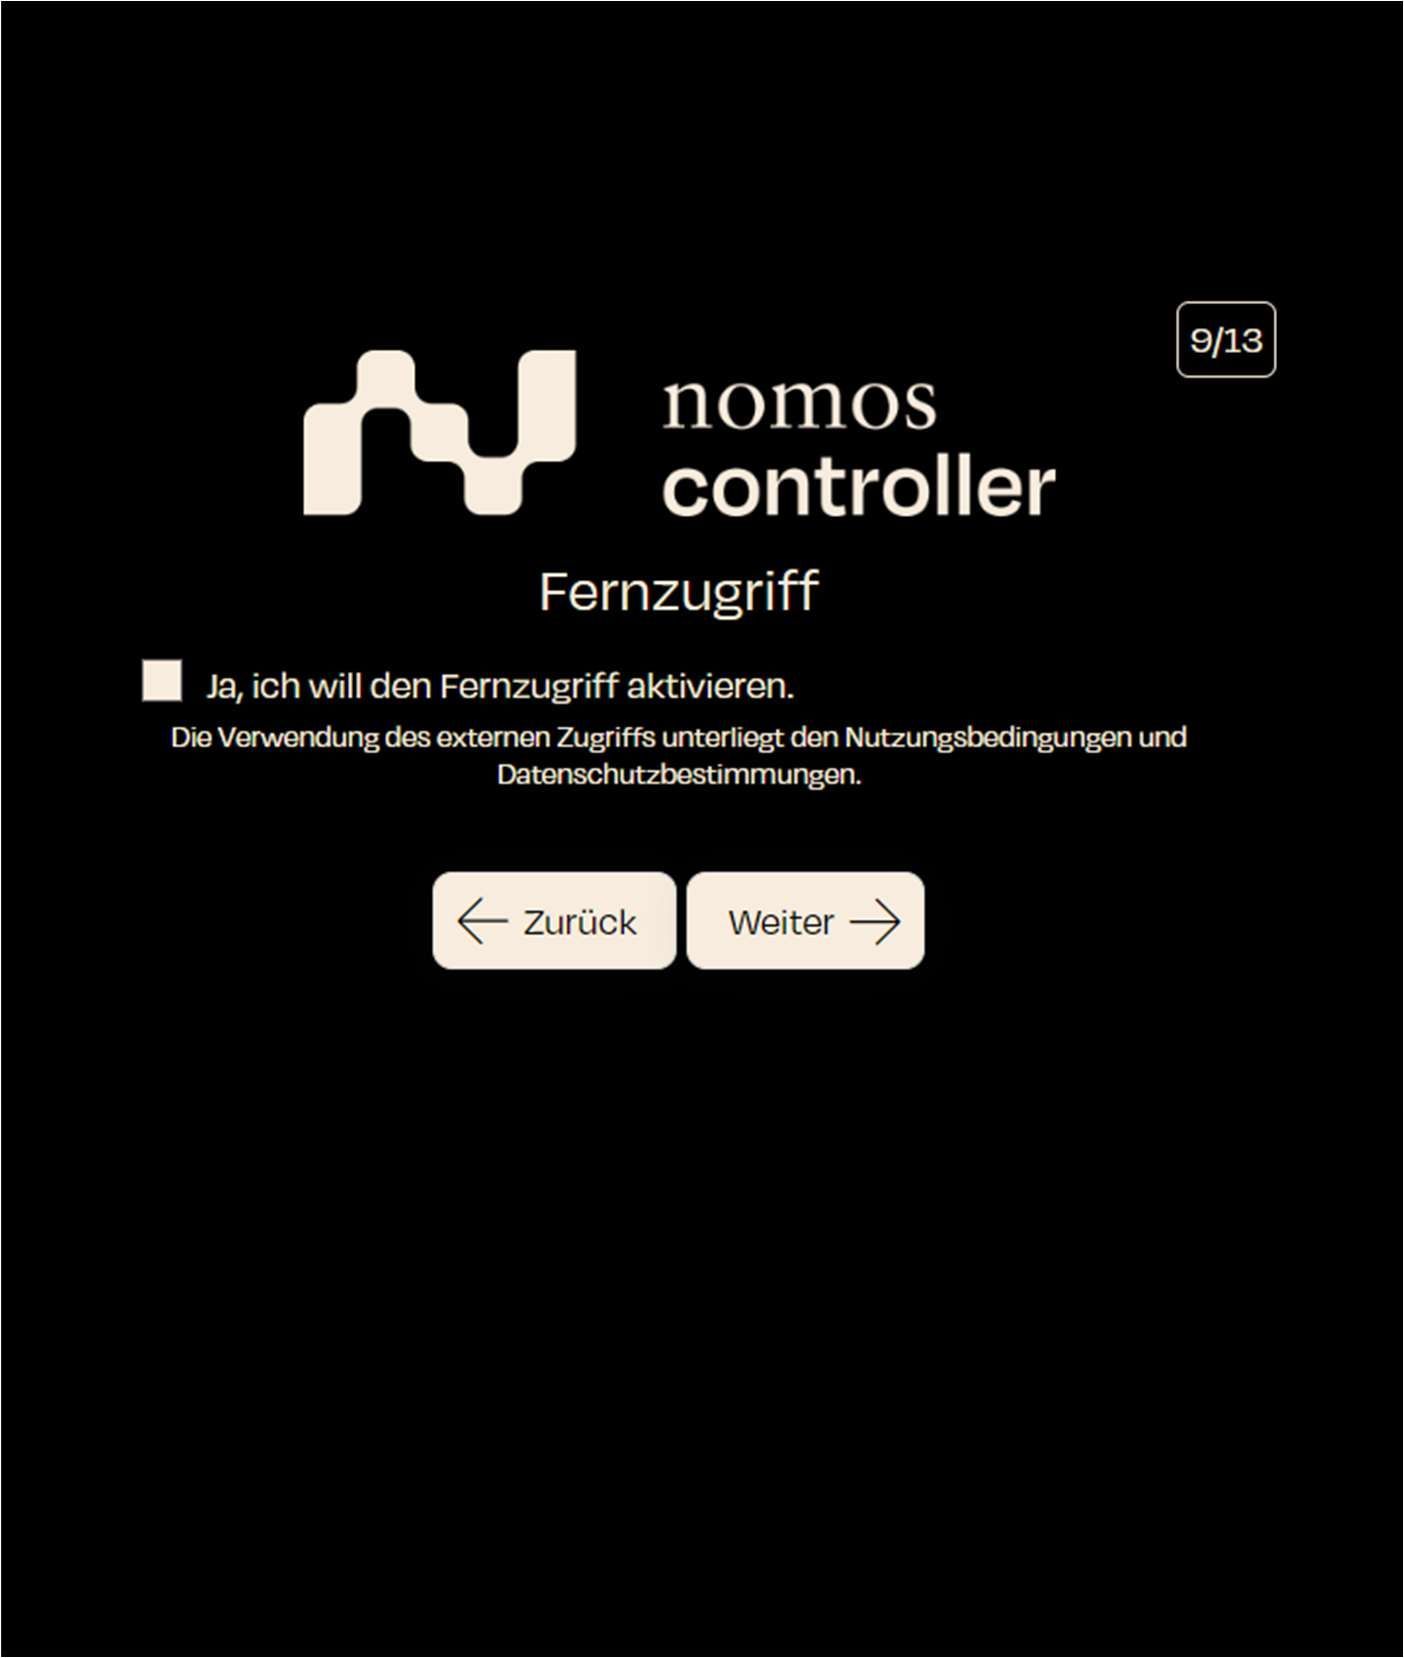
You can now enable remote access to the nomos Controller.
Screen Display: An option to activate remote access is presented.
Option: "Yes, I want to activate remote access."
Note: The use of external access is subject to the terms of use and privacy policy.
Step: Check the box if you wish to use remote access.
Next Step: Click "Next" to confirm remote access and proceed to the next step.
Here you can connect and manage Nuki smart locks or other Nuki devices with the nomos Controller.
Steps to Set Up:
Adding Devices:
If no Nuki device is connected yet, the page will show the message "No device found".
To add a device, you need to first set up the Nuki device using the official Nuki app.
After that, you can integrate the device into the nomos Controller by clicking the "Add Device" button.
Integrating with nomos:
After clicking "Add Device", the nomos Controller will look for available Nuki devices.
Once the device is found and added, it will be displayed on this page and can be used for automations, scenes, and smart home controls.
Notes:
Important Step: Before you can integrate Nuki devices into nomos, they must be set up and connected to your network using the Nuki app.
The Nuki integration allows you to control your door locks and other compatible devices directly through nomos and include them in your smart home workflows.
Important:
Make sure all Nuki devices are properly set up and connected in the Nuki app before adding them to the nomos app.
Ensure that the necessary remote settings are activated in the Nuki app to allow access from other devices (e.g., nomos Controller).
The Busch-Jäger integration allows you to connect and control Busch-Jäger devices directly using the nomos Controller.
Explanation:
Adding a System Access Point:
Click on Add System Access Point to instruct nomos to search for free@home devices.
Ensuring the Connection:
Make sure that the System Access Point is properly connected to the network and that the nomos controller is working in the same network.
Checking Network Settings:
Ensure that the Access Point is visible and operational in the network for smooth detection by nomos.
Additional Notes:
If the connection cannot be established after several attempts, restart the System Access Point and/or the nomos Controller to fix any network issues.
Make sure that the devices have the latest updates installed to avoid compatibility problems.
Functions:
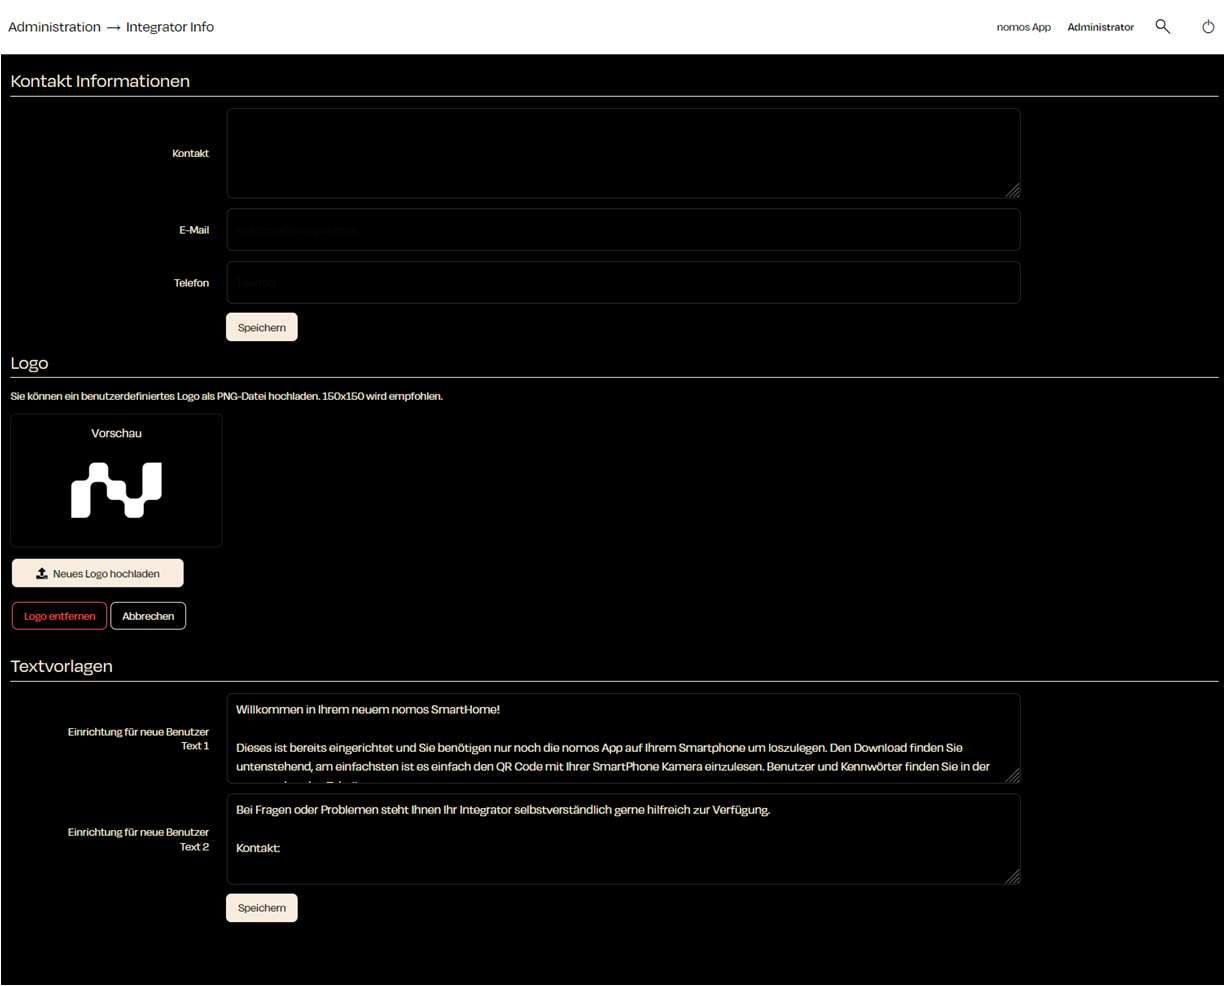
Contact Information:
Contact: Enter the name of the integrator or the company.
E-Mail: Provide an email address to reach the integrator.
Phone: Add a phone number for support.
Klick "Save" to save the information.
Logo:
Here you can upload a custom logo (in PNG format). It is recommended to use a file size of 150x150.
Text Templates:
Setup for New Users - Text 1: Here you can add a welcome message and instructions for new users that will help them set up their SmartHome system.
Note:
This section is important to provide end-users with the integrator's contact information. This way, users can directly contact the responsible system integrator in case of issues or inquiries.
After setting the language, the user is asked to choose their country.
Screen Display: A list of countries appears:
Germany
Switzerland
At the top right of the nomos Controller dashboard, you'll find the navigation bar, providing quick access to essential functions.
Elements of the Navigation Bar
nomos App:
Function: Clicking on "nomos App" switches the view directly to the mobile or web app version of the nomos Controller.
The trigger determines when the automation is executed. This can be initiated by various events or conditions, such as reaching a specific time, a sensor event, or a change in the weather.
Steps to Select a Trigger:
Add Trigger:
Click on "Add your first trigger" A dialog window will open where you can select the platform or event that should trigger the automation.
After creating a new zone in the nomos Controller, it appears in the zone overview. From here, you can perform various actions to manage the zone.
Zone Management:
Created Zone:
The newly created zone is displayed in the overview, for example, „Testbereich EG“.
Overview of your KNX devices:
Once you have set everything up successfully, all the KNX devices you added will be displayed on the dashboard.
Each device is shown with an icon and a name, such as Jalousie Test, Lampe Test und Steckdose Test.
After defining a trigger for an automation, you can optionally add a condition to further control the execution of the automation. A condition ensures that the automation is executed only under specific circumstances.
Steps to Select a Condition:
Add Condition:
Click on "Add your first condition" A dialog window will open, presenting various types of conditions to choose from.
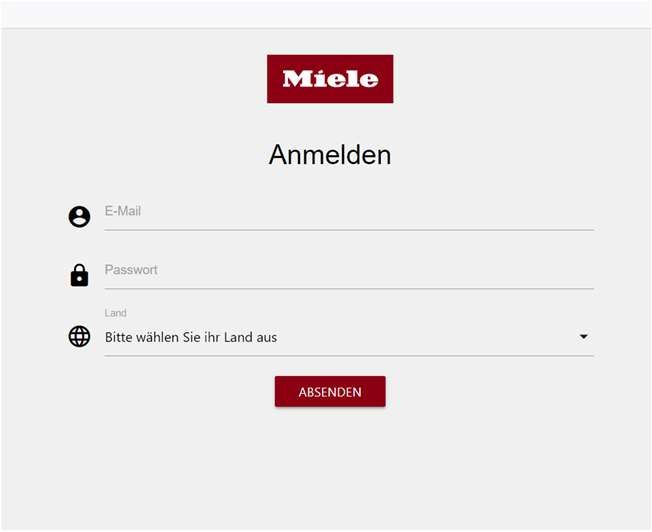
With the Miele integration, you can control Miele devices (like coffee machines or other smart devices) through the nomos Controller.
Logging in with your Miele account:
To connect your Miele devices with the nomos Controller, you need to log in using your Miele account. To do this, click the button "Sign in with your Miele account" on the right side of the screen.
The "Zones" function in the nomos Controller allows you to group rooms into logical units such as floors, wings, or other larger sections. This is particularly useful in large buildings or complex facilities to ensure a clearer structure and organization.
What Are Zones?
Zones represent larger logical units within a building or system. Examples of zones could include:
Floors (e.g., Ground Floor, 1st Floor, 2nd Floor)
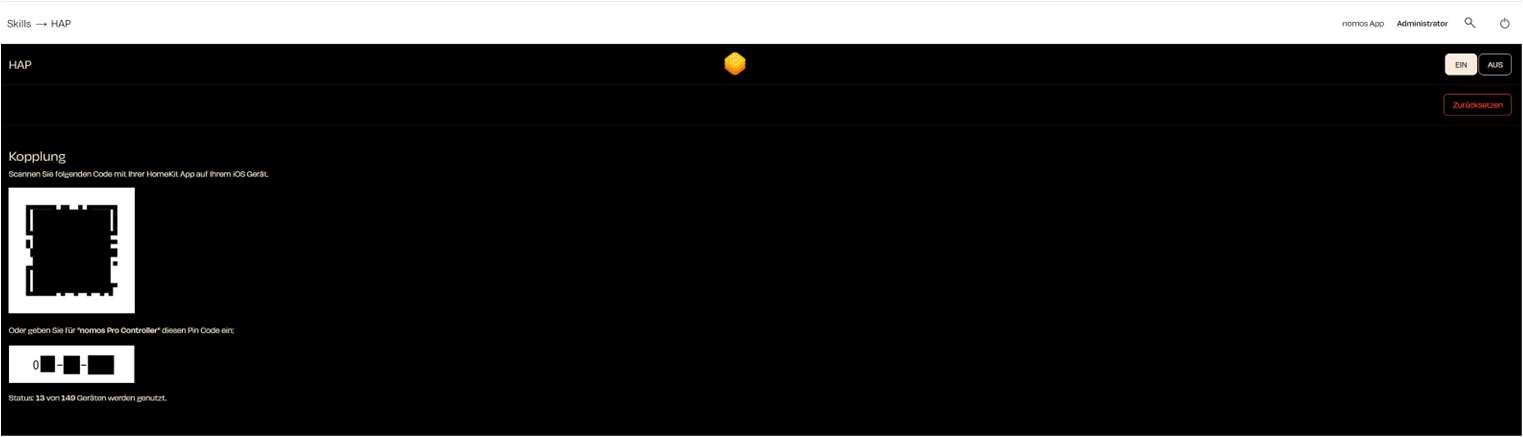
The HAP Integration (HomeKit Accessory Protocol) allows you to connect the nomos Controller to Apple HomeKit. This is done easily by scanning a QR code with your iPhone or iPad.
Steps to Set Up:
Activate HAP:
Make sure the switch is turned ON to activate the HAP function.
Here you can find the MQTT configuration page within the nomos Controller, where users can set up the MQTT broker.
Status:
Broker URL: Displays the currently configured URL of the MQTT broker (e.g., mqtt://localhost).
Status: Shows the connection status of the broker..
The visualization function in the nomos Controller allows you to graphically represent and personalize the structure of a room by uploading an image and positioning devices accordingly. This feature enhances the overview and simplifies device management.
Steps to Use the Visualization and Position Devices:
Upload Image:
After initiating the visualization function via the "Visu" button for a room, upload an image of the room, such as a floor plan or room layout.
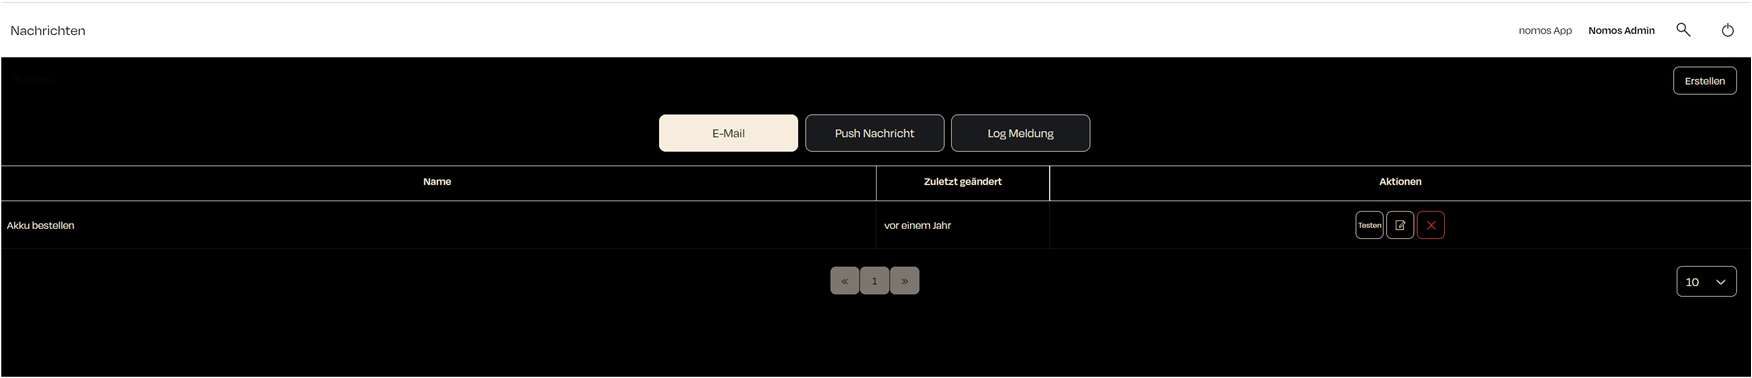
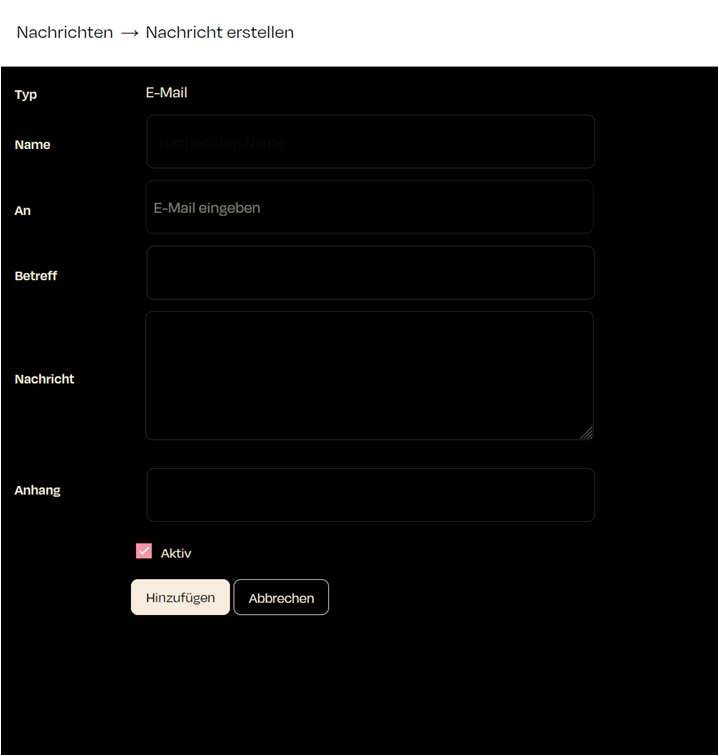
With the notification module, you can easily manage important notifications for your system. This gives you a flexible way to respond to events and inform users via email or push notifications.
Dashboard Notifications
The notifications interface provides an overview of all created notifications. Here, you can create new messages and edit or delete existing ones.
Selection: First, choose the type of message you want by selecting one of the three main categories (Three available buttons -> Email / Push Notification or Log Message).
Create:
The remote access feature in the nomos system allows you to access your controller from anywhere using the nomos app. This provides an easy way to monitor and control your smart home even when you are away.
You can turn remote access on or off through the user interface of the nomos controller. This is especially convenient when you are on the go but still want to have control over your devices and automations.
This integration allows you to connect smart devices from Feller/Zeptrion to your Smart Home and control them using the nomos Controller.
Zeptrion Integration:
Zeptrion App:
To add a device, you first need to set up the devices using the official Zeptrion App.
After accepting the terms and conditions, the next step is to license the nomos Controller.
Screen Display: The serial number of the controller is shown, and the license status is checked.
Serial Number: NXS5B00DE3D
Status: nomos Controller is licensed (a green checkmark indicates successful licensing).
The ZigBee integration allows you to connect and control devices that support ZigBee directly through the nomos Controller.
A ZigBee USB dongle is required for the direct connection of ZigBee devices to the nomos Controller.
Important: Use a USB extension cable that is at least 30 cm long between the dongle and the nomos Controller.
ZigBee Integration:
Status: Hardware Available:
In this section, you can add extra features to the system in the form of addons. Addons allow you to expand the system's capabilities beyond the regular standard integrations. However, these should only be used by integrators or experienced users, as they often do not rely on official APIs.
Overview of Addons:
Device Templates: Here, you can view addon templates that have been added either from the library or through a manual upload.
Created Devices: This area lists all devices that have been created or added through addons.
This integration allows you to control Spotify music through nomos and use it in automations.
Steps to Set Up:
Activate Spotify Integration:
Click the on button to enable Spotify integration.
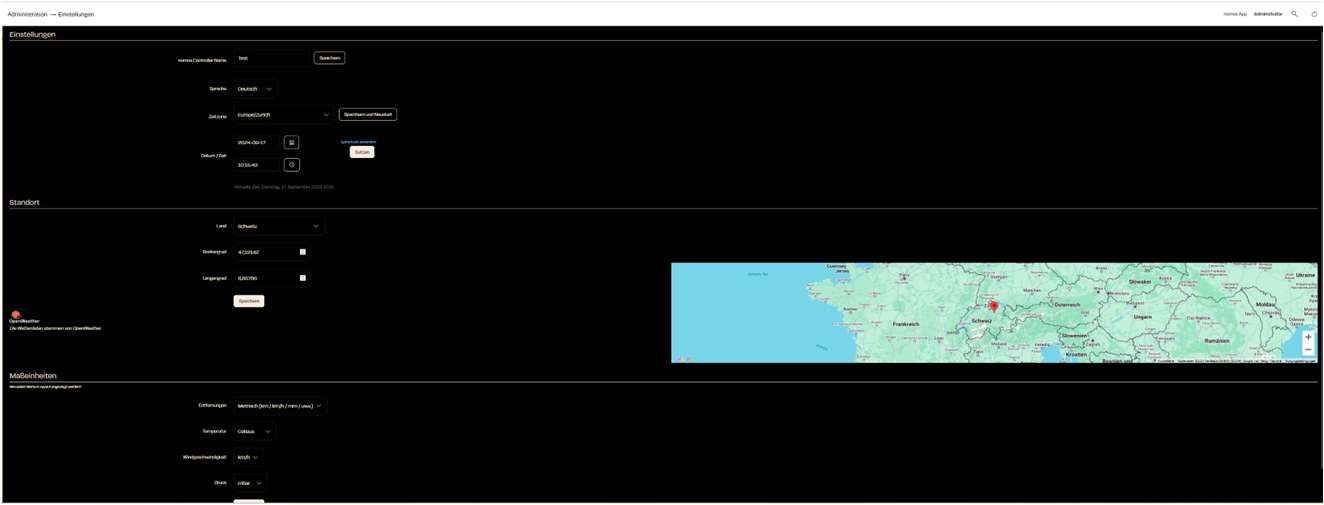
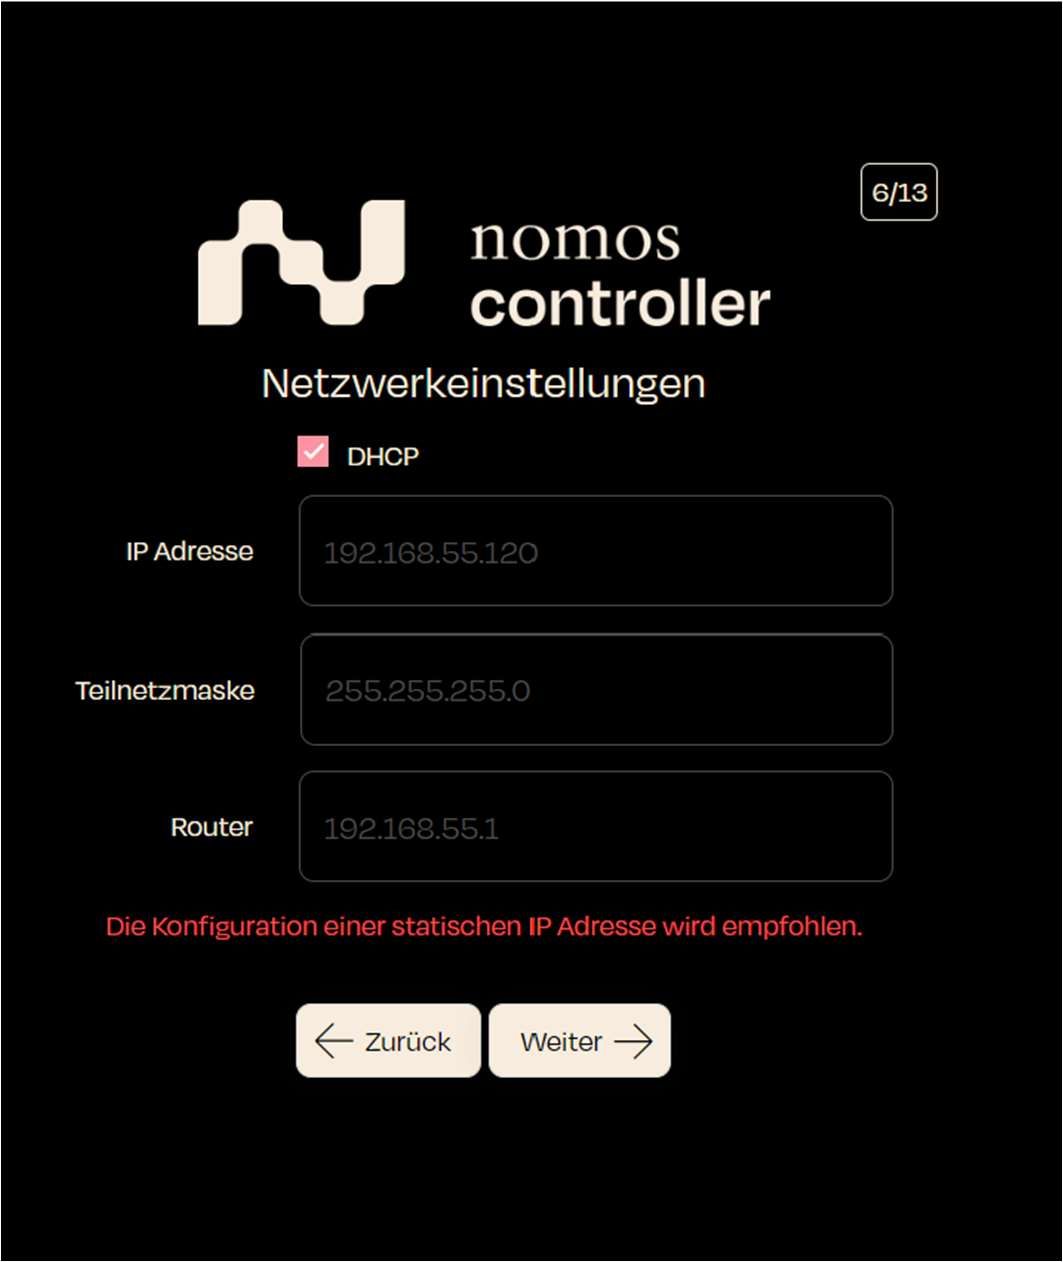
In this section, you can configure the network settings of your nomos Controller. These settings are crucial to ensure that your controller communicates correctly with your network, devices, and the internet.
Hostname
Hostname: The name under which the controller is visible on the network.
DHCP
The log management feature in the nomos Controller allows you to monitor all important events, actions, and system processes. This provides an easy way to check the system status, diagnose errors, and track user actions.
In the log view, you will see all recorded events. Each row represents an event and contains the following information:
With the Ping integration, you can monitor specific devices through the nomos Controller by checking their network availability (reachability) using a ping test.
Steps to Set Up:
Activate Ping Integration:
Click the on button to enable the Ping integration.
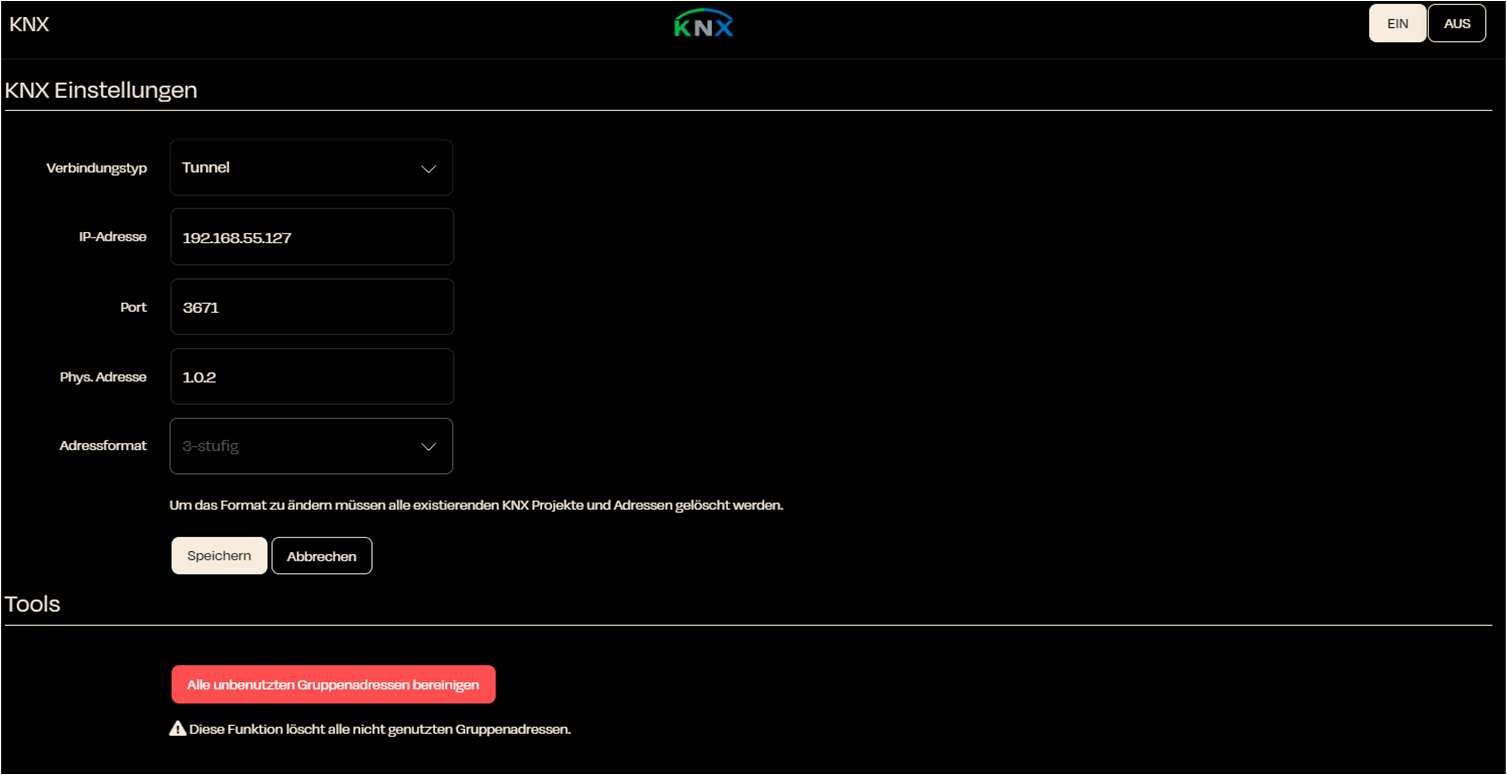
Under Settings, you can enter specific KNX network settings. Proper configuration is crucial for the operation of your smart home system.
Connection Type:
Choose between Tunnel and Routing. This setting should be adjusted based on the local conditions and requirements.
If you don’t see any devices in the "Add Device" window, it means that nomos couldn’t find any Apple devices on your network. To control an Apple device like Apple Music or Apple TV, you need to make a few adjustments:
Steps to resolve:
Enable Home Sharing: Make sure that Home Sharing is turned on for your Apple device. This is necessary for the device to be visible and controllable on the network.
Pair the nomos Controller as Remote: For nomos to work as a remote for Apple devices, the nomos Controller must be paired as a remote control.
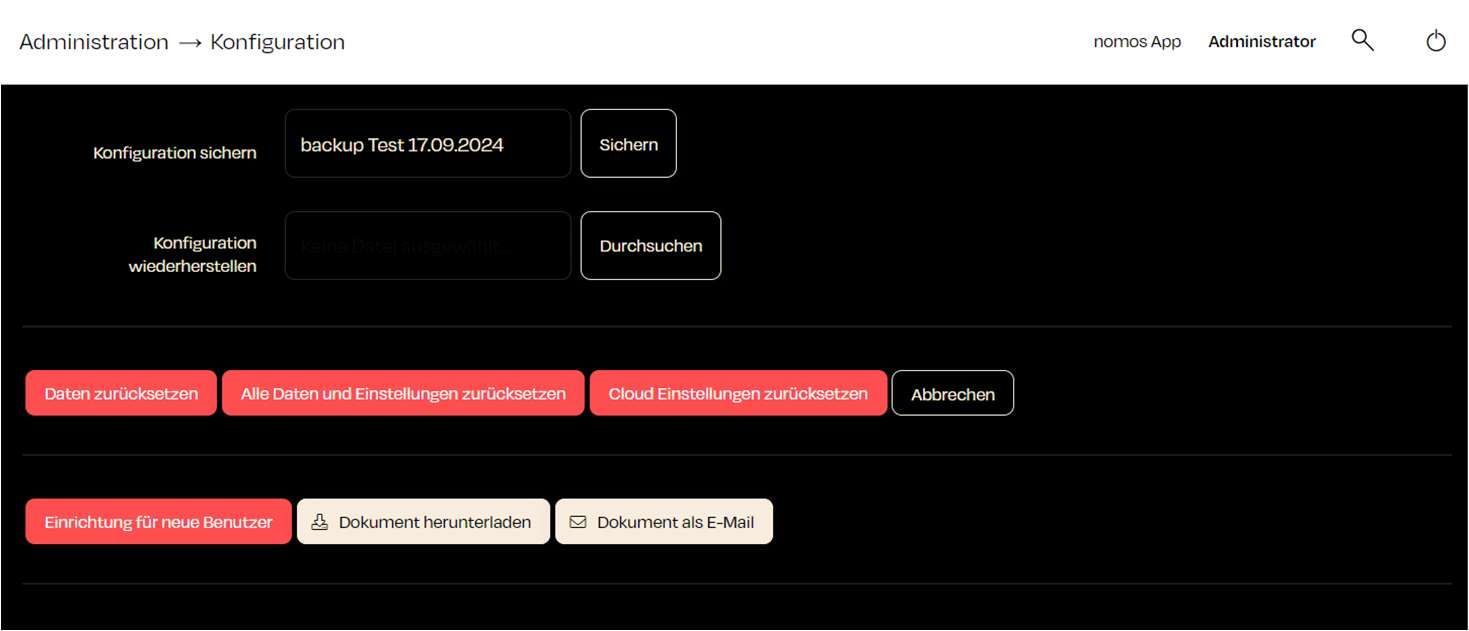
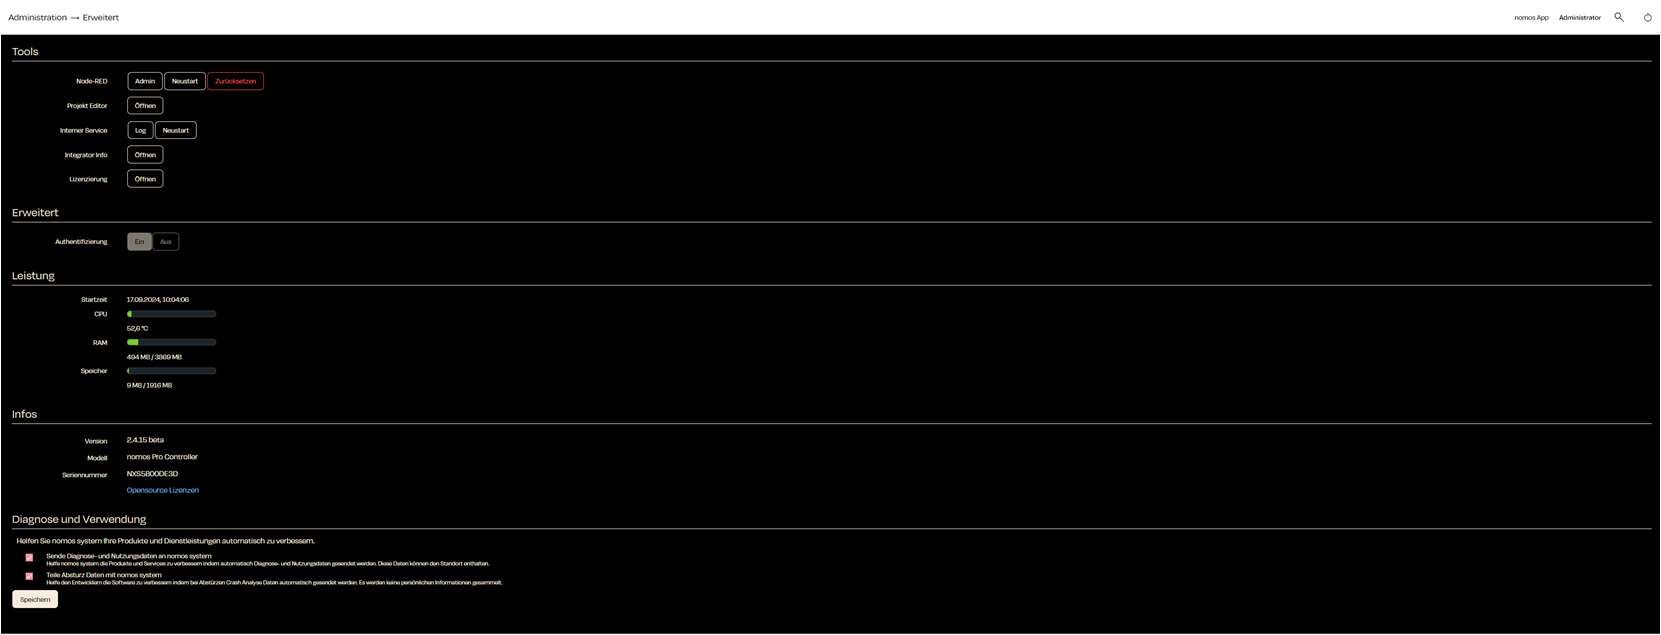
Here, users can create backups, restore configurations, and reset data.
Functions:
Backup Configuration:
You can take a current backup of your configuration.
This integration allows you to control tado° smart heating and climate control devices through the nomos Controller and incorporate them into automations.
Steps to Set Up:
Activate tado° integration:
Click the on button to activate the tado° integration.
The Home Connect integration allows you to connect and control devices that support Home Connect directly through the nomos Controller.
Steps to Set Up:
Activate the Home Connect Connection:
Make sure the switch is turned ON to activate the Home Connect feature.
Functions:
Start and Clear:
Start the Internal Service or clear the current command output history.
Command History:
After clicking on "Online Library", a window will open. Here, you can choose from a list of pre-made profiles to integrate devices into your system.
Search: At the top of the window, you'll find a search box. If you are looking for a specific device or profile, you can type it in here.
Categories: The devices and profiles are organized into categories such as shading, thermostat, and switch. This helps you quickly find the right profile.
Here, users can install new versions of the software, schedule automatic updates, and perform manual uploads.
Functions:
New Version Available:
When a new version of the nomos software is available, it will be displayed at the top.
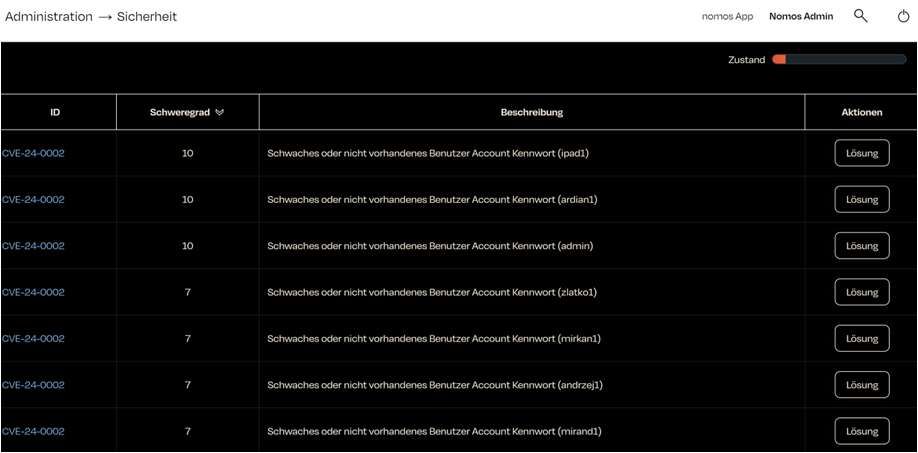
The nomos Controller regularly conducts a security check to identify potential vulnerabilities. The results of this check are displayed in a table.
ID (CVE): A unique identifier (Common Vulnerabilities and Exposures) for the security flaw. CVE-24-0002 refers to a specific issue.
Severity: An assessment of how serious the vulnerability is. Higher numbers (e.g., 10 in the screenshot) indicate a greater risk.
Description: A brief explanation of the security flaw.
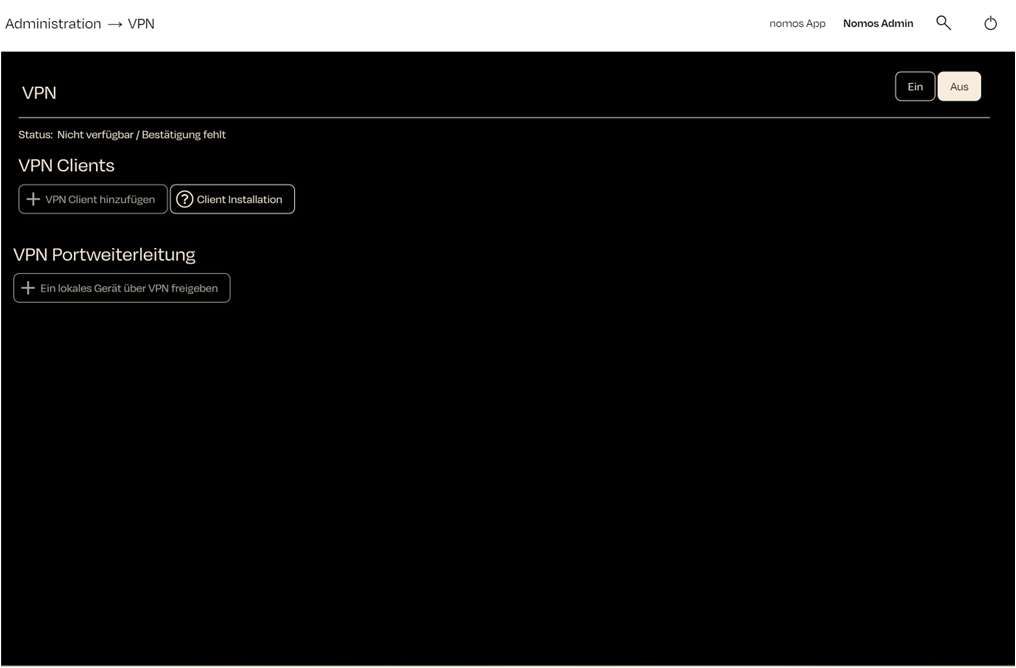
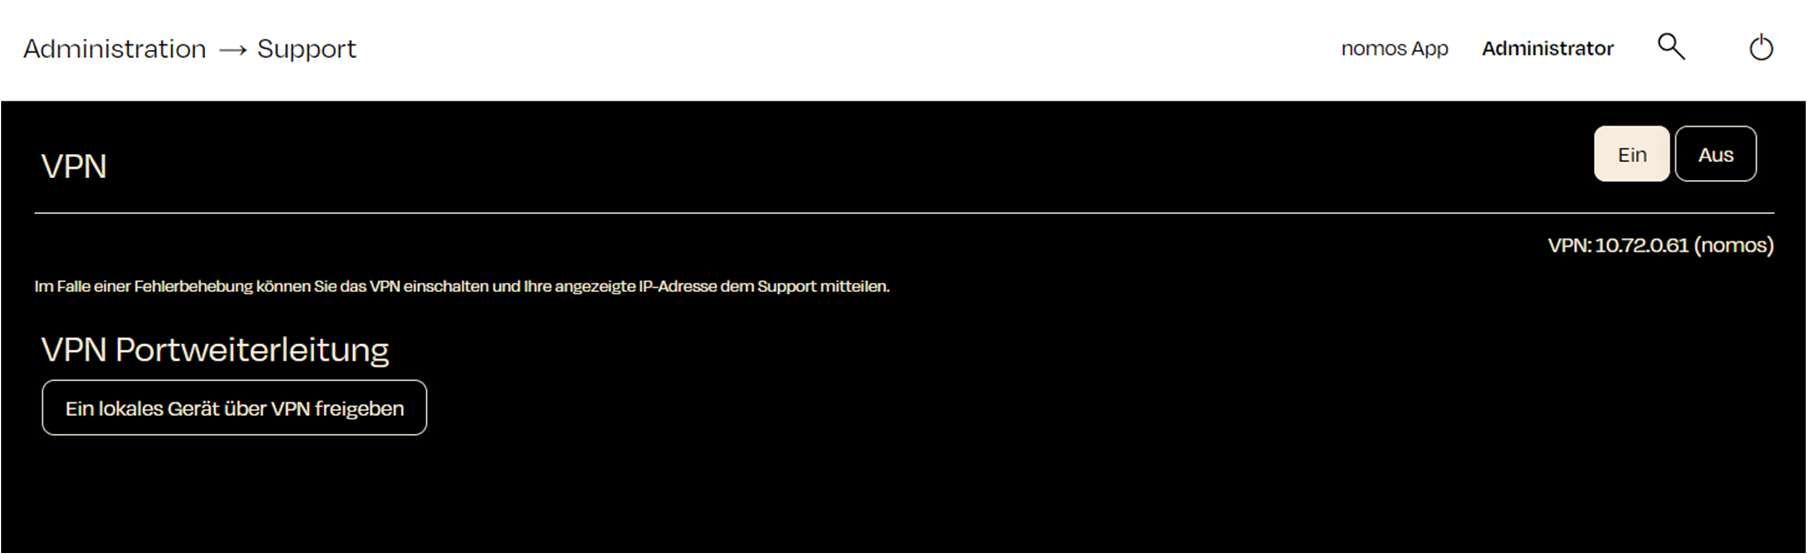
This chapter describes how to set up the VPN (Virtual Private Network) for your nomos controller. A VPN allows you to securely access your home network from outside locations.
Activating the VPN:
Click the "On" button at the top right of the VPN menu.
A text box will appear. Enter the partner name. This name is required.
Adding a VPN Client:
Functions:
Serial Number: Displays the unique serial number (nomos) of the controller.
Status: Indicates whether the nomos controller is properly licensed.
Update Online Licenses: This button allows you to update licenses over the internet. This is useful when new licensing terms or features have been added.
Additional Notes:
Click on Add Device to restart the search after you've adjusted the necessary Apple settings.
Ensure that all devices are connected to the same network and logged in with the same Apple ID for smooth integration.
Lock: Locks the scene to prevent further changes.
Austria
United Kingdom
Step: Select your country. In this example, "Germany" has been chosen.
Next Step: Click "Next" to continue.
Administrator:
Function: Displays the current user logged into the system. In this case, it's the user "Administrator."
Search (Magnifying Glass Icon):
Function: Enables searching within the dashboard. Users can search for devices, automations, messages, and other elements.
Power Icon:
Function: Allows for restarting or logging out of the nomos Controller.
ON/OFF Button:
Function: This button appears depending on the active device or process. It allows for turning protocols, devices, or automations on or off directly from the view.
Select Platform:
In the "Platform" dropdown menu, choose the appropriate platform or category that provides the trigger.
Examples of platforms:
KNX: Access KNX group addresses to use devices or scenes on this platform as triggers.
OpenWeather: Set weather conditions as triggers (e.g., rain, sunset, temperature change).
System: System events like restart or shutdown can also be used as triggers.
Variables: Changes in defined system variables can also serve as triggers.
Multiple Selection (Optional):
If you want to select multiple triggers simultaneously, you can activate the "Multiple selection" option. This allows you to define several events as potential triggers that are monitored in parallel.
Search for Triggers:
Use the search field to find specific triggers more quickly, especially in larger installations or when many group addresses are present.
Confirm:
After selecting the desired trigger, close the window to add the trigger to the automation.
Note:
Triggers are the first step of every automation. They define when and under what circumstances an action is executed. By using different platforms, you can utilize a wide range of events as triggers to optimally automate the system.
This zone can now be further configured and populated with rooms.
Available Actions:
Next to each zone, there are several buttons to manage the zone:
Visu: The visualization button allows you to access and edit the graphical representation of the zone. Similar to room visualization, you can upload images and visually place rooms.
Manage Rooms: This button enables you to assign rooms to this zone or remove rooms from it.
Delete (X): Clicking the "X" allows you to delete the zone if it is no longer needed.
Edit Zone:
Next to the zone's name, you'll find a pencil icon. Clicking this icon allows you to edit the zone's name if necessary.
Add Device:
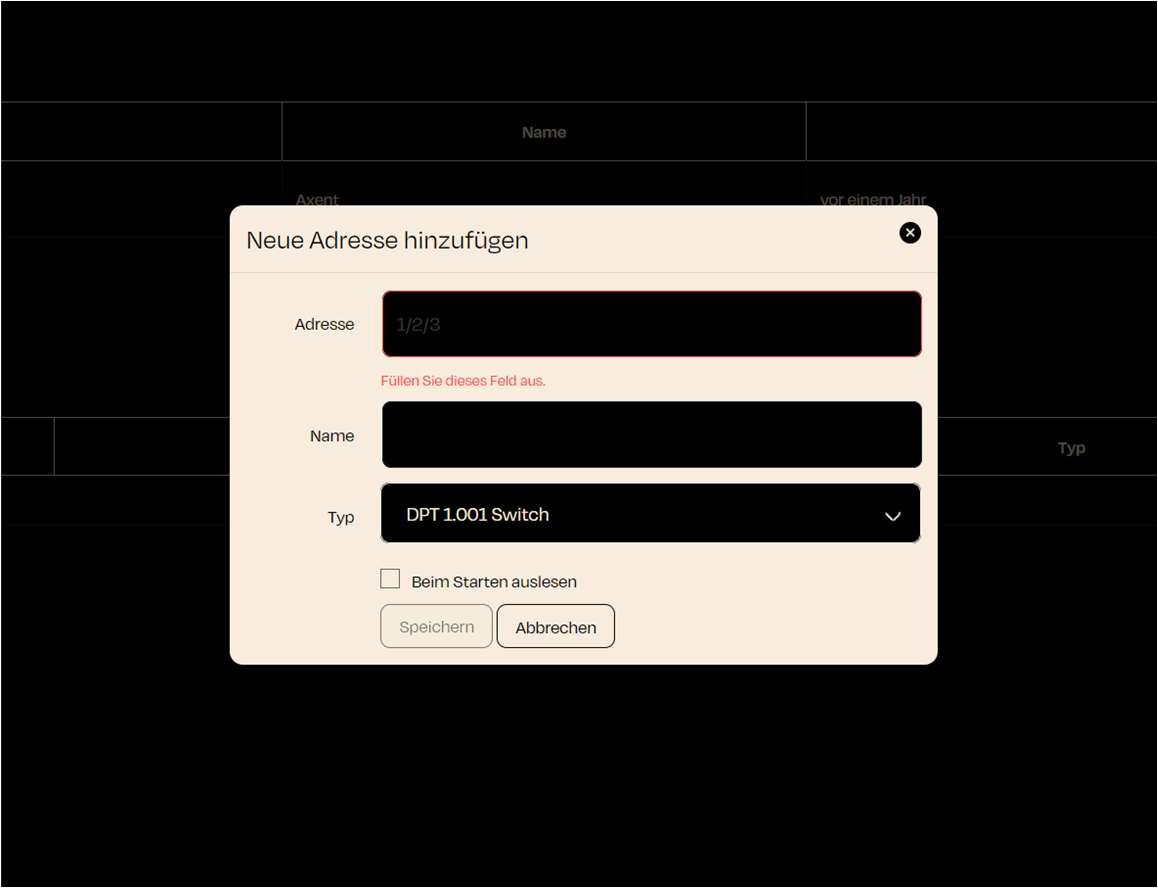
To add a new KNX device, click the Add Device button. Here, you can enter the desired devices into the nomos Controller.
Manage Adresses:
The Manage Addresses button allows you to configure and adjust KNX group addresses directly.
Settings:
In the Settings section, you can enter specific KNX network settings that are relevant for your home automation.
Device Control:
In the overview, you can perform specific actions for each device:
Turn on and off
Edit device information or settings
Delete devices that are no longer needed
Select Platform:
Similar to triggers, you can select from the "Platform" dropdown menu whether the condition should be based on a specific device, a system variable, or a time factor..
Examples of Conditions:
Time: Conditions can be set on a daily, weekly, or monthly basis. For example, an automation can be executed only during certain times of the day or only on weekends.
System: System-based conditions, such as a system restart or CPU temperature monitoring, can be used here.
KNX Group Addresses: Devices and group addresses in the KNX system can be used as conditions. For example, an automation can be triggered only if a specific device is in a particular state.
Variables: You can create custom variables and use them as conditions, e.g., based on certain thresholds or status information.
Multiple Selection (Optional):
You can activate the "Multiple selection" option to define multiple conditions that must be met for the automation to be executed.
Search for Conditions:
MUse the search function to quickly find specific conditions or group addresses.
Confirm:
After selecting the desired condition, close the window to add the condition to the automation.
Note:
A condition is optional but helps ensure that the automation is executed only under specific circumstances. This can be especially useful to avoid unnecessary actions or to further refine the system's behavior.
When you click the button, a new browser window should open, taking you to the Miele login page. If the window doesn’t open automatically, you can click the link "here" to open it manually.
Connecting your Miele account:
Once you have successfully logged in with your Miele account, the nomos Controller will gain access to your Miele devices. These devices will appear in the app and can be included in automations or scenes.
Controlling devices:
After the connection, you will be able to monitor and control your Miele devices through the nomos app. The devices will then show up in the list under the Miele symbol.
Important note:
Make sure to use the correct login credentials for your Miele account.
Your Miele devices must be connected to the Miele Cloud for the integration to work successfully.
Building wings (e.g., West Wing, East Wing)
Building sections (e.g., Administration Area, Production Area)
Multiple rooms can be organized and managed within each zone.
Screen Overview
Create New Zone:
At the top right of the screen, you'll find the "New Zone" button.
Add Rooms to a Zone:
Once a zone has been created, you can assign rooms to this zone to further refine the structure.
This facilitates the management of automations, scenes, and device states, as you can control an entire zone (e.g., a floor) collectively.
Start Pairing:
Open the HomeKit app on your iOS device.
Scan the QR code displayed on the screen to pair the nomos Controller with HomeKit.
Alternatively: PIN Code:
If you cannot scan the QR code, you can manually enter the displayed PIN code into your HomeKit app to establish the connection.
Status of Devices:
The current status shows how many devices from the nomos platform are currently connected to Apple HomeKit. For example: “13 out of 149 devices are in use.”
Reset Pairing:
To reset the HomeKit pairing, click the red Reset button if you want to reconfigure the connection to Apple HomeKit.
Set Up HomeKit App:
Once the QR scan (or PIN) has been successfully paired with the HomeKit app, you can continue the integration in the Apple HomeKit app.
Located at the top right of the "Rooms" menu is the "New Room" button. This feature allows you to create new rooms to which devices and automations can be assigned.
Default Room:
The default room is used to display devices that have not been assigned to a specific room.
Weather data: As shown in the example, weather information (such as "Current Weather," "Weather Today," "Weather Tomorrow," "Weather Day After Tomorrow") is automatically assigned to the default room.
Manage Devices:
On the right side of the screen is the "Manage Devices" button, which allows you to add, remove, or move devices between rooms.
Visualization (Visu):
Directly next to the device management is the "Visu" (Visualization) button. This function provides a visual representation of the room configuration to offer a better overview of the assignments.
Topic Status: Displays the status of the assigned topics (message channels).
Topic Subscriber: Number and details of clients receiving messages from a specific topic.
Topic Publisher: Number and details of clients sending messages to a specific topic.
Help:
Clicking on the help button provides assistance with configuration or issues regarding the MQTT connection.
Settings:
Broker URL: Here you can specify the URL of the MQTT broker, such as “mqtt://localhost” or an external broker address.
Port: The default port is set to 1883, commonly used for unencrypted MQTT connections. This can be adjusted if necessary.
Authentication: When enabled, user authentication can be configured for access to the MQTT broker.
Usage Notes:
MQTT is a lightweight messaging protocol specifically optimized for connections with minimal data traffic and low latency. It is widely used in the Smart Home sector to exchange messages between devices.
The MQTT broker acts as a central unit to distribute messages between clients (devices).
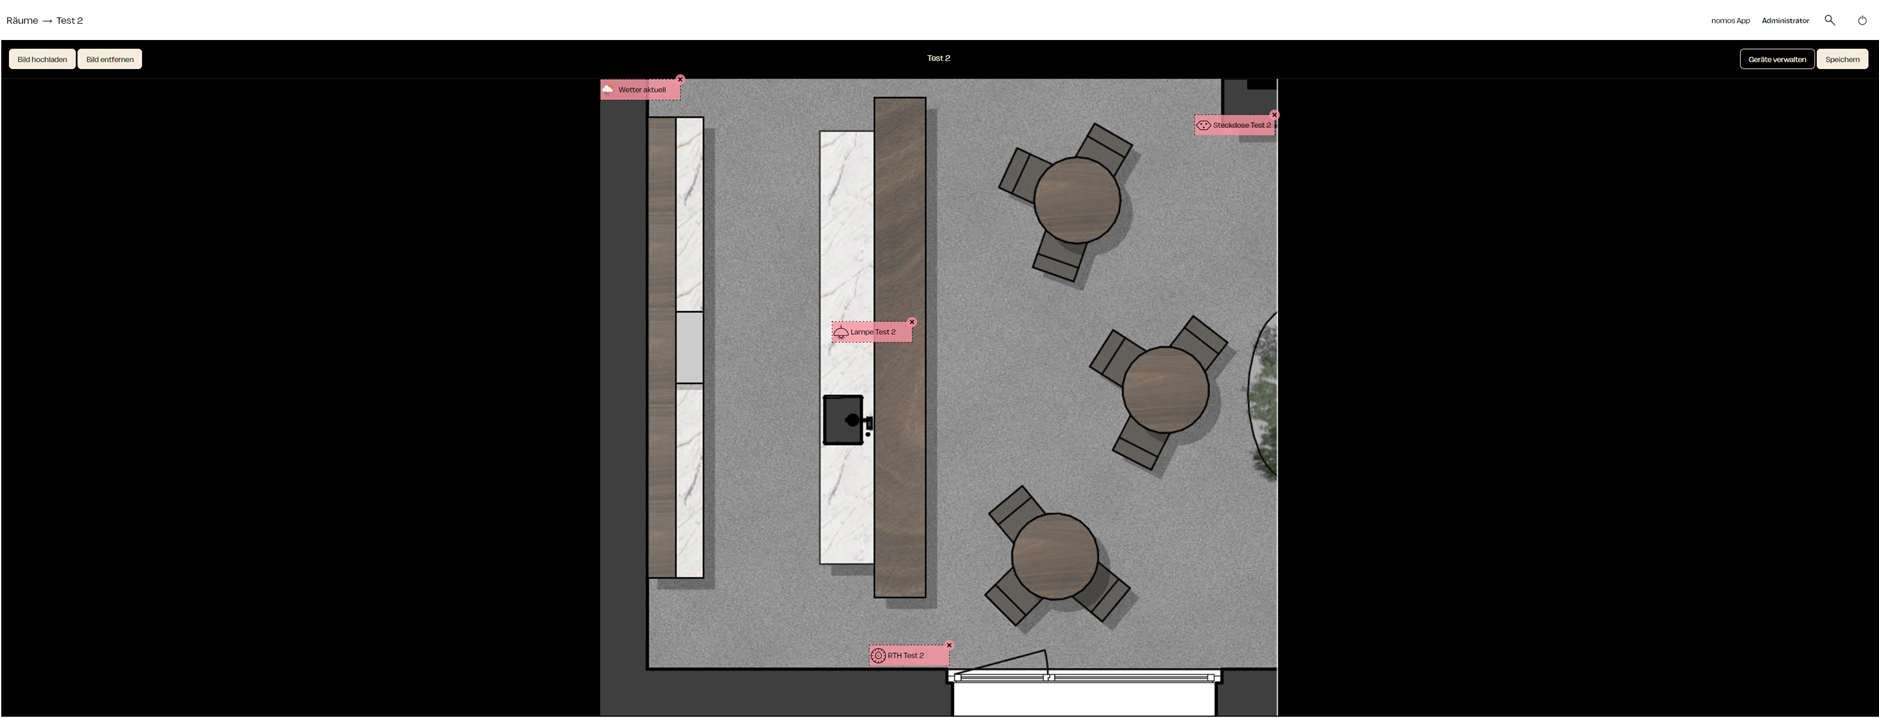
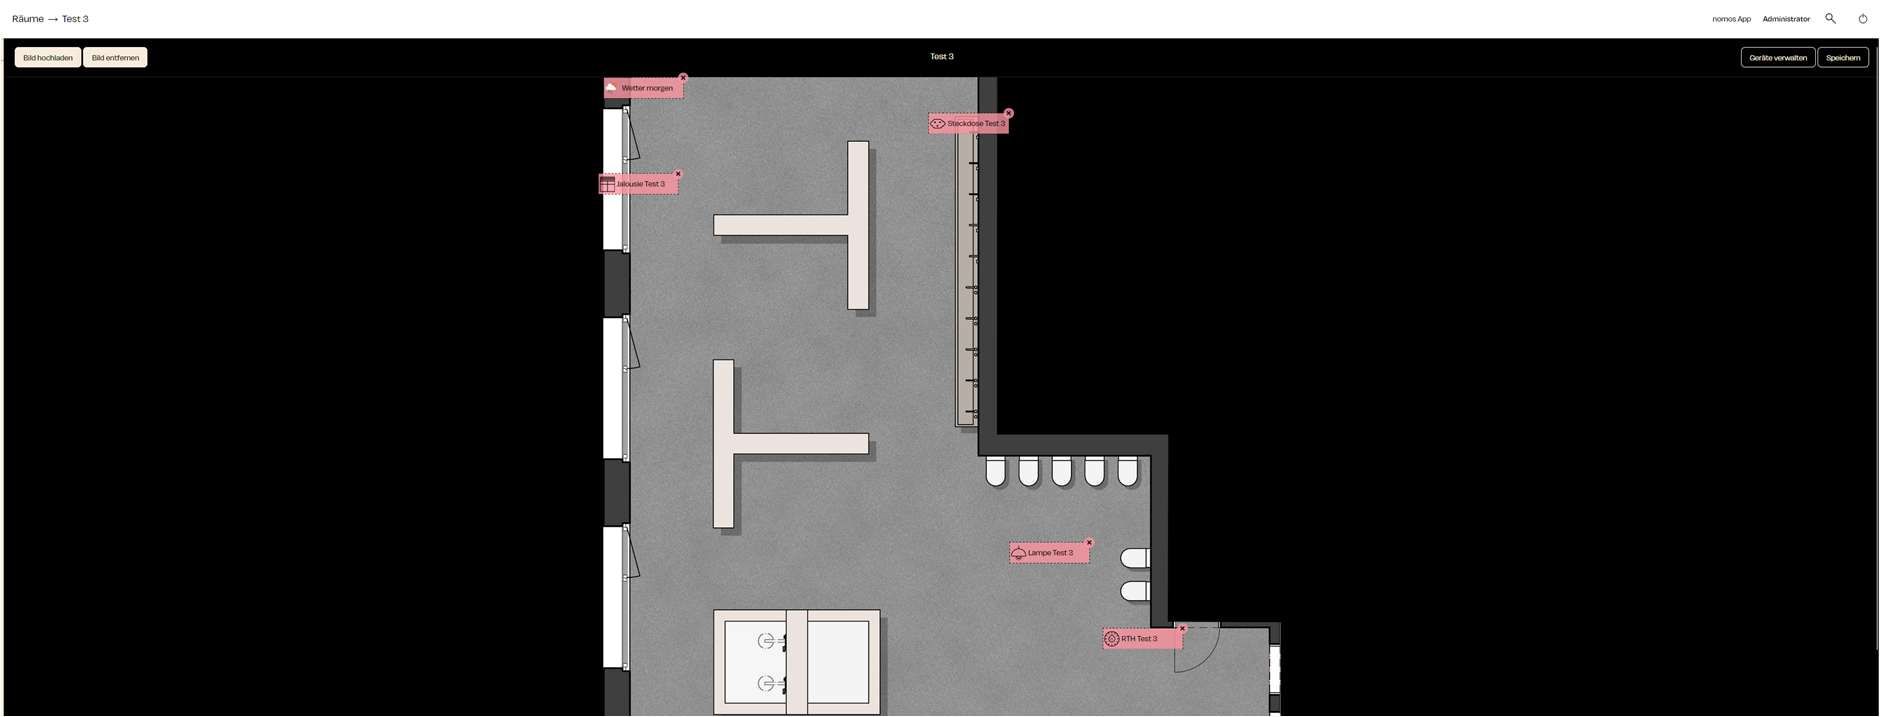
Step: Click "Upload Image" to select the image to be used for visualization.
Manage Devices:
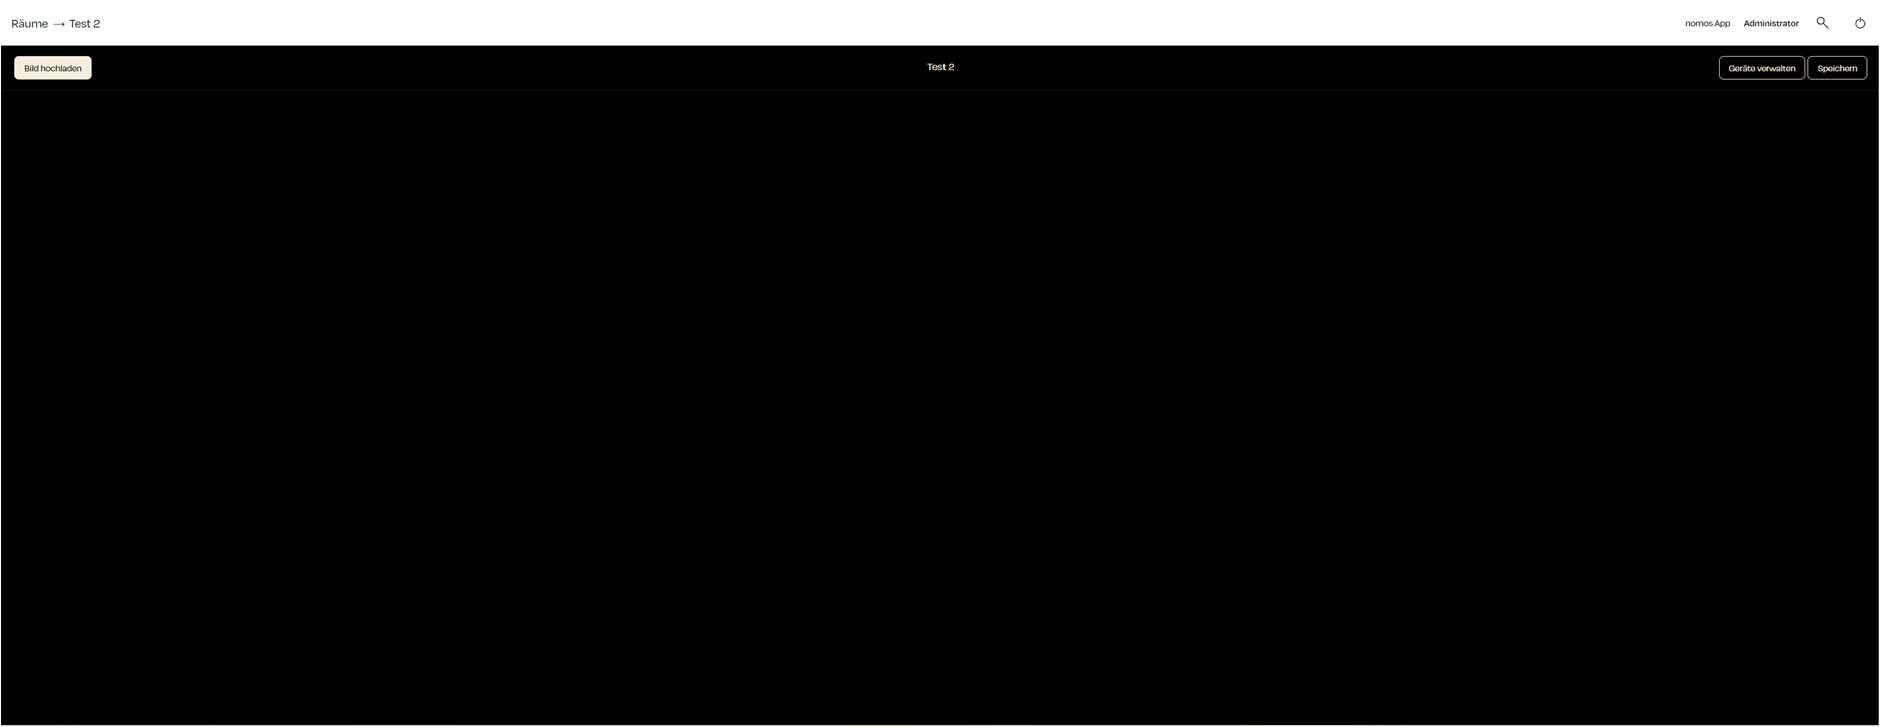
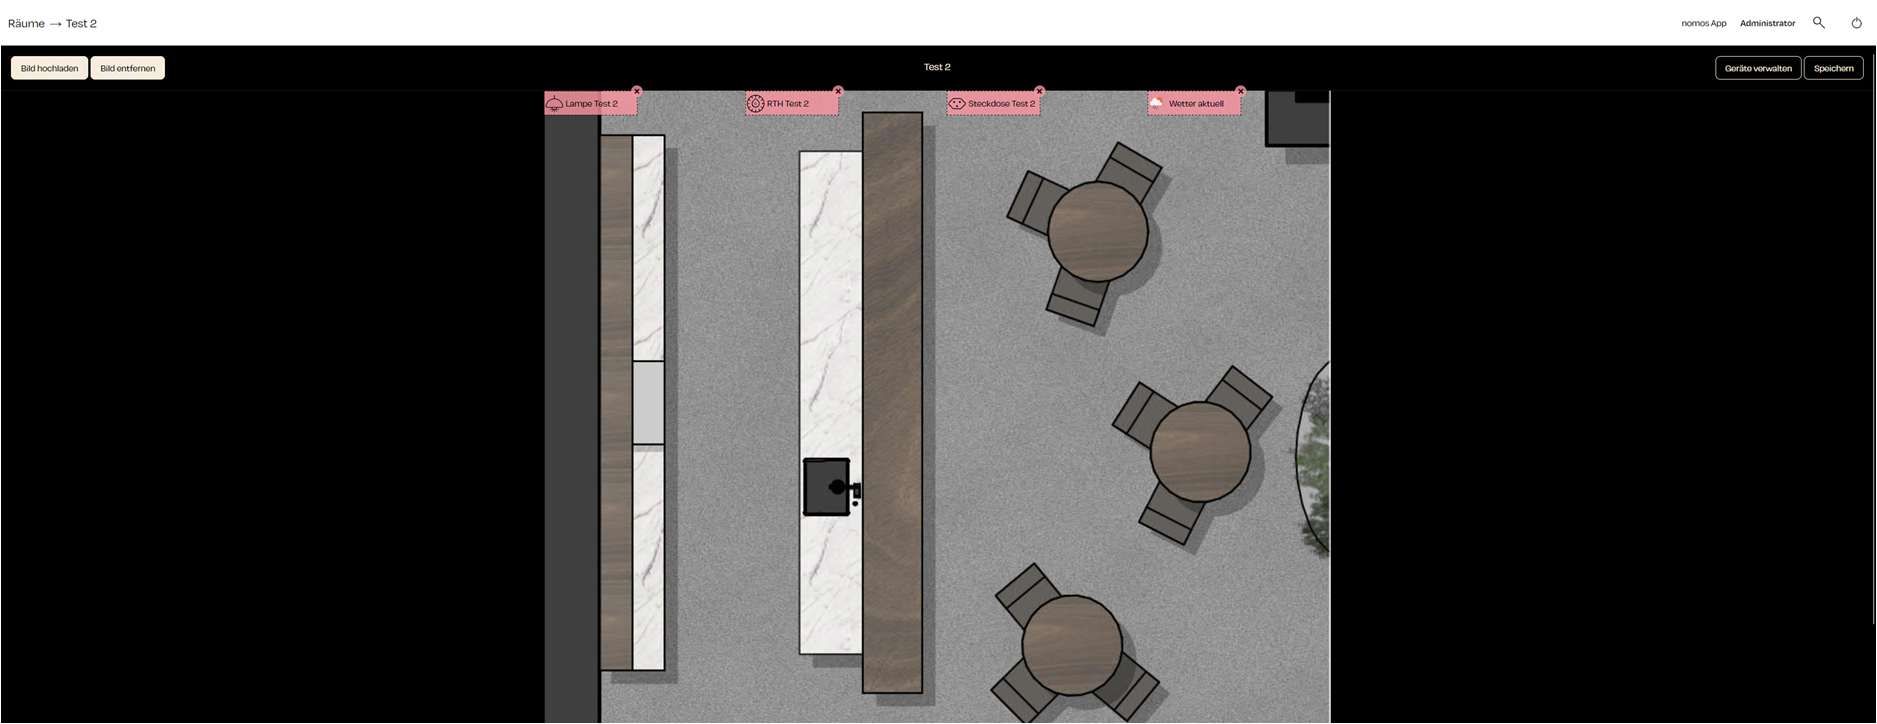
Once the image is uploaded, devices assigned to the room appear as pink fields on the screen. Each of these fields represents a device, such as:
Lampe Test 2
RTH Test 2 (Thermostat)
Steckdose Test 2 (Lighting)
Current Weather
These devices can now be placed on the image.
Move Devices:
The pink fields representing the devices can be freely moved on the image.
Step: Drag each pink field to the location in the room where the respective device is physically situated, e.g., the lamp near a table or the socket on the wall.
This flexible arrangement helps reflect the actual physical placement of devices in the room
Save Visualization:
After all devices are correctly placed on the image, click the "Save" button to secure the changes.
This visualization remains saved and can be edited at any time.
Remove Image:
If you want to change or remove the image, you can click the “Remove Image” button and upload a new one.
Email: With this option, you can create email notifications.
Push Notification: Here, you can set up push notifications for connected devices.
Log Message: Use this button to create log messages that are recorded in the system and displayed in the app.
Manage Notifications
The table shows existing notifications.
Name: The name of the notification.
Last updated: Indicates when the notification was last edited.
Actions:
Test: Tests the notification to ensure it works correctly.
Edit: Opens the notification for editing its settings.
Delete: Removes the notification from the system.
Remote access can only be activated if the customer gives explicit permission. This ensures that only authorized users can access the controller. This security measure helps prevent unauthorized access and guarantees that the use of remote access complies with the terms of use and privacy policies.
If needed, you can disconnect all devices currently accessing the controller by using the "Reset all Clients" button. This can be useful if you want to reorganize control over access to your systems.
Once the devices are set up in the Zeptrion App, you can integrate them into the nomos system by clicking the "Add Device" button.
After clicking "Add Device," the nomos App will search for available Zeptrion devices and add them.
Notes:
Make sure the Zeptrion App is properly installed and set up before trying to add devices through the nomos system.
Keeping both the Zeptrion App and the nomos App up to date can help ensure smooth synchronization.
Ensure that the Zeptrion devices and the nomos Controller are connected to the same network.
Step: Check the serial number and ensure that the license is correctly activated.
Next Step: Click "Continue" to proceed with the configuration.
If the license is not activated at this step, please upload the license file you received. You can obtain this file from either Nomos System AG or your integrator.
Last updated: Indicates when the link was last updated.
Actions: Here you can edit or delete links.
If no links have been created yet, the message "No items found" will be displayed.
To create a new link, click the "Create" button in the top right corner. This will open the form for adding a new link.
When creating a link, you need to enter the following information:
Link Name: Enter a unique name that describes the purpose or content of the link.
URL: The full web address of the link.
Icon: Optionally, you can choose an icon for the link that will appear on the interface.
Fullscreen: If this option is enabled, the link will open in fullscreen mode.
Enabled: Choose whether the link should be active immediately.
This will show whether the necessary hardware for ZigBee integration is available.
Before using ZigBee devices, make sure that the ZigBee hardware is installed and turned on.
Buttons and Options:
Manage Devices: This button opens a menu where you can manage the connected ZigBee devices. Here, you can add, edit, or remove devices. When pairing devices, follow the manufacturer's instructions and operation manuals for each product. Depending on the manufacturer, some steps may need to be done directly on the device.
Settings: Here, you can adjust the network settings and other configuration options for the ZigBee integration.
Reset: This option is used to reset the ZigBee integration. Use this carefully as it will return all ZigBee settings to their factory defaults.
Online Library: You can use this button to download and add addons from a central online library.
Manual Upload: Here, you can manually upload and install addons that you have received externally.
On/Off Switch: At the top right corner of the screen, there are switches to turn the addon system on or off. Be sure to activate addons only when you are certain they work properly and are suitable for installation.
Click on "Sign in with your Spotify Account" to connect your Spotify account with nomos.
A popup window will open where you can enter your Spotify login details.
A Spotify Premium account is recommended for full functionality.
Control Spotify Music:
After logging in, you can play music directly through the nomos app, pause it, adjust the volume, and browse your playlists.
Use Spotify in Automations:
You can integrate Spotify into your smart home automations. For example, you can set it to automatically play music when you come home or when a certain scene is activated.
Notes:
Make sure your Spotify Premium account is active to achieve the best results.
If DHCP is enabled, the controller will automatically be assigned an IP address by the router.
If DHCP is disabled, you can manually configure the network details.
Manual IP Settings
IP Address: The static IP address you want to assign to the controller.
Sbnet Mask: Usually 255.255.255.0, this defines the network segment in which the controller is located.
Router: The IP address of the router or gateway.
MAC Address: The unique hardware address of the controller.
DNS Servers
DNS Server 1 & 2: These fields specify which DNS servers the controller should use. By default, the Cloudflare DNS server (1.1.1.1 or 1.0.0.1) is often used, but you can configure other DNS servers as well.
Internet Connection
A green symbol means that the controller is successfully connected to the internet.
Save and Restart
Click on Save and Restart to apply the changes. The controller will restart and the new network settings will be saved.
Message: A description of the event (e.g., "System Restart", "License Update Installed").
Name: The name of the system or component that triggered the event.
Priority: Indicates the importance of the event (e.g., "None", "Low", "High").
Clear All: You can clear the entire log by clicking the "Clear All" button. This is useful for simplifying log management and removing old entries that are no longer relevant.
Each log entry provides detailed information about various system processes, such as:
System restarts
Installation of updates
Authentication attempts (successful or failed)
Activations or deactivations of features like remote access or cloud connectivity
You can then add devices that should be pinged regularly to check their availability on the network.
Add Device:
Click the "Add Ping" button to monitor a new device.
Enter the IP address or hostname of the device you want to monitor.
Monitor Device Availability:
Once added, the device will be pinged regularly by nomos.
If the device becomes unreachable, you can set up a notification or alarm to trigger appropriate actions.
Use Cases:
Monitor Network Devices: Keep track of whether routers, printers, or other devices in your network are online.
Smart Home Devices: Ensure that specific smart home components are online and available.
Notes:
This is especially useful for monitoring the availability of devices in the network without having to check manually all the time.
The Ping integration can be used in automations to trigger events when a device becomes unreachable.
Through this simple network monitoring, outages can be detected early and resolved quickly.
Input field: Enter the IP address of the KNX interface here. Ensure that this address is correct and valid within your network.
Port:
Input field: The port used for KNX communication (3671). This is the default port for KNX Tunnel. Change the port only if absolutely necessary, and only if you know which port should be set.
Physical Address:
Input field: Enter the physical address of the KNX interface in the KNX network here.
Address Format:
Selection: Here, you can choose the address format to be used for KNX communication.
Tools:
This is where you can delete all unused group addresses. This function is meant to clean up the system from unused data and prevent unnecessary load. Be careful, use this function only when the project integration is complete and all necessary addresses/devices/objects have been set up.
Using the "Browse" button, you can select and restore a previously saved configuration file.
Reset Data:
There are three options for resetting:
Reset Data: This option resets certain data to factory settings.
Reset All Data and Settings: This option deletes all data and returns the system to its original state.
Reset Cloud Settings: This option resets the settings for cloud services.
Setup for New Users:
Here, a document for user setup can be either downloaded or sent via email to assist the new user in configuring the system for the first time.
Note:
Backing up and restoring the configuration is especially important for easy recovery after changes or in case of problems. However, please be aware that resetting data can restore the entire system to factory settings.
Connect with tado°:
A popup window will appear where you need to log in to your tado° account.
Enter your tado° login details (email address and password) to connect nomos and tado°.
Manage tado° devices:
After logging in successfully, nomos will display all tado° devices installed in your home.
You can control temperatures, set heating and cooling modes, and create automations based on tado° sensor data.
Use tado° in automations:
You can incorporate the tado° integration into scenes and automations. For example, you can set it up so that the heating turns on automatically when you come home, or adjust the temperature based on the outdoor temperature.
Notes:
Make sure your tado° system is properly installed and connected to the internet before activating the nomos integration.
With the tado° integration, you can enhance your smart home with intelligent temperature controls, enjoying more comfort and energy savings.
Log in to Your Home Connect Account:
Click the button Sign in with your Home Connect account to start the login process.
You will be redirected to the Home Connect login page, where you need to enter your Home Connect credentials.
Connect Devices:
Once you are logged in, the nomos Controller will automatically search for all Home Connect devices linked to your account.
These devices will then be displayed in the system and can be controlled directly through nomos.
Note:
Make sure you have an active Home Connect account and your devices are correctly set up in the Home Connect app before connecting them with nomos.
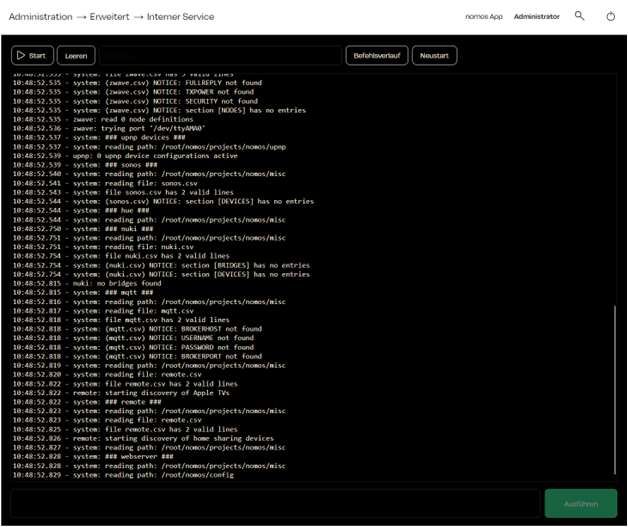
Displays a detailed log of the system commands executed, along with paths and actions taken.
Overview of the system status, the files read, and various devices and connections that have been found or searched (e.g., Sonos, Nuki, MQTT, Remote).
Restart:
Allows you to restart the Internal Service to reinitialize the processes.
Usage:
The Internal Service is a tool primarily used by integrators and advanced users to monitor the system status and logs.
Command output: helps diagnose issues and track system events.
Starting and executing commands: Below is an input field for executing specific commands, allowing direct interaction with the system.
Note:
This area is intended for experienced users or integrators only, as improper changes in the Internal Service can lead to malfunctions.
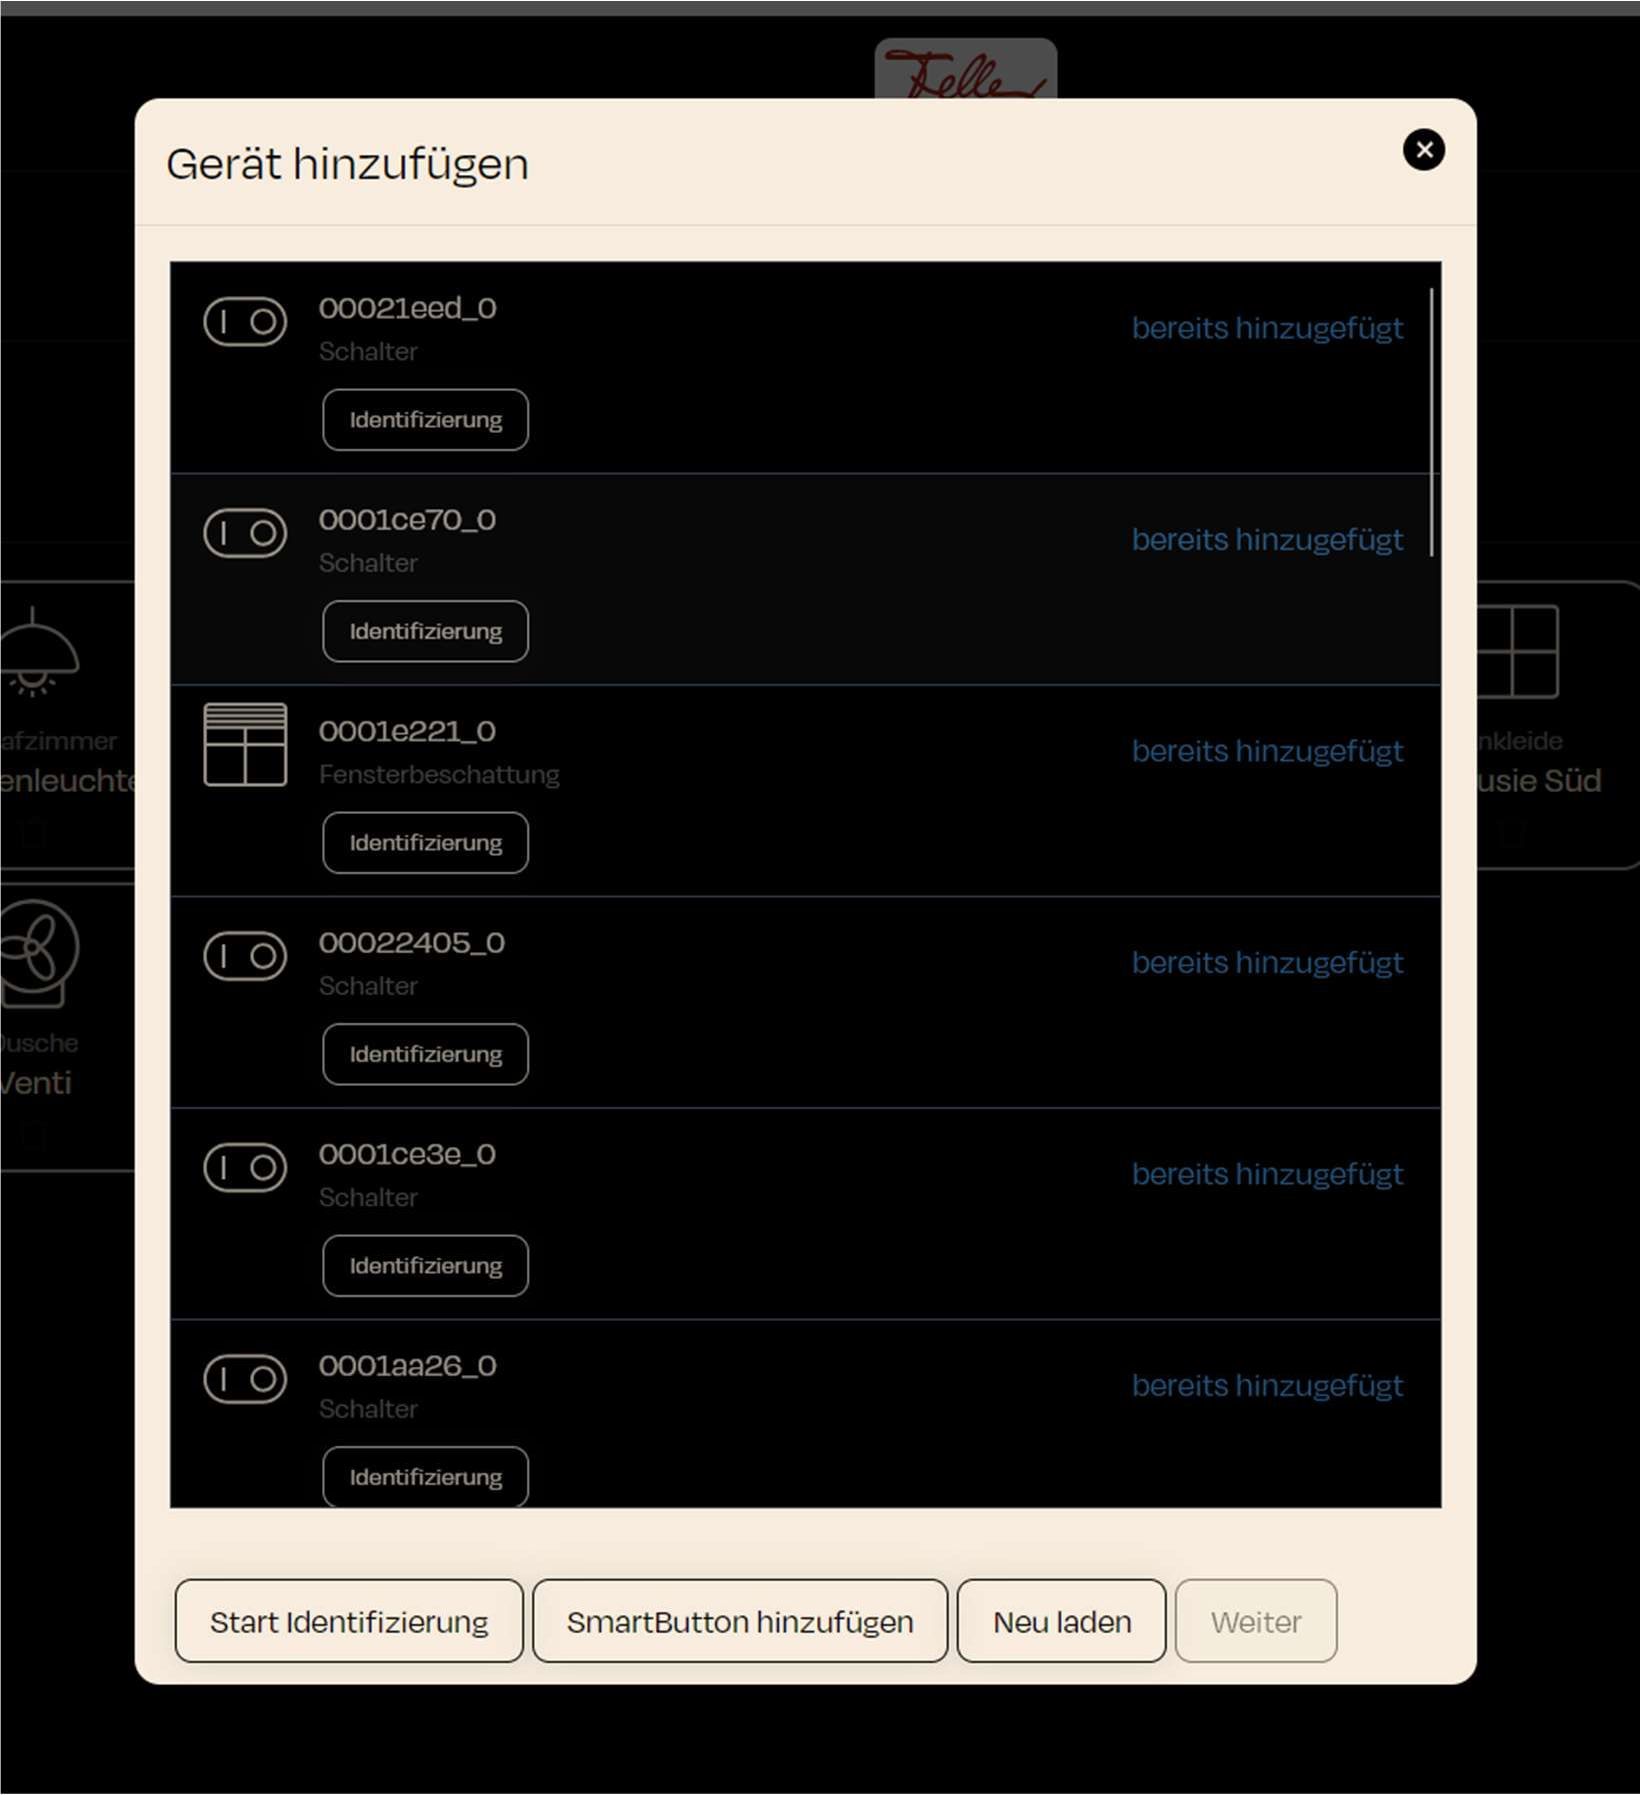
Select Profile:
For each device, the name and related platform will be displayed (e.g., KNX or MQTT).
Select the appropriate device from the list.
Download: Next to each device, there is a download button. Click this button to download the profile and add the device.
Install: Starts the update to the new version.
Changes: Shows detailed information about the changes in the new version.
Manual Upload: Allows the upload of a downloaded update file to manually update the system.
Cancel: Cancels the update process.
Automatic Software Update:
Here, users can enable or disable automatic updates.
Weekday: Users can select the day of the week for the automatic update installation.
Installation Time: A time frame can also be set, for example, from 2:00 AM to 4:00 AM..
Note:
Automatic software updates can help keep the system up to date without requiring manual intervention from the user. However, it is advisable to create a backup before major updates.
Actions/Solution: For each vulnerability, there is a "Solution" button that helps you complete or improve your inputs.
Fixing Security Vulnerabilities (General Tips):
The "Solution" button for each vulnerability leads to the following steps:
Password Change: Change the affected password.
User Account Deactivation/Deletion: If a user account is no longer needed, it can be deactivated or completely deleted.
Software Updates: Ensure that the nomos Controller is up to date.
Additional Security Measures:
Regular Security Checks: Schedule regular security reviews.
Firewall Configuration: Set up your firewall to prevent unauthorized access to the nomos Controller.
Network Security: Protect your network with strong passwords and other security measures.
Access Control: Make sure that only authorized individuals have access to the nomos Controller.
This button allows you to add new VPN clients to the system. This involves entering the client information and setting up the necessary security certificates or passwords.
Verification: Check if there are already clients listed in the "VPN Clients" section. If there are, you can proceed to step 3.
Adding: If there are no clients yet, click on “+ Add VPN Client”. Follow the on-screen instructions to continue.
VPN Port Forwarding:
Function: This section manages port forwarding for the VPN. Port forwarding allows incoming connections on specific ports.
+ Expose local device to VPN: This button lets you share a local device on your network for access through the VPN.
Cancel: Use this button to cancel the licensing process and go back to the previous view.
Note:
It is important that the nomos controller is licensed to make sure all functions and updates work correctly. The licensing process is usually linked to the serial number of the device.
In the dashboard of the nomos Controller, you can easily maintain an overview of rooms and the devices assigned to them. This interface displays which devices are organized in which rooms and allows for straightforward management of assignments.
Screen Overview:
Manage Rooms:
On the left side of the dashboard, you'll find the "Rooms" menu, which displays an overview of the created rooms.
In the example, the room "Test" has been created, with the corresponding devices assigned to it.
Devices in Rooms:
Each room displays the assigned devices in the form of tiles. For the "Test" room, the following devices have been assigned:
Jalousie Test (Window Shading)
Lampe Test (Lighting)
Default Room:
The default room contains devices that haven't been assigned to a specific room. In this example, these are the weather data:
Current Weather
Weather Today
Room and Device Management:
Next to each room, there are buttons for "Visu" (Visualization) and "Manage Devices."
„Visu“ provides a visual representation of the room and its devices..
Notes:
Devices can be moved flexibly between rooms. You can add or remove devices at any time to adjust the organization of your rooms.
Rooms are useful for optimizing specific automations and scenes that can be applied to these devices.
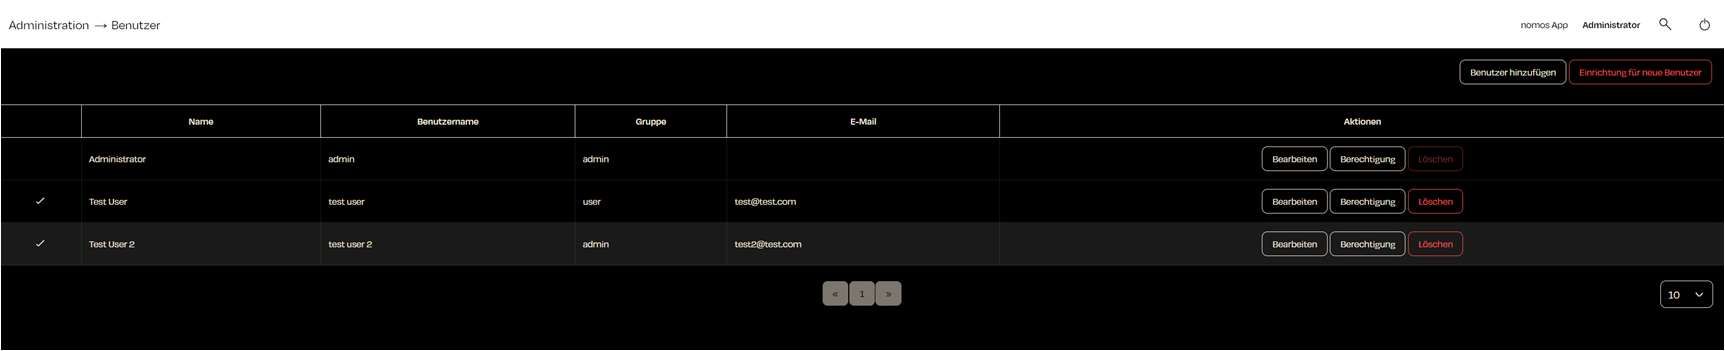
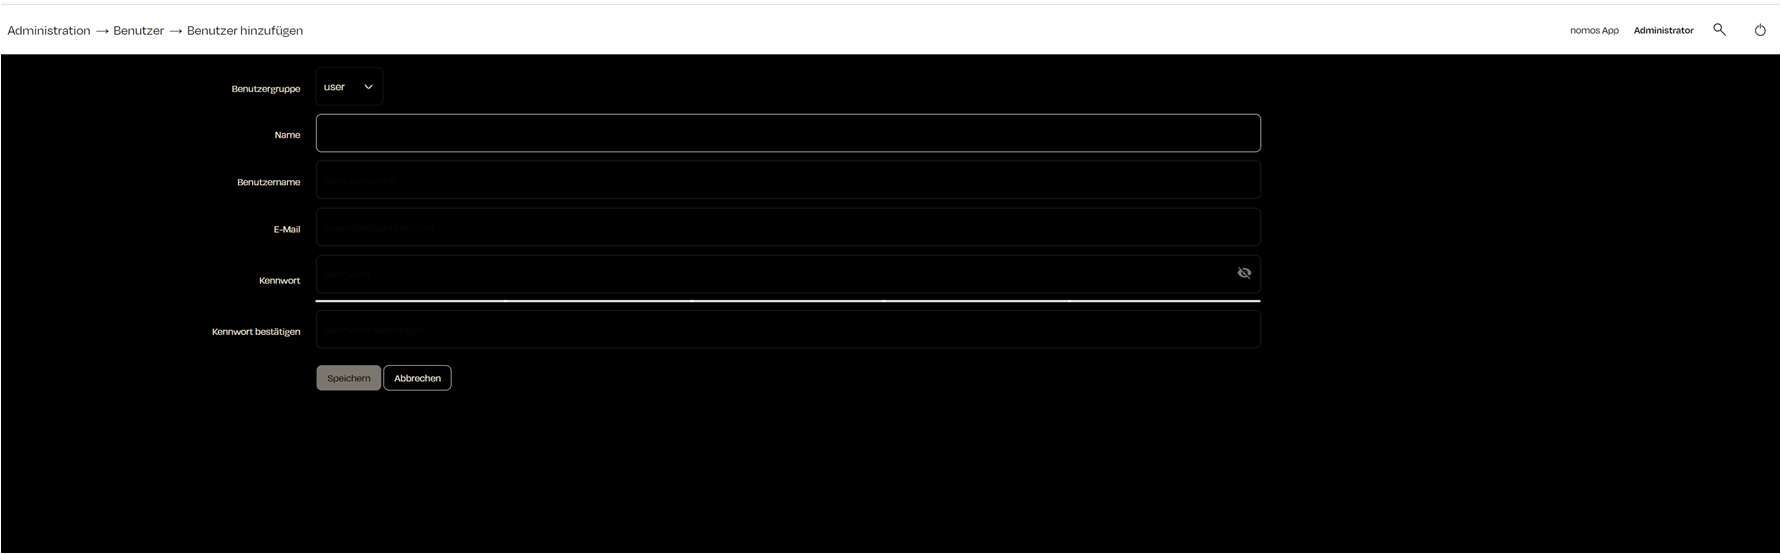
Adding a new user in the nomos app is a straightforward process that allows administrators to create new user accounts and assign permissions.
Select User Group
User Group: Choose the user group for the new user. There are different groups such as "user" and "admin." Admins have full access to the app's settings and features, while users ("user") have limited rights.
Fill out User Information
Full Name: Enter the full name of the new user.
Username: The username will be used for logging into the nomos app.
E-Mail: Provide the user's email address. This can be used for notifications and password recovery.
Password: Create a secure password for the account.
Create User
Add: Once all information is correctly entered, click "Save" to create the new user.
Cancel: Click "Cancel" to abort the process and discard the entries.
Here you can connect your Netatmo account with the nomos Controller to integrate Netatmo devices like weather stations, security cameras, or thermostats into your smart home setup.
Steps to Set Up:
Netatmo Account Login:
To start the integration, click on the button "Sign in with your Netatmo Account".
If the login window doesn’t appear automatically, there’s a link that says: “If window does not open automatically click here.”
This link allows you to manually open the login window.
Establish Connection:
After clicking the button, you will be redirected to the Netatmo login page. There, you can log in with your Netatmo account details.
Once you have logged in, Netatmo devices will be automatically integrated into the nomos Controller and can be controlled within the system.
Note:
Netatmo offers a variety of smart home devices that monitor environmental data and security features. By integrating them into the nomos app, these devices can be controlled from a central location and linked with other automations or scenes.
Important:
Make sure your Netatmo account is set up correctly, and ensure that the devices are properly connected to the account before starting the nomos integration.
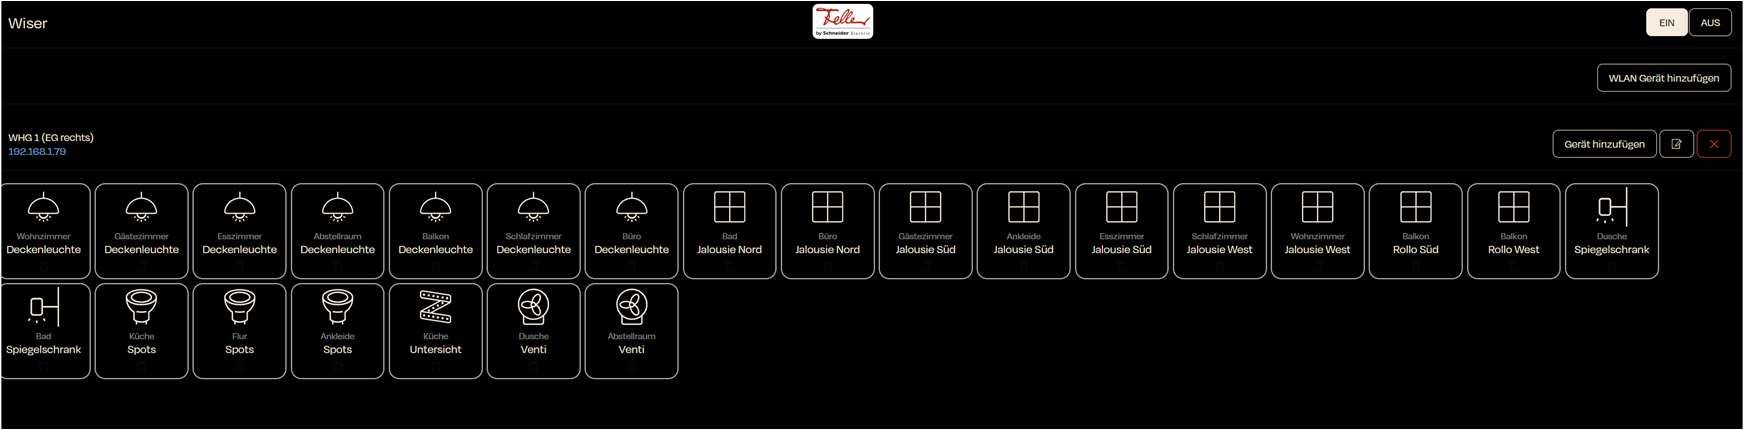
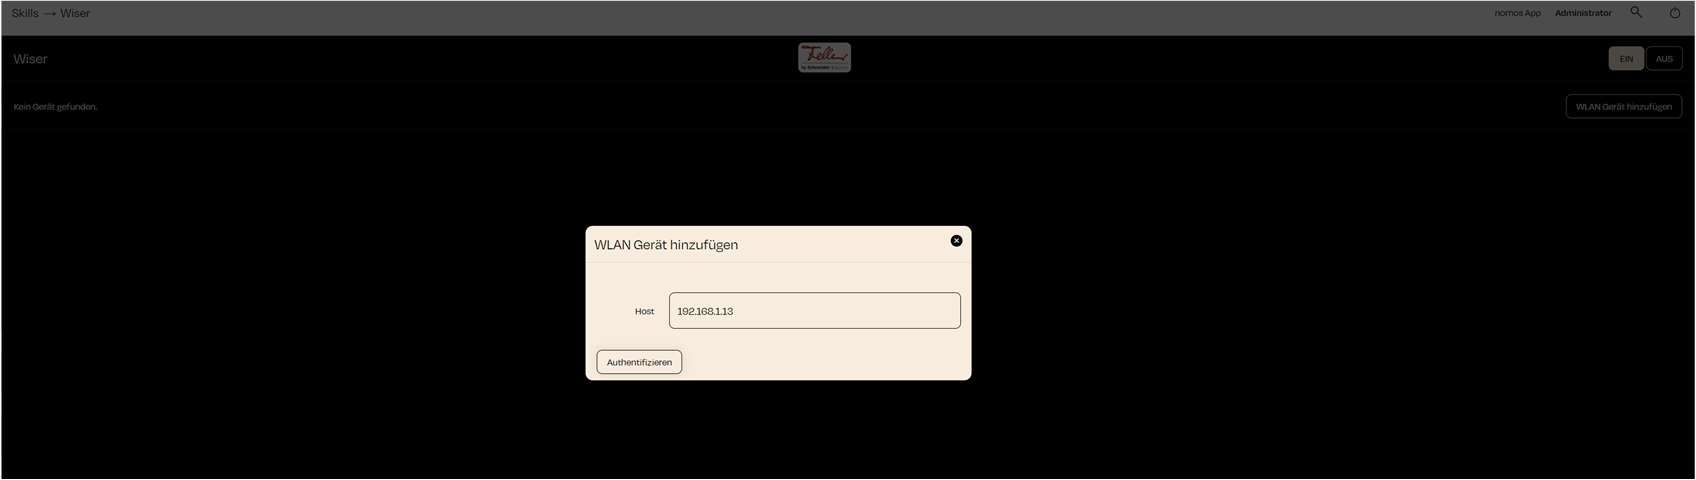
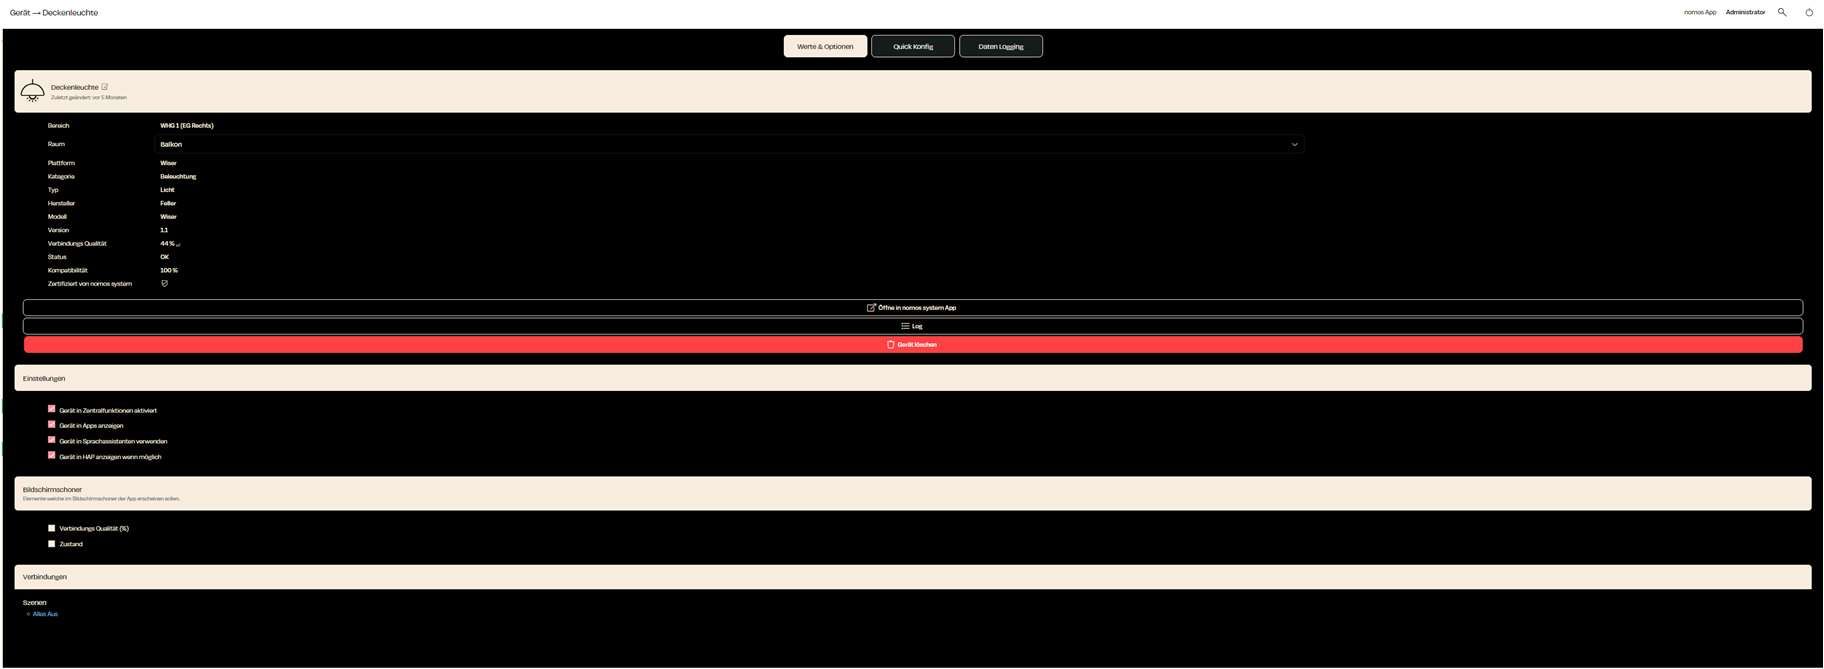
This integration allows you to connect smart devices from Feller to your Smart Home and control them using the nomos Controller.
Setting up Wiser Connection:
Feller-Wiser App:
Ensure that the entire system is neatly integrated and that the project in your Feller App is fully completed.
Activate Wiser by Feller integration:
Click the on button to activate the integration. This will start searching for available Wiser devices.
Add WLAN Device:
On the main page of the Wiser integration, there is a button labeled "Add WLAN Device" Click on it to start the process.
Enter Host Address:
A pop-up window will appear where you need to enter the device's IP address. In this example, the host address is 192.168.1.13.
Enter the correct IP address of the Wiser device you want to connect.
Authenticate:
Once you have found the correct IP address for your Wiser WLAN switch, click on "Authenticate" to initiate the connection. The nomos Controller will check the IP address and connect the device if the IP is correct and the device is reachable.
After you start the "Authenticate," the WLAN switch will begin to blink.
By pressing the blinking WLAN switch once, you confirm the "
Successful Connection:
After successful authentication, the device will appear on the main page of the Wiser integration.
Important Notes:
Correct IP Address: Make sure to enter the correct IP address of the device, which you can find on your router, for example.
Authentication: Ensure that the device is connected to the WLAN network and is reachable to successfully complete the authentication process.
Make sure your Wiser devices are properly installed and connected to the correct WLAN.
Ensure all your Wiser devices are fully set up in the Feller App before executing the integration with the nomos Controller.
Type:
First, choose the type of notification you want by selecting one of the three main categories (Three available buttons -> Email / Push Notification or Log Message).
Name:
Give a unique name to the notification. This name will be shown in the overview and should describe the purpose of the notification.
To:
Enter the recipient's email address. For push notifications, you might enter a device ID or another identifier here.
Subject:
This is the subject of the email or message. It should be short and clear to inform the recipient about the content.
Message:
This is where you write the actual content of the message. This text can include more detailed information or instructions.
Attachment:
You can optionally attach files to the email that the recipient will receive along with the message. This could be, for example, a log file.
Active: By checking this box, you ensure that the message will be used immediately after saving. If you uncheck this option, the message will be saved but not sent out actively.
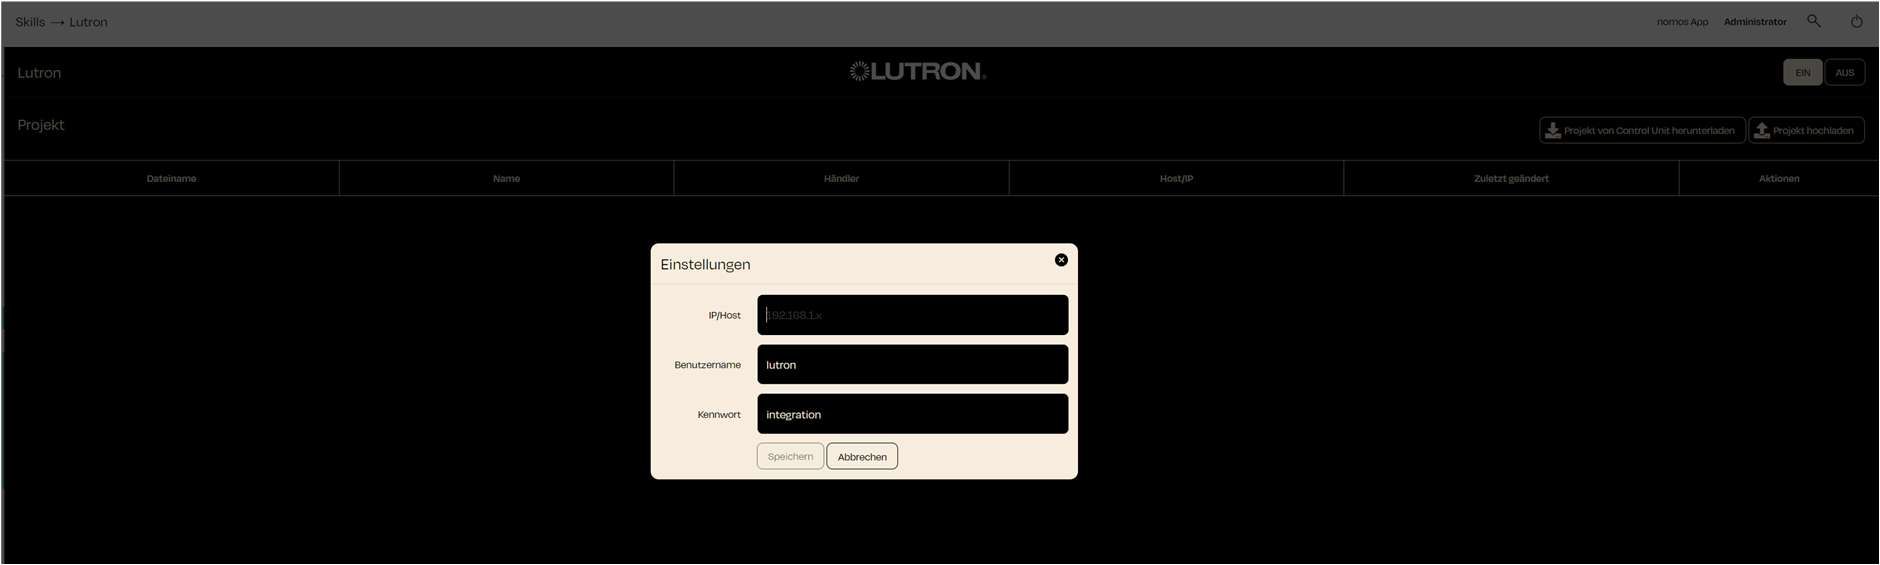
The dashboard is designed to manage Lutron projects and connect with the Control Unit. There are two main functions that can be used for configuring Lutron projects:
Download Project from Control Unit:
This button allows you to download an existing project from the Control Unit to the nomos controller. This is useful for integrating changes to an already existing Lutron project into the nomos Controller.
This is useful for integrating changes to an already existing Lutron project into the nomos Controller.
After downloading, the project will appear in the list, including information such as filename, name, dealer, host/IP, and date of last modification.
Upload Project:
With this feature, you can upload a new or modified Lutron project to the Control Unit.
This is used to activate and run a newly created or changed project on the Lutron hardware.
It's important to ensure that the uploaded project is correct and complete before applying it to the Control Unit.
Project List
InIn the table below, you can view existing projects, including the following information:
Filename: The name of the project file.
Name: The unique name of the Lutron project.
Dealer: The name of the provider or installer handling the project.
Lutron / Add Project:
IP/Host:
Enter the IP address or hostname of the Lutron Control Unit here. This is necessary for nomos to communicate with the Lutron hardware.
Example: 192.168.1.12
Username:
Important:
Make sure that the network connection is stable and that the IP address is entered correctly to avoid communication issues.
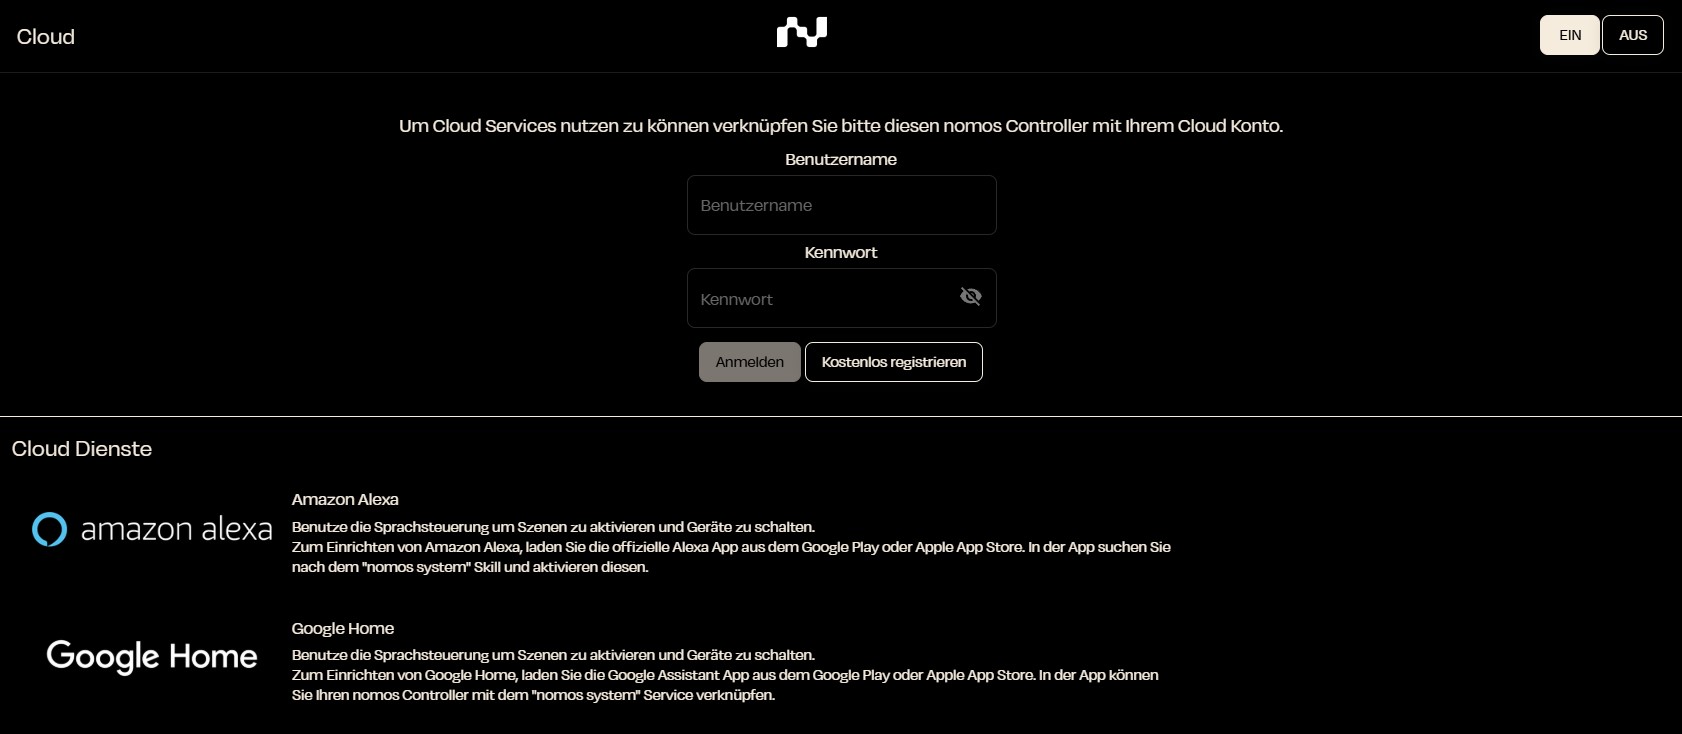
The cloud integration in the nomos system allows you to connect the nomos Controller with various cloud services to enjoy advanced features like voice control or automated actions.
To use cloud services like Amazon Alexa and Google Home, you need to link your nomos Controller with a cloud account. Here are the steps to do this:
Username: Enter your cloud username.
Password: Enter your corresponding password.
Sign In: Click on "Sign In" to establish the connection. If you don’t have an account yet, you can create a new one by clicking on "Sign up for free".
At the bottom of the page, you will see various supported cloud services:
Amazon Alexa: Use voice control to activate scenes and switch devices. To set up Alexa, download the official Amazon Alexa app and search for the "nomos" skill.
Google Home: Similar to Alexa, you can use voice commands with Google Home. Download the Google Home app and activate the "nomos" service.
Once you have successfully connected your nomos Controller to a cloud service, you can manage it through the interface and create individual automations.
The automation feature in the nomos Controller allows you to automate recurring actions or processes.
Automations are rules or sequences of actions that run automatically when certain conditions are met. These rules can be set for individual rooms, device categories, or specific platforms.
This view displays an overview of all created automations in the nomos Controller. Each automation includes the following information:
Name: The name of the created automation (e.g., „Guten Morgen“).
Enabled: A checkmark indicates whether the automation is enabled.
Last updated: Indicates when the automation was last edited.
Actions:
Additionally, you can create a new automation using the "New Automation" button in the top right corner.
You can also filter existing automations by room, platform, or device category.
Cameras can be added and managed to improve monitoring and security in your system.
The dashboard currently does not show any cameras because none have been added. To add a camera, click the "Add" button.
When you click the "Add" button, a new window will open where you can enter the information for the new camera.
Here, the administrator has the option to turn a VPN connection on or off, which is used for remote access to the system.
Enable/Disable VPN:
On the right side, you will see the option to turn the VPN feature on or off. This function is necessary to create a secure connection from outside, especially when support staff need to access the system.
By clicking on “On,” the VPN connection will be enabled, and the displayed VPN IP address (in this case, “VPN: 10.72.0.61”) will be provided.
Customer-Side Sharing::
Important: The customer must explicitly share this VPN connection by activating it and informing support of the displayed IP address. Only then can support access the system to carry out any necessary troubleshooting or configurations.
Port Forwarding via VPN:
Below that, there is the option “+ Expose local device to VPN” which allows a specific device to be shared for remote access over VPN for support. This feature enables support to specifically access certain devices on the customer's network (e.g., KNX).
Security:
Using a VPN provides a secure way to protect the system from unauthorized access. The customer always has control over when this feature is activated and which devices are shared.
In user management, you can manage user accounts, set permissions, and add new users.
User Overview
Full Name: The full name of the user.
Username: The username for logging in.
Group: The role of the user, such as "admin" or "user".
E-Mail: The user's email address for notifications.
Actions
Edit: You can change the details of a user, such as their name, email, or username.
Permission: Here, you can set what permissions the user has within the app.
Delete: Remove the user from the system.
Add User
By clicking "Add User", you can create a new user account. A form will open where you need to enter basic information like name, username, group, and email address.
Setup for new Users
This option allows you to create or change templates for new users. This way, you can predefine settings and permissions for newly created accounts.
Group Membership
The group membership determines a user's rights in the system. A user in the "admin" group has access to administrative functions, while a "user" has limited rights and can only use certain functions.
Permissions
The permission settings allow you to individually specify which areas and functions the user can access. This ensures that users can only view and change the areas relevant to them.
„Advanced“ provides you with deeper insights and control over the advanced features of the nomos Controller. This menu is mainly intended for administrators who need access to diagnostics and system settings.
Tools / Node-RED
This is a powerful visual development environment that allows you to create and manage automations and workflows on the nomos Controller.
Admin: Opens the Node-RED admin interface.
Restart: Restarts the Node-RED service.
Reset: Resets all settings and configurations of Node-RED.
Tools /
Opens the project editor for more in-depth configurations and customizations of the system.
Tools /
Allows management of the internal internet service, including log views.
Tools /
This area allows for the provision of specific information from the integrator that is visible to users.
Tools /
Displays information about your license and allows for license management.
Performance Shows the current performance data of the system:
Start time: Indicates the last start time of the controller.
CPU: Displays the current temperature of the CPU.
RAM: Shows the current usage of RAM.
Info
Version: Displays the current software version.
Model: Shows the model of the nomos Controller.
Serial number: Indicates the serial number of the controller.
Diagnostics and Usage This section provides options to help nomos by sharing diagnostic data:
Send diagnostics and usage data to nomos system: Allows nomos to automatically collect error reports and usage statistics.
Share crash data with nomos system: sends information on software crashes to nomos to help improve stability.
In this menu, you can perform various administrative functions.
Settings Here you can adjust settings like language, timezone, and date/time.
Network In this section, you can manage the network settings of the controller.
Users This area allows you to add, edit, or delete users.
This section provides the option to configure and manage mobile devices for receiving push notifications.
Advanced settings for deeper configurations and system customizations.
Here you will find support information and help resources.
This is where you can set up VPN clients.
This section provides an overview of security-related information for the controller.
In this section, you can back up or restore various configurations and settings.
This section allows you to update the software of the controller.
On the nomos/Skills/Wiser dashboard, you can see an overview of the devices that are already connected.
Wiser Dashboard Overview:
IP Address of the Controller:
Above the list, you will find the IP address of the connected controller that manages the devices. In this case, it is 192.168.1.79.
This is useful to ensure that the connection to the controller is set up correctly.
Add Device:
In the top right corner, there is a button to add a device to incorporate new devices into the system. Here, additional Wiser components such as switches, lamps, blinds, and more can be added.
Edit or Remove Device:
Next to the add button, there is also the option to edit or remove a device. These actions can be accessed through the corresponding icons (pencil for editing, X for deleting).
Detailed Information about Devices:
By clicking on a device, you can access more detailed information such as the device status, assigned scenes, or automations.
Settings
nomos Controller Name: Here you can set the name of the controller.
Language: Use the dropdown menu to choose your preferred language for the user interface (e.g., German, English, French, Dutch).
The Z-Wave integration allows you to connect and control Z-Wave compatible devices directly through the nomos Controller.
A Z-Wave USB dongle is required for the direct connection of Z-Wave devices to the nomos Controller.
Since Z-Wave is a wireless protocol, it's important to pay attention to the physical placement of the controller. The nomos Controller (with Z-Wave USB dongle) should be placed centrally in the building to ensure optimal range and signal strength in all directions.
Important: Use a USB extension of at least 30 cm between the dongle and the nomos Controller.
Z-Wave Integration:
Activate Integration:
Click on a connected device to see more options. A window will open showing detailed information and settings for the selected device.
Device Overview:
Zone and Room:
This shows the zone and room where the device is located. In this case, the device is placed in the area WHG 1 (ground floor right) in the balcony room.
Here’s how you can add Wiser devices to the nomos Controller:
Add Device:
Using the “Add Device” button, you can now access the devices in your Wiser system and integrate them into the nomos Controller as needed.
Click the “Add Device” button. A list of all available devices will appear, and you can integrate them into the nomos Controller one by one.
In the next step, you need to set up the network settings.
Screen Display:
Activate or deactivate the DHCP option. By default, DHCP is enabled, which means the IP address is assigned automatically.
IP Adress: 192.168.55.120 (if DHCP is enabled, the IP will be assigned automatically)
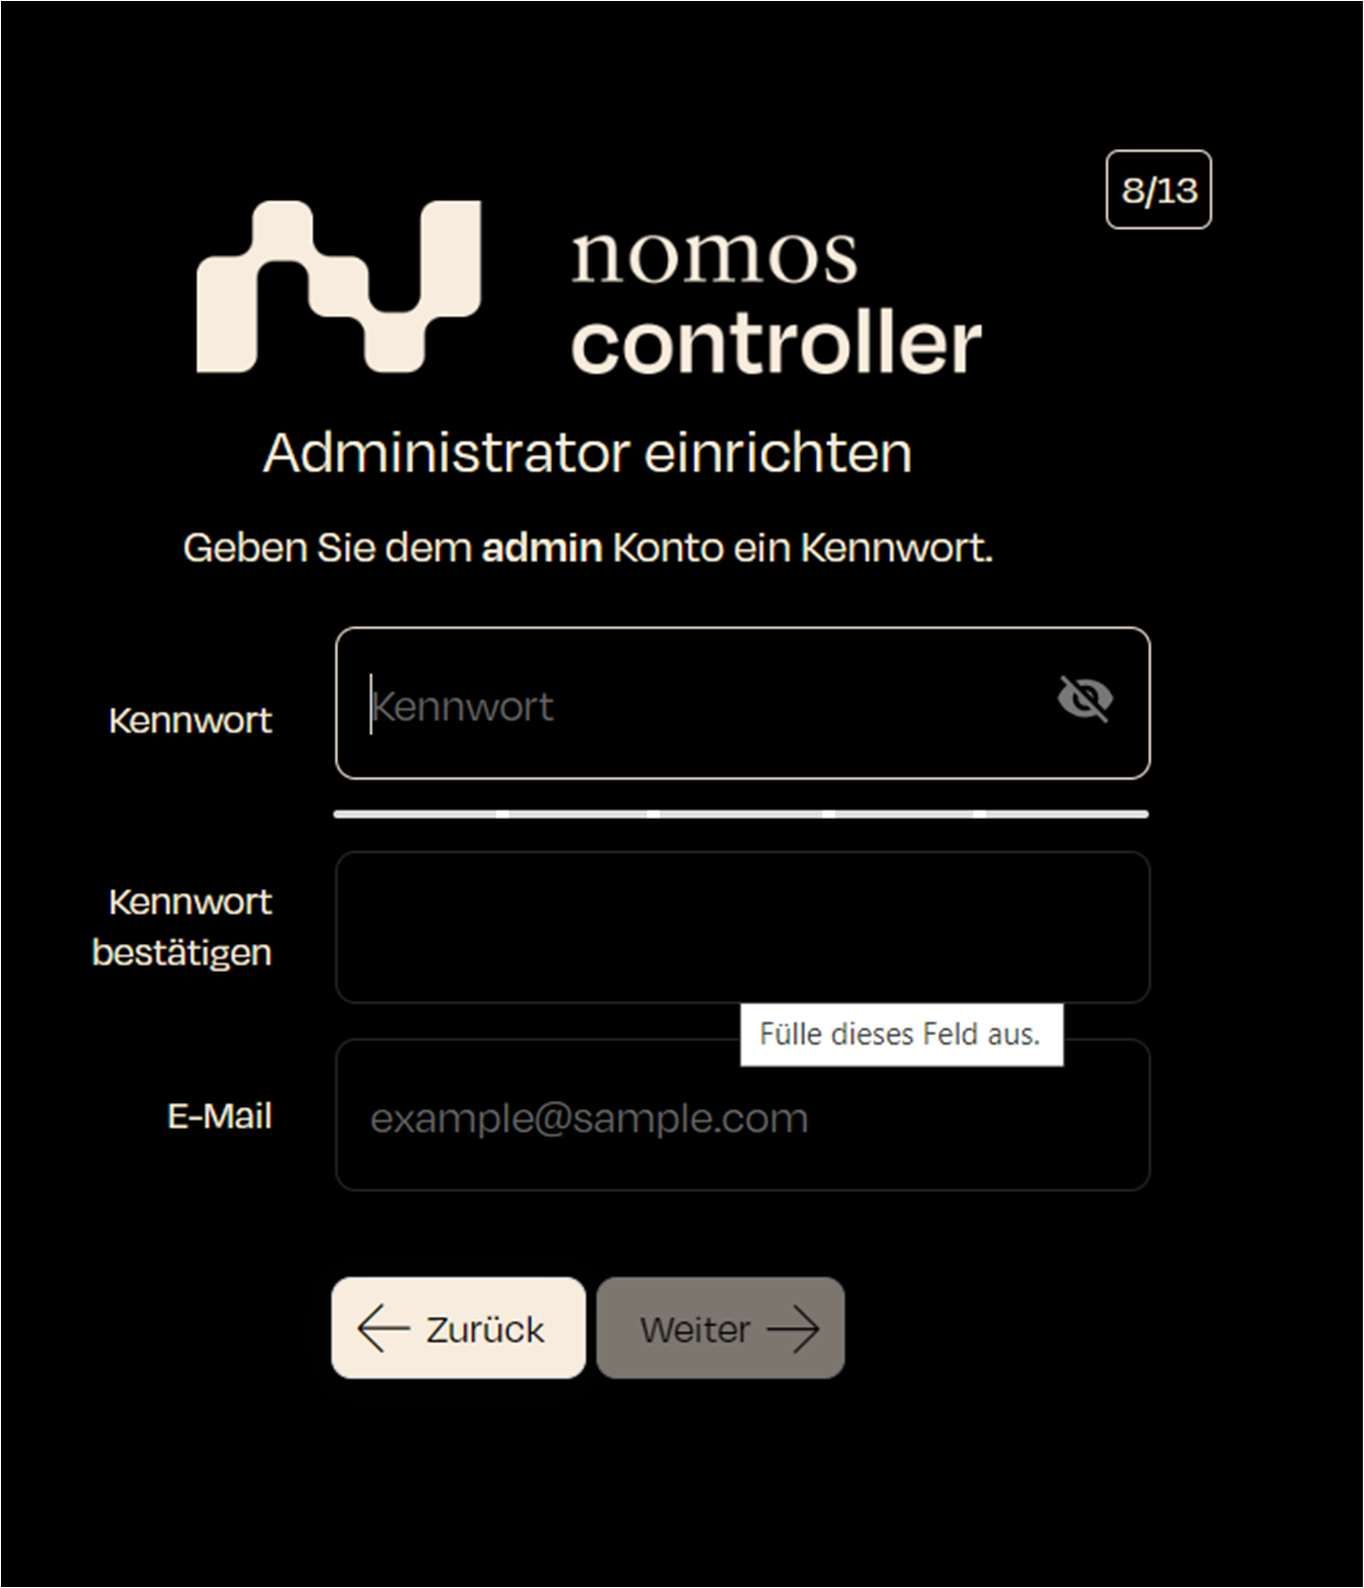
RTH Test (Thermostats)
Steckdose Test (Lighting)
Each device displays its type beneath it (e.g., Lighting, Thermostats).
Weather Tomorrow
Weather Day After Tomorrow
These devices are automatically placed in the default room until they are assigned to another room.
Click the "X" to delete a room if it's no longer needed.
Verify Password: Confirm the password to ensure it has been entered correctly.
Host/IP: The IP address or hostname connected to the Lutron Control Unit.
Last updated: The date when the project was last changed or updated.
Enter the username required to access the Lutron Control Unit. By default, it is saved as "lutron."
Password:
Here, you need to enter the password to access the Control Unit. A common password for integration is "integration," but it should be adjusted if a different password has been set.
Save:
After entering all the information correctly, click Save to add the device and establish a connection with the Control Unit.
Edit (Pencil Icon): Opens the automation for editing.
Duplicate (Double Document Icon): Creates a copy of the automation.
Delete (Trash Can Icon): Deletes the automation.
Lock (Lock Icon): Locks the automation to prevent further changes.
Give the camera a unique name that describes its location or function. For example, "Front Door Camera" or "Office Surveillance".
URL Type
Select the URL type for the camera:
Snapshot: For a still image.
MJPEG or RTSP can also be selected depending on the camera type, if supported.
URL
Insert the URL for the camera stream or for the snapshot. The format for a snapshot must be in static image format as .jpeg or .png. If a username and password are required, use the following format: http://username:password@host:port/path/to/file
Screensaver
Option to display the camera in screen saver mode.
Room Assignment
Assign the camera to a specific room to make organization and management easier.
Storage: Indicates the used storage space on the system drive.
Opensource Lizenzen: Links to the open-source licenses used.
For example, weather information can be integrated, showing:
Weather Current
Weather Today
Weather Tomorrow
Weather Day After Tomorrow
Zones:
Allows the creation and organization of different physical or virtual areas of the project (e.g., ground floor, upper floor).
Automations:
Define automated processes based on specific events or conditions.
Variables:
Variables can be used within the system to store states or values utilized in automations and scenes.
Scenes:
Create scenarios that control specific sequences and events, such as executing automations or switching devices (scene button located at the bottom right in the app view).
Skills:
Lists all standardized communication protocols that can be fully integrated into the nomos Controller
Notifications:
Allows the creation of individual notifications (email/push/log) triggered by desired scenes, functions, or automations.
Schedules:
Enables the creation of schedules for various actions and automations within the system.
Cameras:
Integrate and manage camera feeds within the dashboard for monitoring purposes.
Links:
Manage and access external or internal links relevant to your system setup.
Cloud:
Access cloud-related settings and integrations for remote management (nomos-Cloud/Alexa/Google Home).
Remote Access:
Configure settings to enable or disable remote access to the nomos Controller.
Log:
View system logs for monitoring activities and troubleshooting.
Administration:
Access administrative settings, including user management, network configurations, and system updates.
Update Notification:
At the top left corner of the dashboard, a notification appears when an update is available, ensuring that the controller is always up to date.
Timezone Select your time zone so that the controller functions in the correct time zone.
Date/Time: Here you can see the current date and time. You can set these manually if necessary.
Location The location is used to configure the weather service (OpenWeather) correctly for displaying weather data.
Country: Choose the country where your controller is located.
Latitude / Longitude: Enter the exact geographical coordinates for the controller's location to get accurate weather and time information..
Units Select the units that should be used in the app and system.
Metric: Choose between metric (km/h, km) and imperial units (mph, mi).
Temperature: Decide whether the temperature should be displayed in Celsius or Fahrenheit.
Windspeed: Here you can choose between km/h, m/s, or mph.
Pressure: Specify the units for air pressure (mbar, hPa, etc.).
Save and Restart
After all settings are configured, you can save the changes and restart the system to apply the settings.
Click the on button to activate the Z-Wave integration.
Manage Devices:
This button opens a menu where you can manage the available Z-Wave devices. Here, you can add, edit, or restart the network scan to find hidden devices. When pairing devices, make sure to refer to the manufacturer’s instructions and user manuals for each product. Depending on the manufacturer, certain steps may need to be performed directly on the device.
Remove Device:
This option allows you to remove Z-Wave devices from the network. Make sure to correctly remove the device from the network before physically disconnecting it to avoid communication issues. Again, refer to the manufacturer’s instructions and user manuals for specific steps that may need to be done on the device itself.
Network Update:
This button is used to update the Z-Wave network. This can be helpful when new devices are added or when the positions of Z-Wave devices in the building change.
A network update can optimize the connection between the devices and the control center.
Reset:
This function completely resets the Z-Wave network and removes all added devices.
Warning: This function should only be used if all devices are removed and the network needs to be set up again, as all configurations will be deleted.
Notes:
Z-Wave devices communicate through a mesh network, meaning each device can relay signals to other devices to extend the range.
Before resetting the network, make sure to back up all important data.
When making changes to the network, use the “Network Update” to optimize communication between the devices.
Platform, Category, and Type:
The platform is Wiser, the category is Lighting, and the type is Light.
Manufacturer and Model:
Manufacturer: Feller
Model: Wiser
Connection and Status:
This shows the connection quality (here 44%) and the current status of the device (OK).
Compatibility and Certification:
Compatibility: 100%
Certified by nomos-system.
Settings:
Central Function:
Activate or deactivate whether the device should participate in central functions, such as controlling in central scenarios.
App Display:
The device can be shown in apps or kept hidden, depending on your needs.
Voice Control:
Enable whether the device can be used with voice assistants (e.g., Google Assistant, Alexa, or Siri).
HAP Display:
This indicates whether the device is available in the HomeKit Accessory Protocol (HAP) to be controlled through Apple Home.
Connection:
Scenes:
This shows the connected scenes, such as a scene that turns off all lights ("All Off").
Screen Configuration:
Connection Quality:
This setting allows displaying the connection quality on a status screen.
More Options:
Values & Options:
This button allows you to set advanced settings such as the brightness of the lamp or other functions (depending on the device type).
Data Logs:
You can access a data log here that provides useful information about the connection and activity of the device.
Delete Device:
If you want to remove the device from the system, you can do this through the delete device option.
List of Available Devices:
The list of available devices will be displayed. Each device is shown with a unique ID, its category (e.g., switch, window shading), and its status (already added).
Identification::
Click on Identification to identify the device in the physical space (e.g., by blinking lights or another indication).
You can also identify each device by matching its unique ID from the switches. For this, open the relevant switch in the Feller app (Settings) and check the serial number. This serial number should also be visible on the nomos Controller in the list of available devices.
To ensure proper identification and adding of available Feller devices, it’s essential to clearly and accurately name all rooms and switches when setting up the Feller app.
Buttons at the Bottom:
Start Identification: This button initiates the identification process.
Add Smart Button: If you want to add a SmartButton, you can do so using this button.
Reload: If the devices didn’t load correctly or new devices have been added, you can reload the list.
Continue: After selecting and identifying your desired device, click on Continue to complete the configuration.
Notes:
Device Identification: To ensure you select the correct device, it’s important to carry out the identification process. This helps avoid misconfigurations.
Already Added: Devices that have already been added cannot be integrated into the system again. They will be marked accordingly.
Subnet Mask: 255.255.255.0
Router: 192.168.55.1
Note: It is recommended to configure a static IP address for a more stable network connection.
Step: If you are using DHCP, make sure the boxes are filled out correctly. If configuring a static IP address, manually enter the required information.
Next Step: Click on “Next” to continue with the setup.
When you click on Manage Addresses in the KNX menu, the following dashboard appears. This provides an overview of all current KNX projects and manually added group addresses.
Dashboard Explanation:
Projects:
Here, all uploaded KNX projects are displayed.
The table shows the following information:
File Name: The name of the uploaded KNX project, e.g., "abc.knxproj".
Name: The project name.
Last updated: The date when the project was last updated or uploaded.
Actions:
Several actions are available for each project:
Address List: Click this button to view the group addresses of the project.
Delete Project: Use this button to delete a project if it is no longer needed.
Manually Added Group Addresses:
In this section, you can add group addresses manually if they are not included in an uploaded project.
To add a new address, click on Add New Address. A dialog will open where you can enter the details for the group address (e.g., address, name, and type).
Manage Adresses/Adress List
When you click on Address List for a KNX project, the following overview is displayed. This address list shows all group addresses of the respective KNX project and allows you to manage and adjust addresses..
Overview of Adress List:
Address:
This shows the group addresses defined in the KNX project.
Example: “0/0/0” for switching devices.
Name:
Add Manual Address
If you want to add a new group address manually in the KNX project, a new window will appear.
Enter Address:
Please enter the desired group address in the format X/X/X (e.g., “1/2/3”).
This field is required and must be filled out correctly.
Name of the Address:
Access and Login:
The interface is accessible through a dedicated login screen, where the integrator's username and password must be entered.
Features:
Node-RED offers the following capabilities:
Creating automation flows using simple drag-and-drop elements.
Managing connections and data flows between different devices and services in the nomos system.
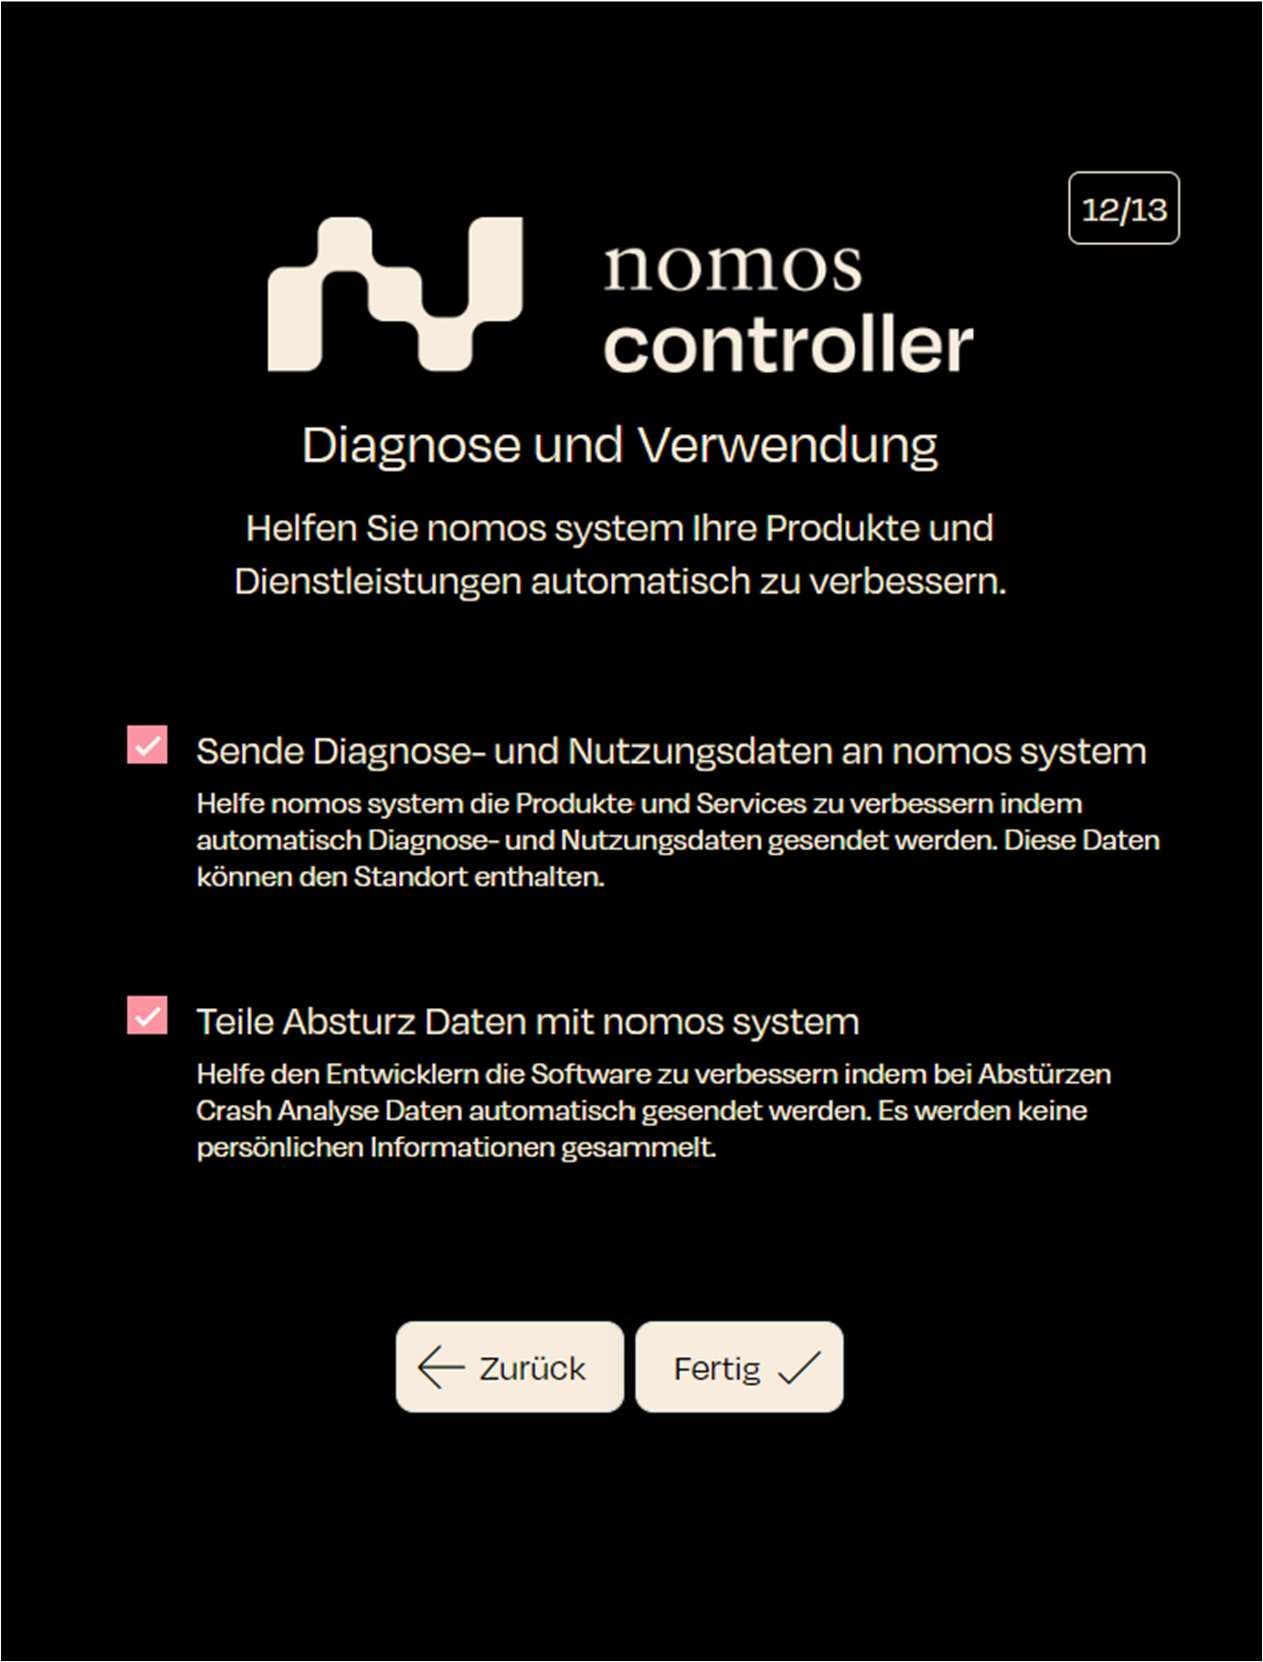
General information on the operating instructions / product support
The information, data, values, etc. contained in this documentation are subject to change without prior notice. Likewise, the illustrations are non-binding. All product names used in this manual are registered trademarks of their respective companies. No part of this documentation may be reproduced or transmitted for any purpose, in any form or by any means (electronic or mechanical), without the express written permission of nomos system AG.
All rights reserved! Nomos System AG Albulastrasse 57 8048 Zurich, Switzerland

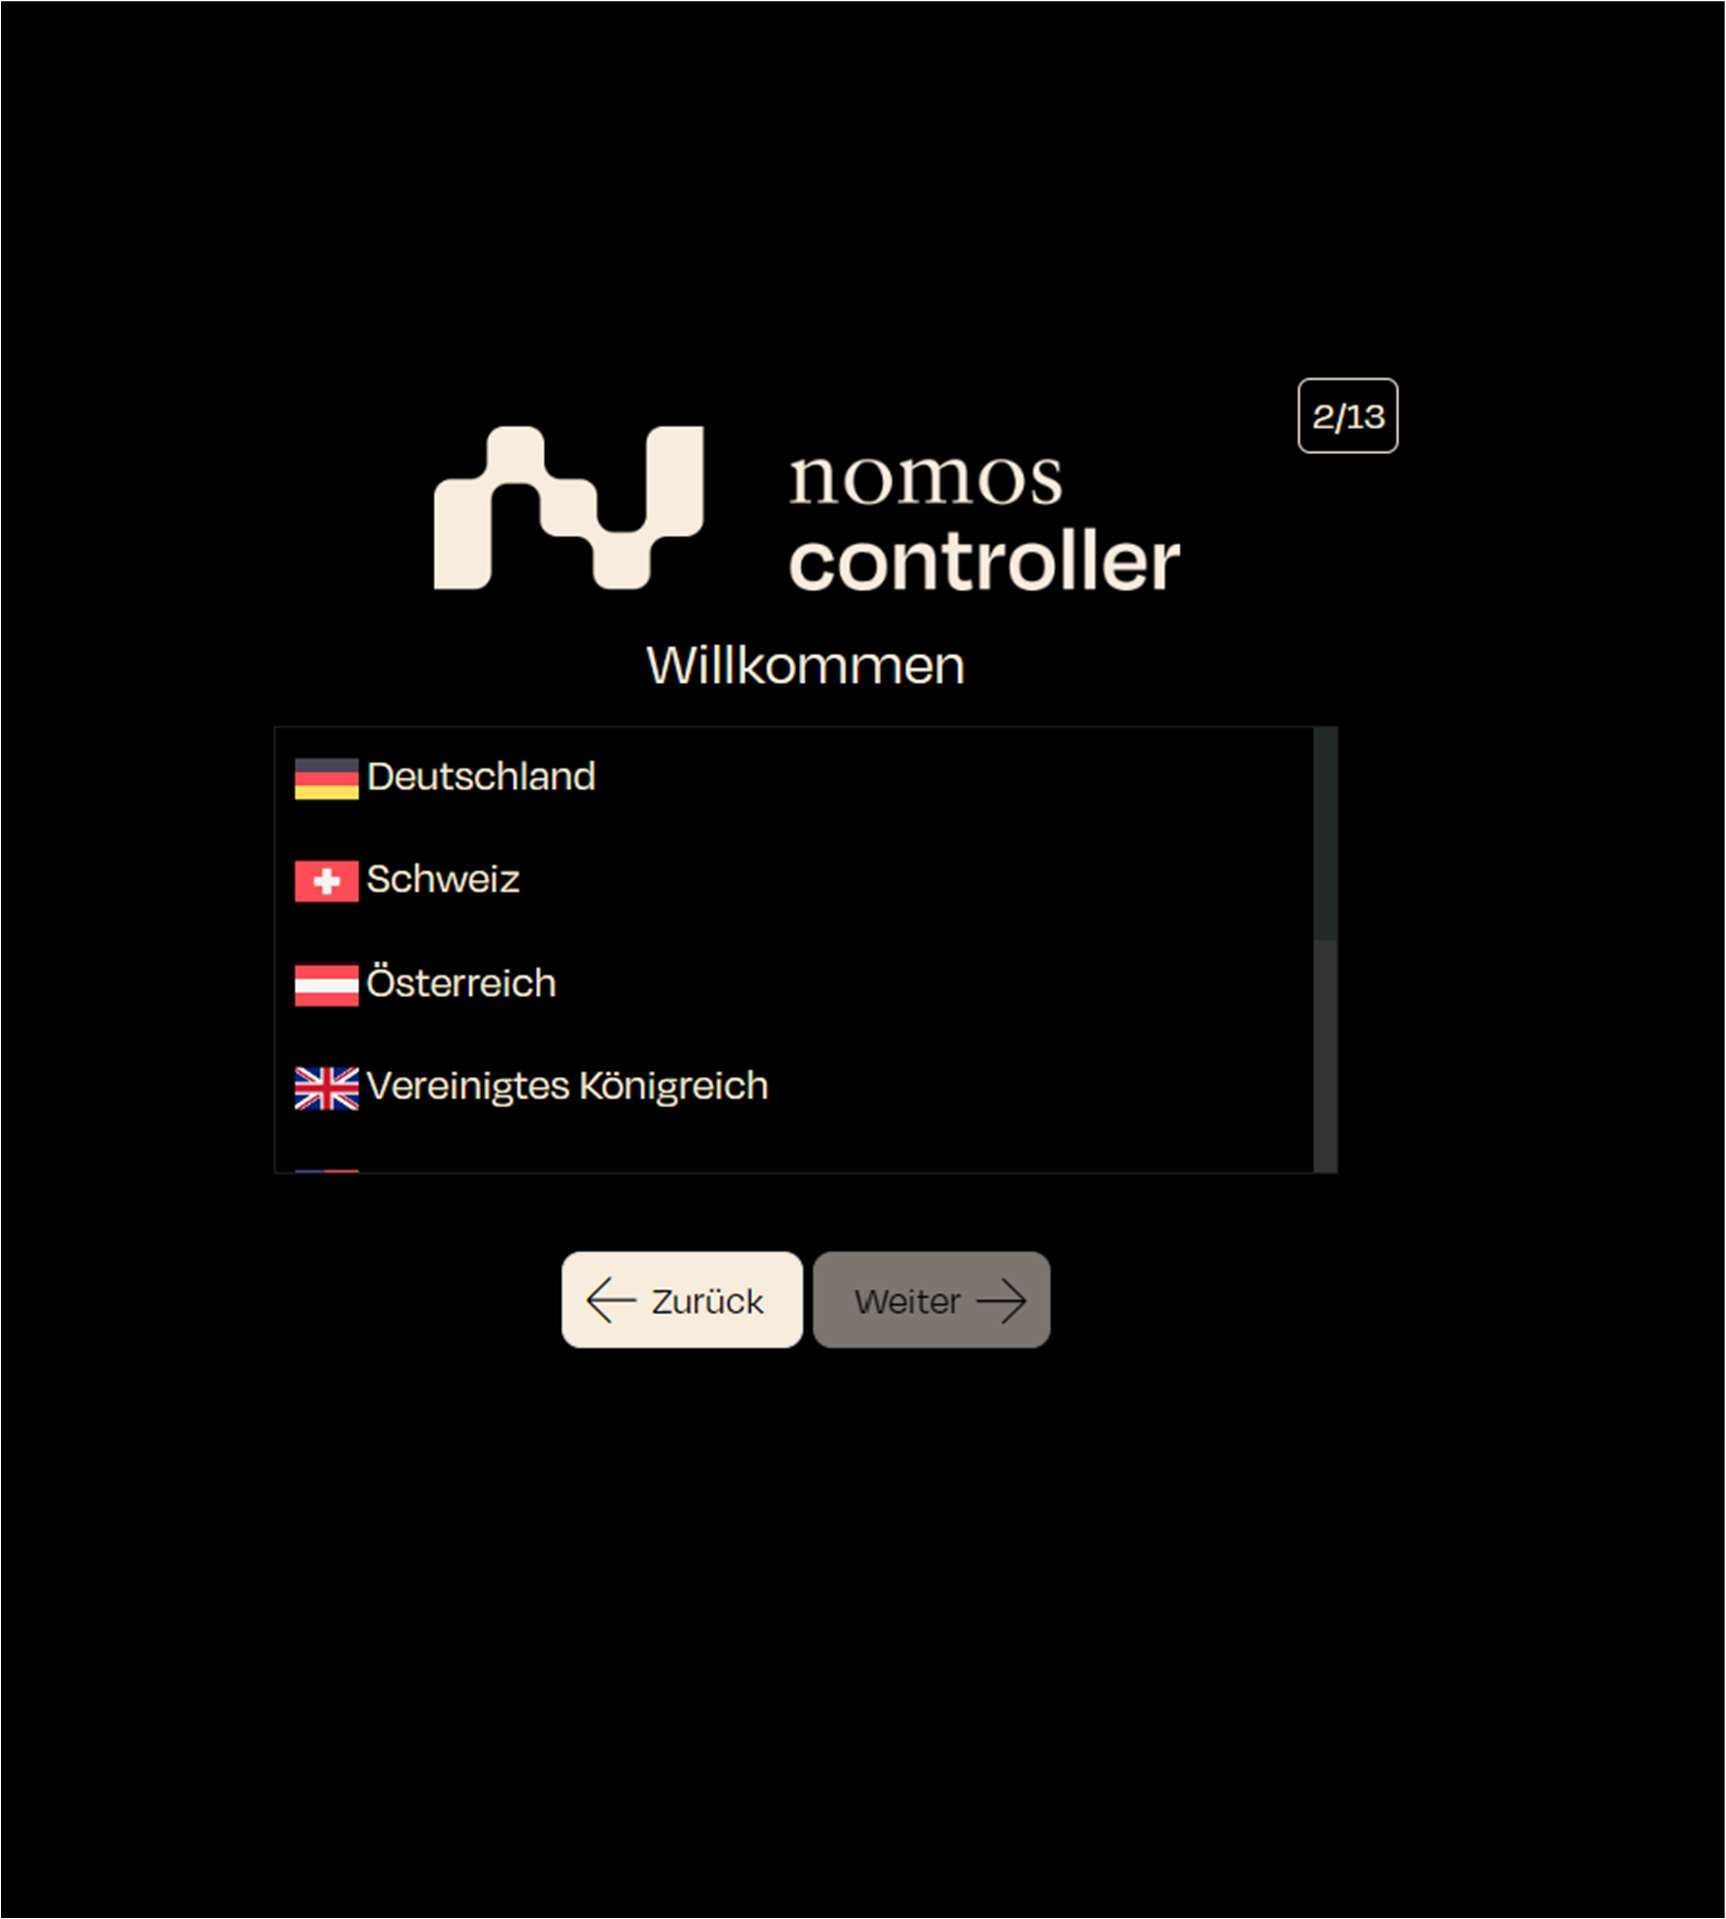
The name of the group address describes what the address is used for, e.g., “Light/Socket/Switch Devices” or “Button Input ON/OFF”.
Type:
Here, you can select the data type for the respective address. The system offers various KNX Data Point Types (DPT) that define the type of communication, for example:
DPT 1.001 Switch: For switching functions.
DPT 1.003 Enable: To activate/deactivate functions.
DPT 1.011 State: To display the status of a device.
RoS (Read on Start):
If this box is checked, the group address will be read at system startup to check the current status. This can be helpful to ensure that the system always knows the current status of devices.
Actions:
Delete Address: Here you can remove group addresses that are no longer needed by clicking "Delete Address."
Give the address a name that describes its function (e.g., “Living Room Light”).
Set Type:
Select the appropriate data type (DPT) for the group address. This determines what kind of data or commands will be sent or received through the address.
Reading on Startup (optional):
Check this option if the address should be read at system startup to capture the current status.
This feature is useful when it is important to know the state of a device at startup.
Save or Cancel:
Click on Save to add the group address to the system.
Integrating APIs and external services for advanced automations and scenarios.
Important Note:
The configuration and use of Node-RED should only be performed by trained integrators. In-depth expertise is required to configure the system correctly and safely.
Node-RED Interface
Here you see the main interface of Node-RED when a user accesses the area. Integrators can create various flows and automations here.
Features of the Node-RED Interface:
Left Column: A list of available functions and nomos components (such as motion sensors, temperature sensors, window contacts) that can be dragged and dropped into the flow.
Right Area: Information about the current flow and its configuration.
Central Workspace: The place where flows and automations are created and configured. Different blocks (nodes) can be connected here to create automated processes.
Note:
Important Note: This tool is intended solely for integrators who have experience with automation and programming processes. Careless use can lead to malfunctions.
In this step, you define the location of the controller.
Screen Display: A map is displayed, and the user can define the location using latitude and longitude coordinates.
Example Values:
Latitude: 51
In this step, the user is given the opportunity to assign a unique name to the controller.
Screen display: A text field appears where the user can enter a name for the nomos Controller.
Step: Enter a name for the controller that you would like to use.
Next step: Click on "Next" to confirm the name and proceed to the next step.
Logging into the nomos Controller
Username: Enter the username you created during setup or that was assigned to you.
Password: Enter the corresponding password for the username.
Stay Logged In: If this option is enabled, you will remain logged in even after closing the browser or session.
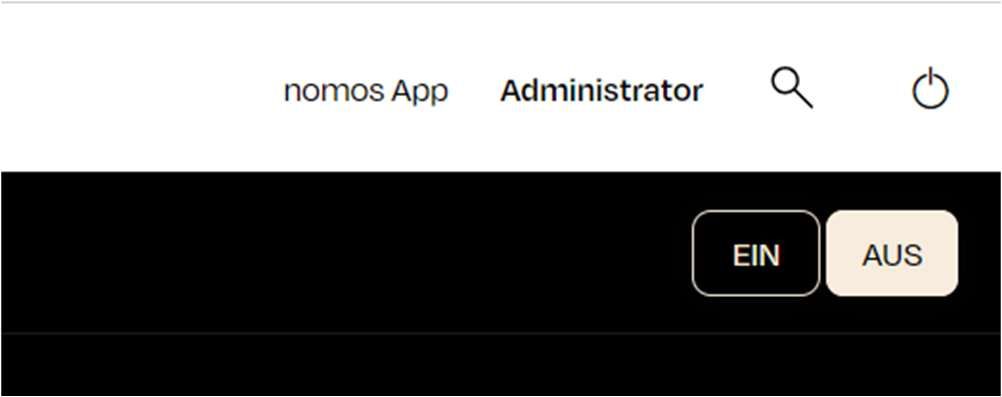
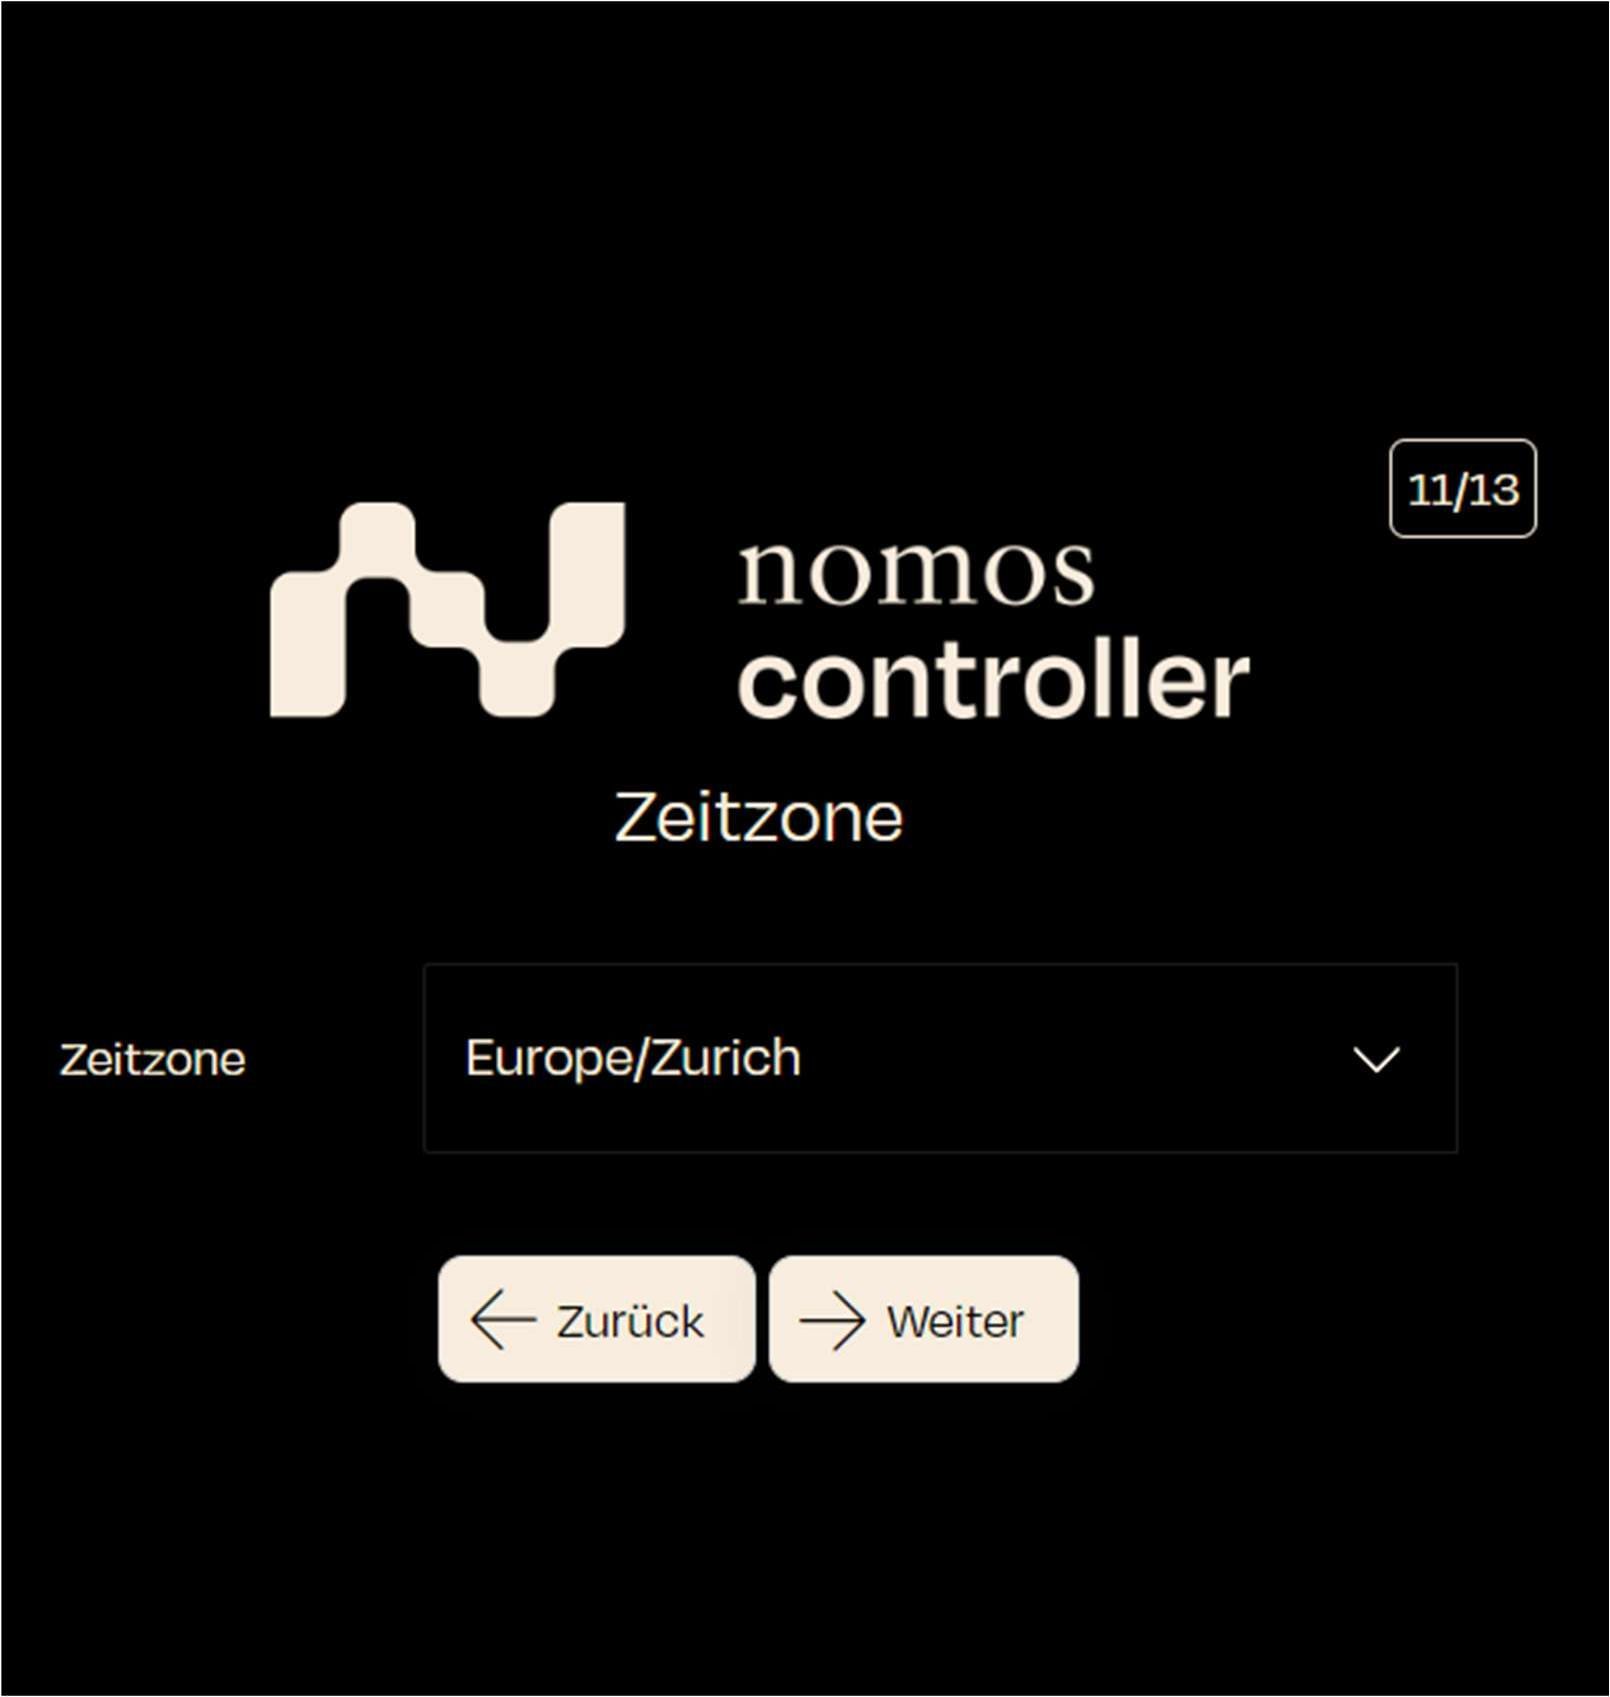
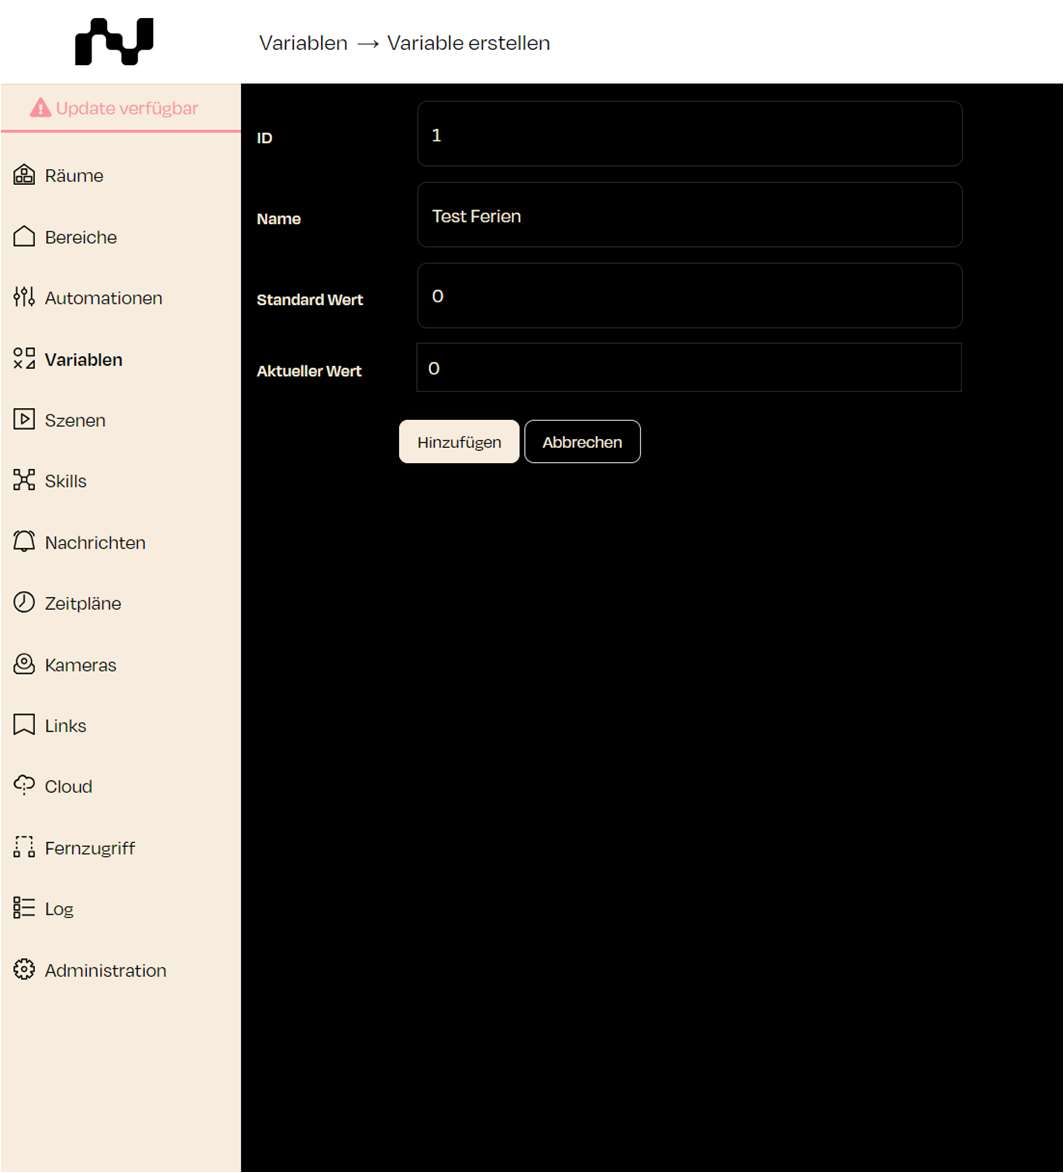

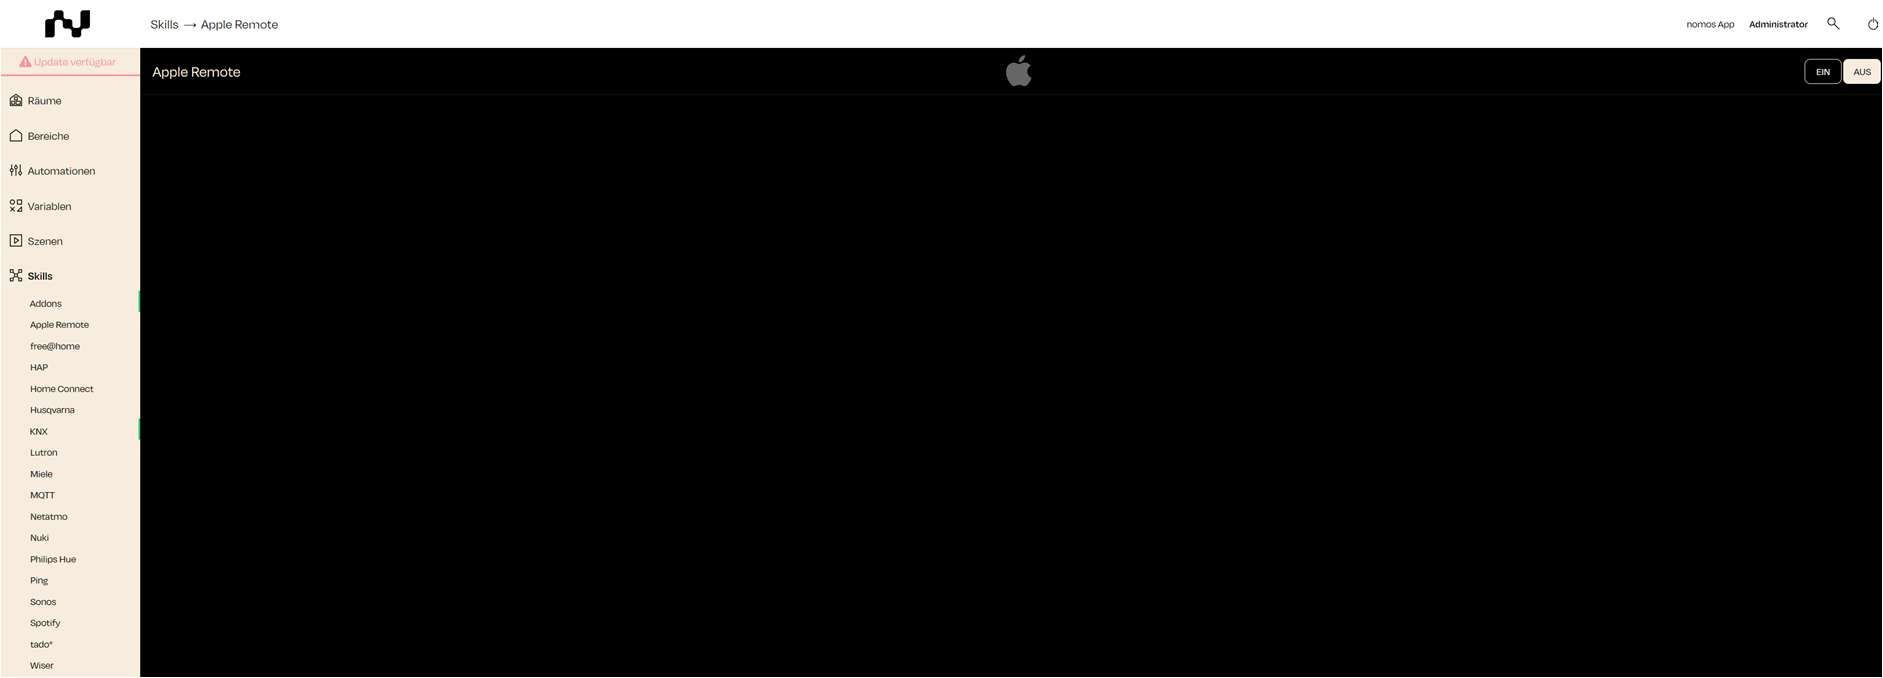
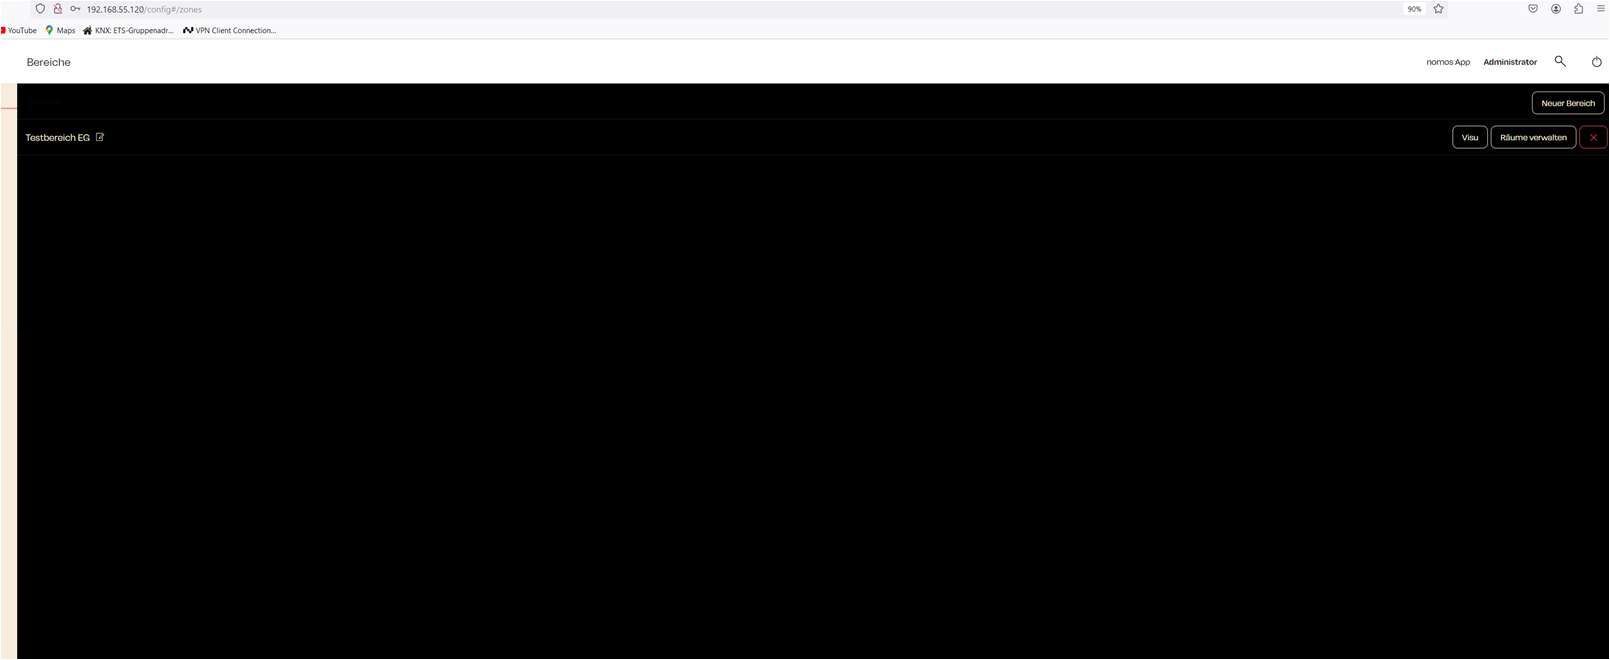
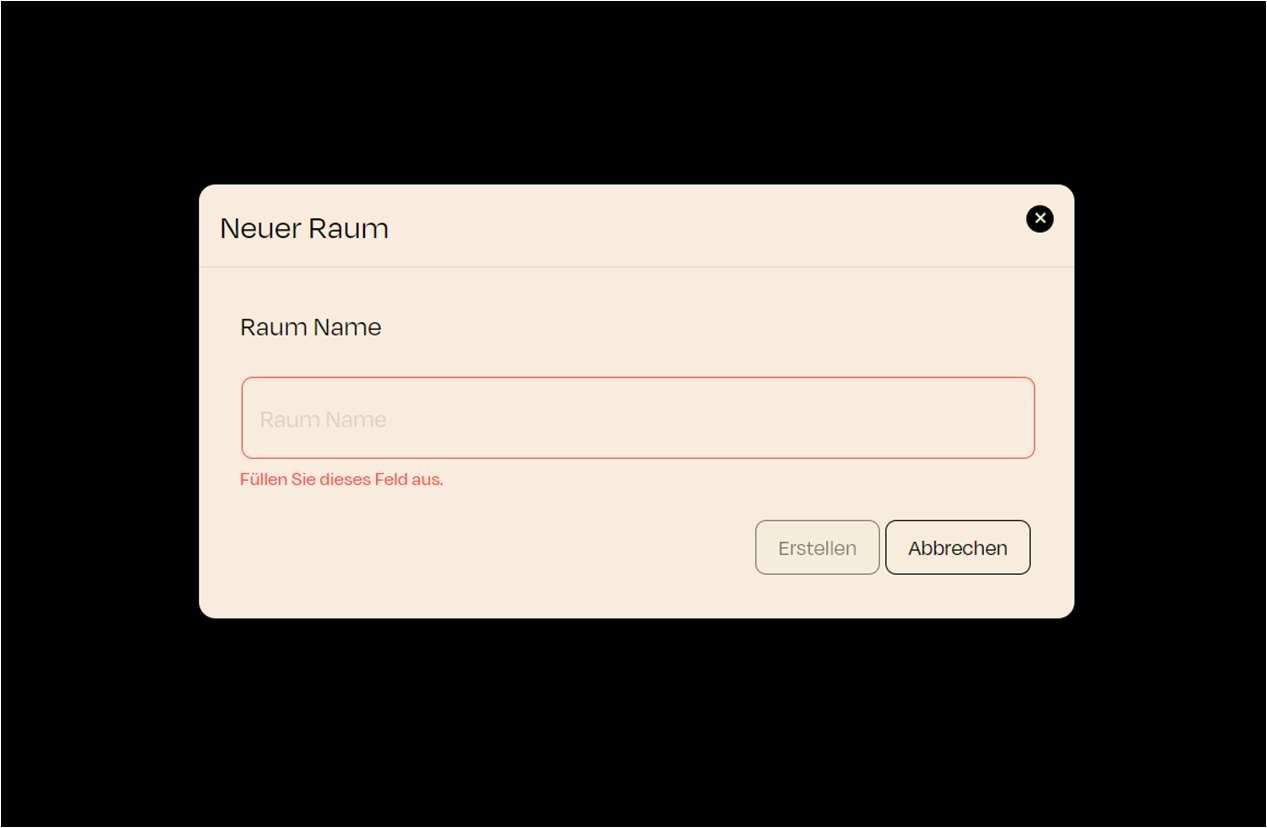
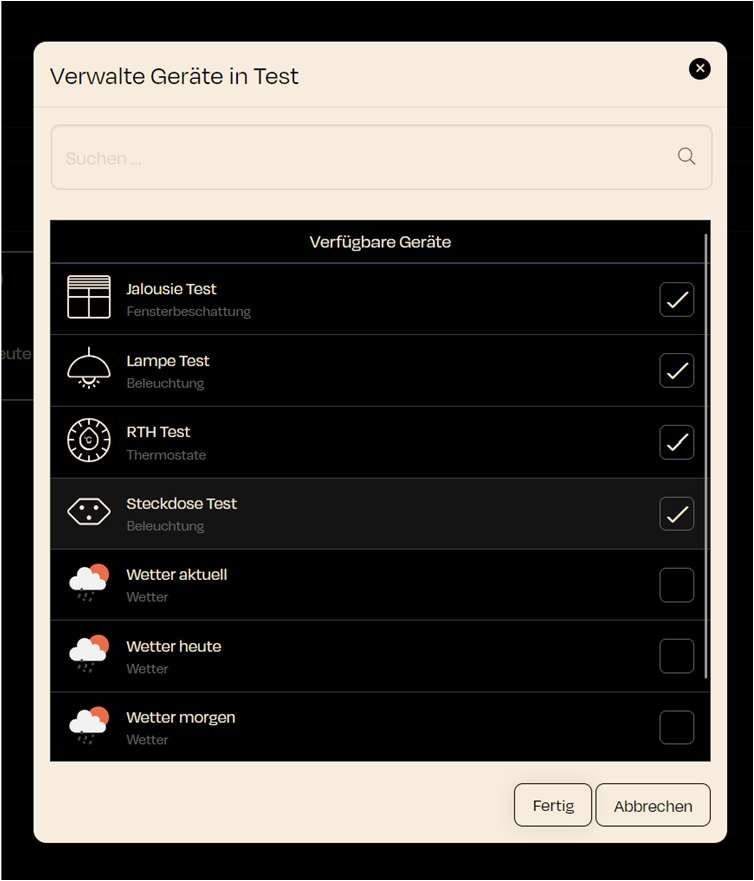
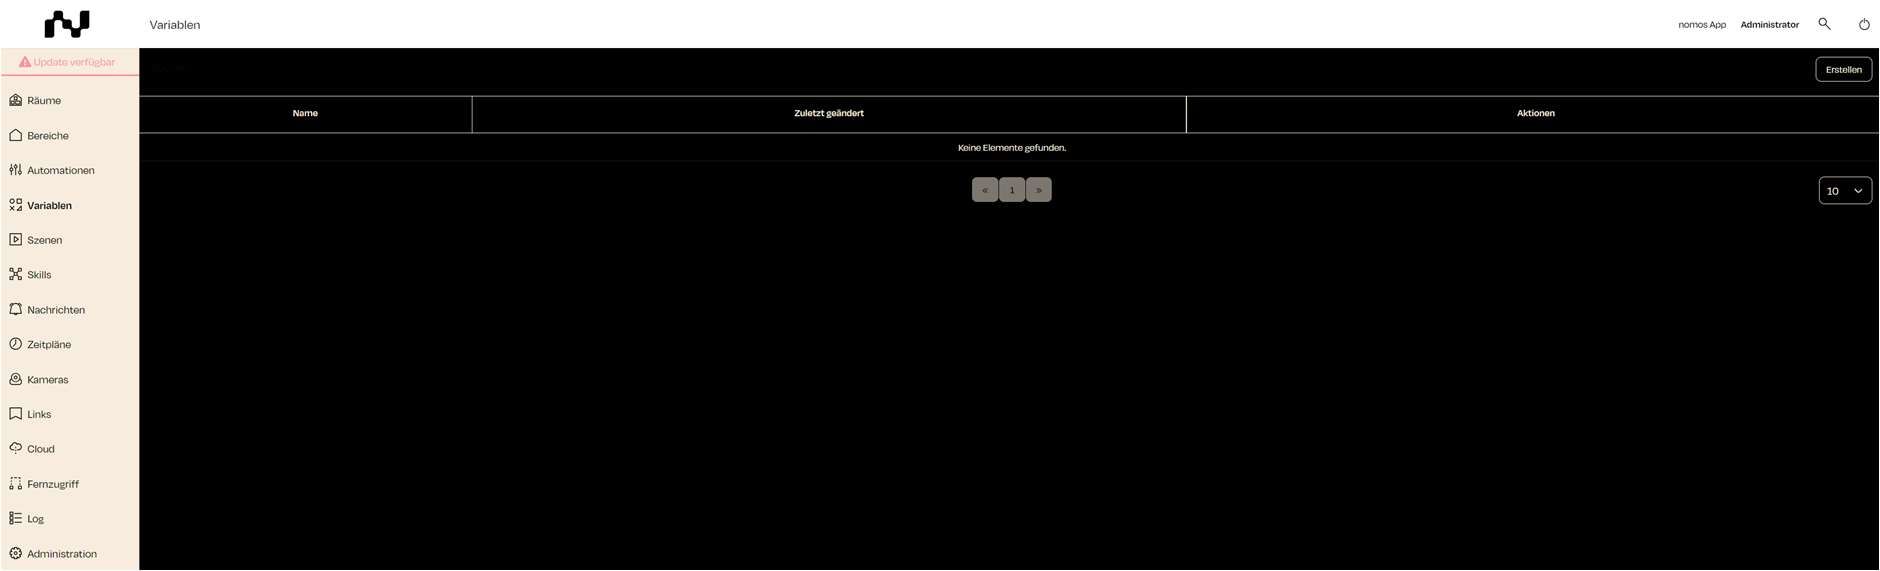
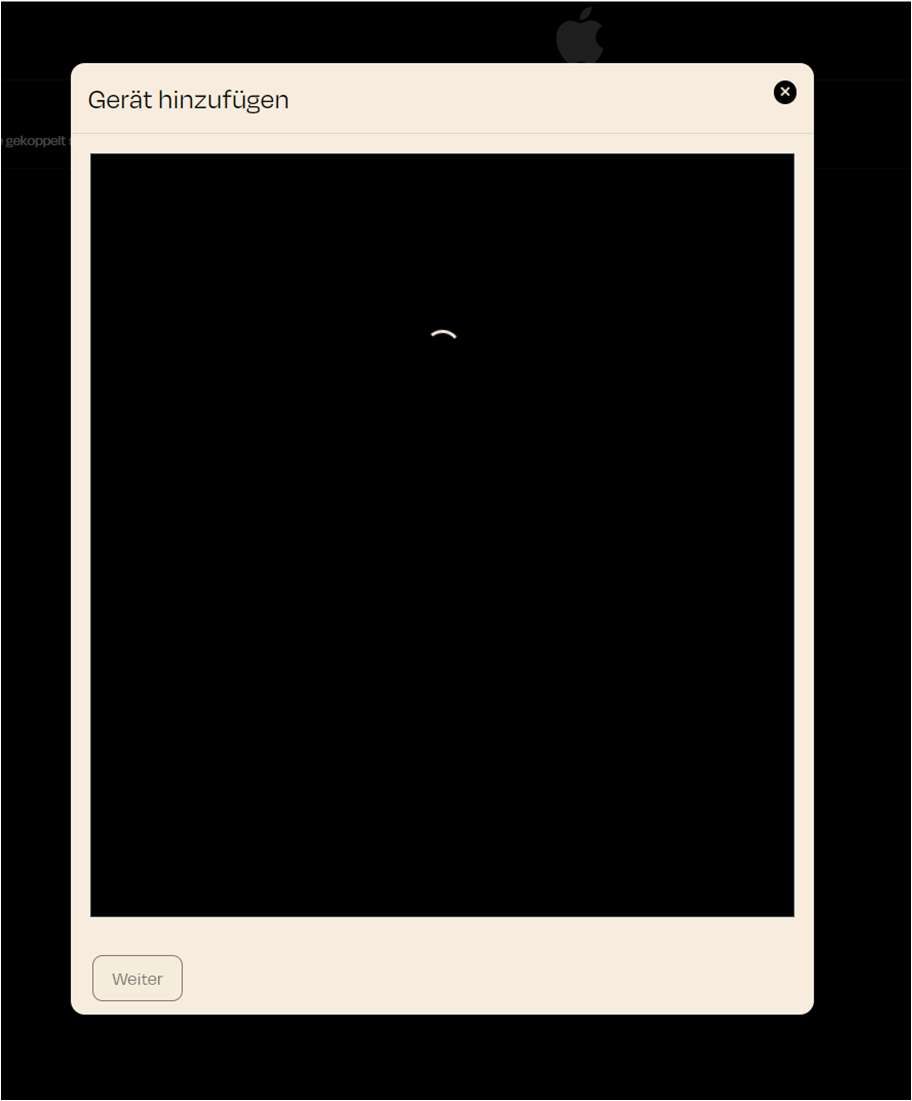
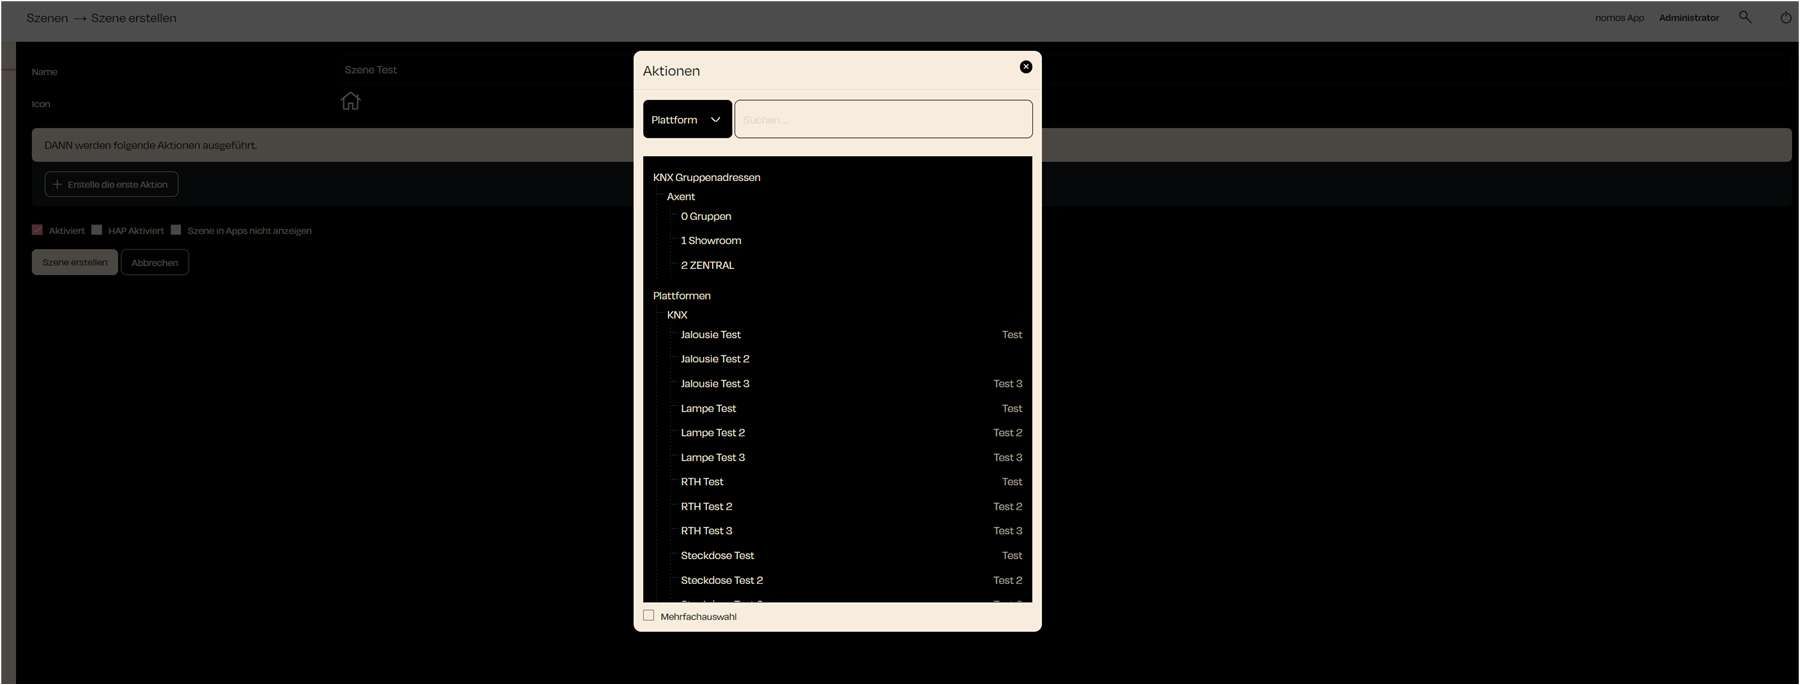
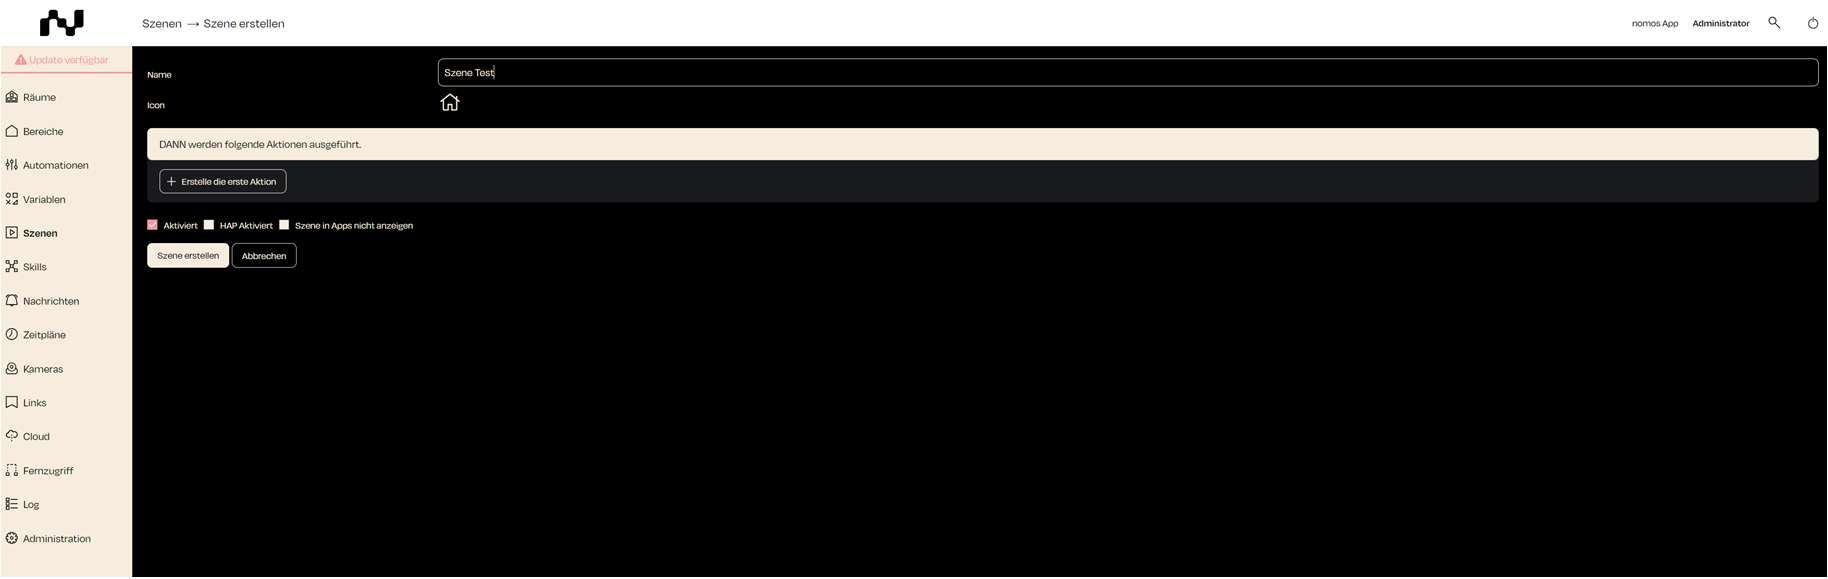
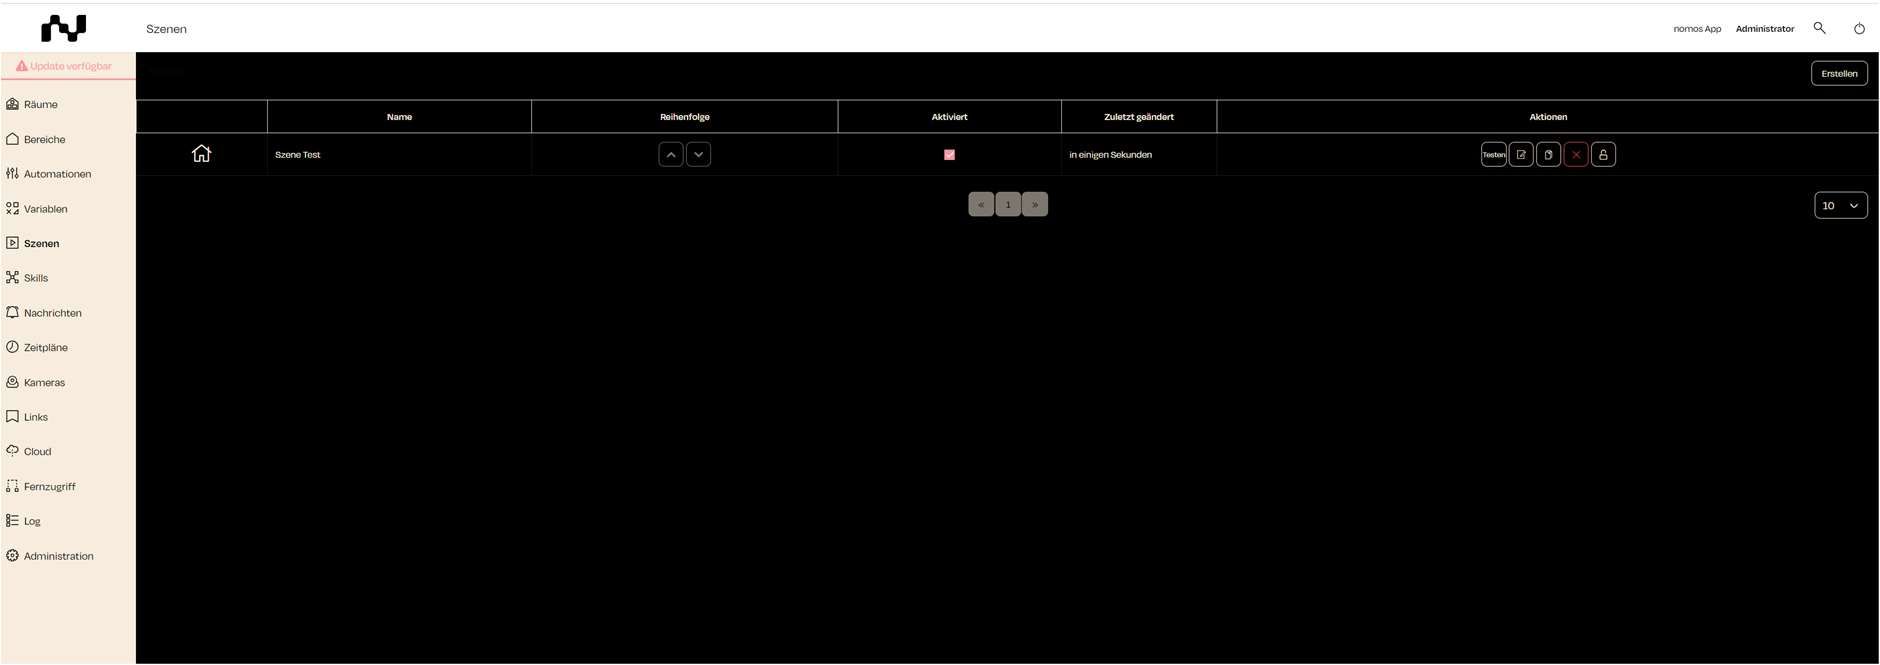

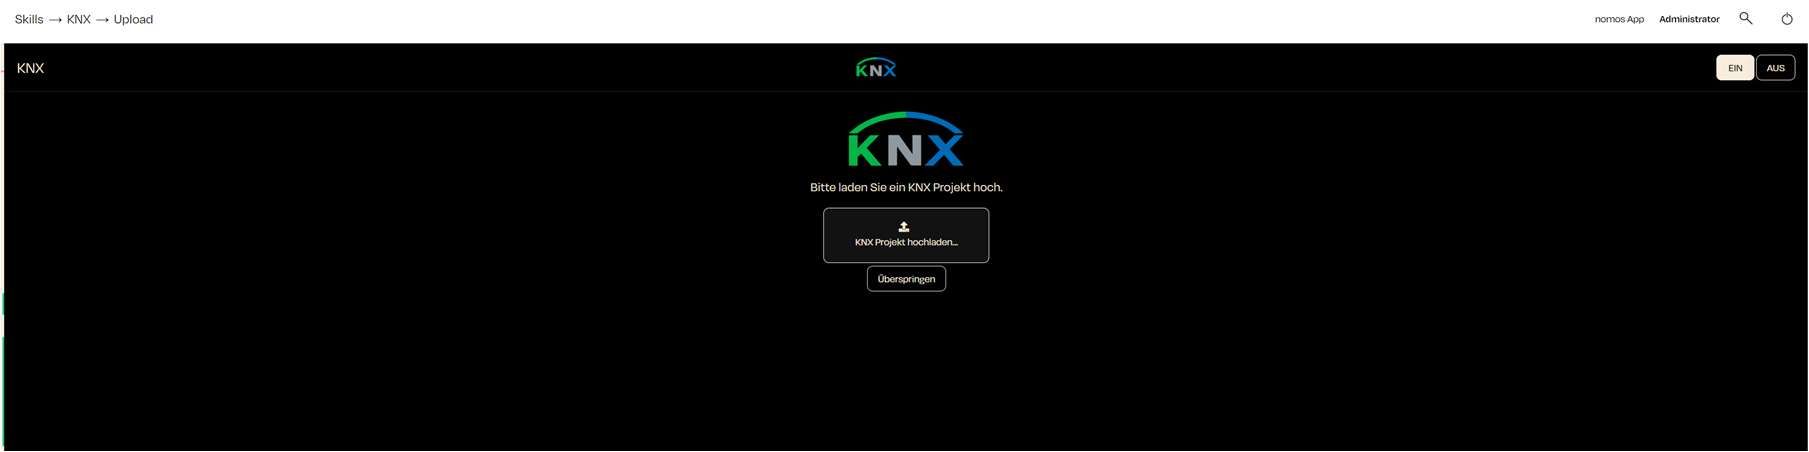


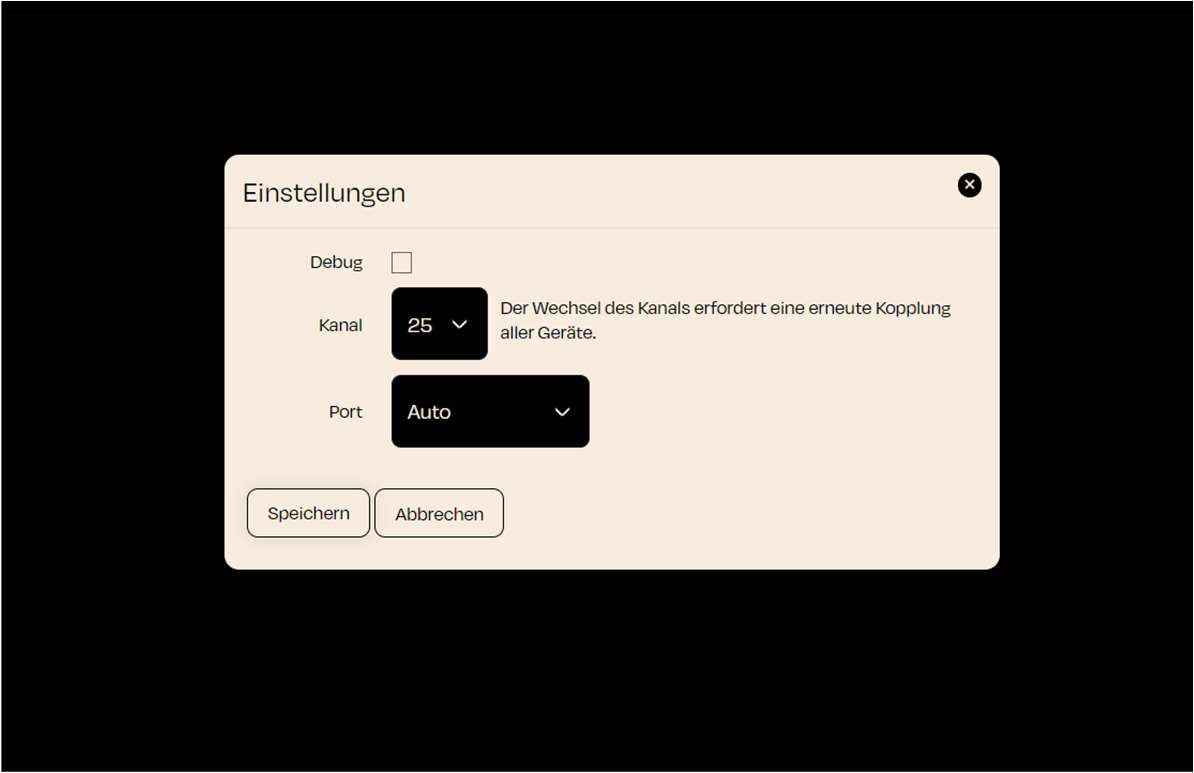
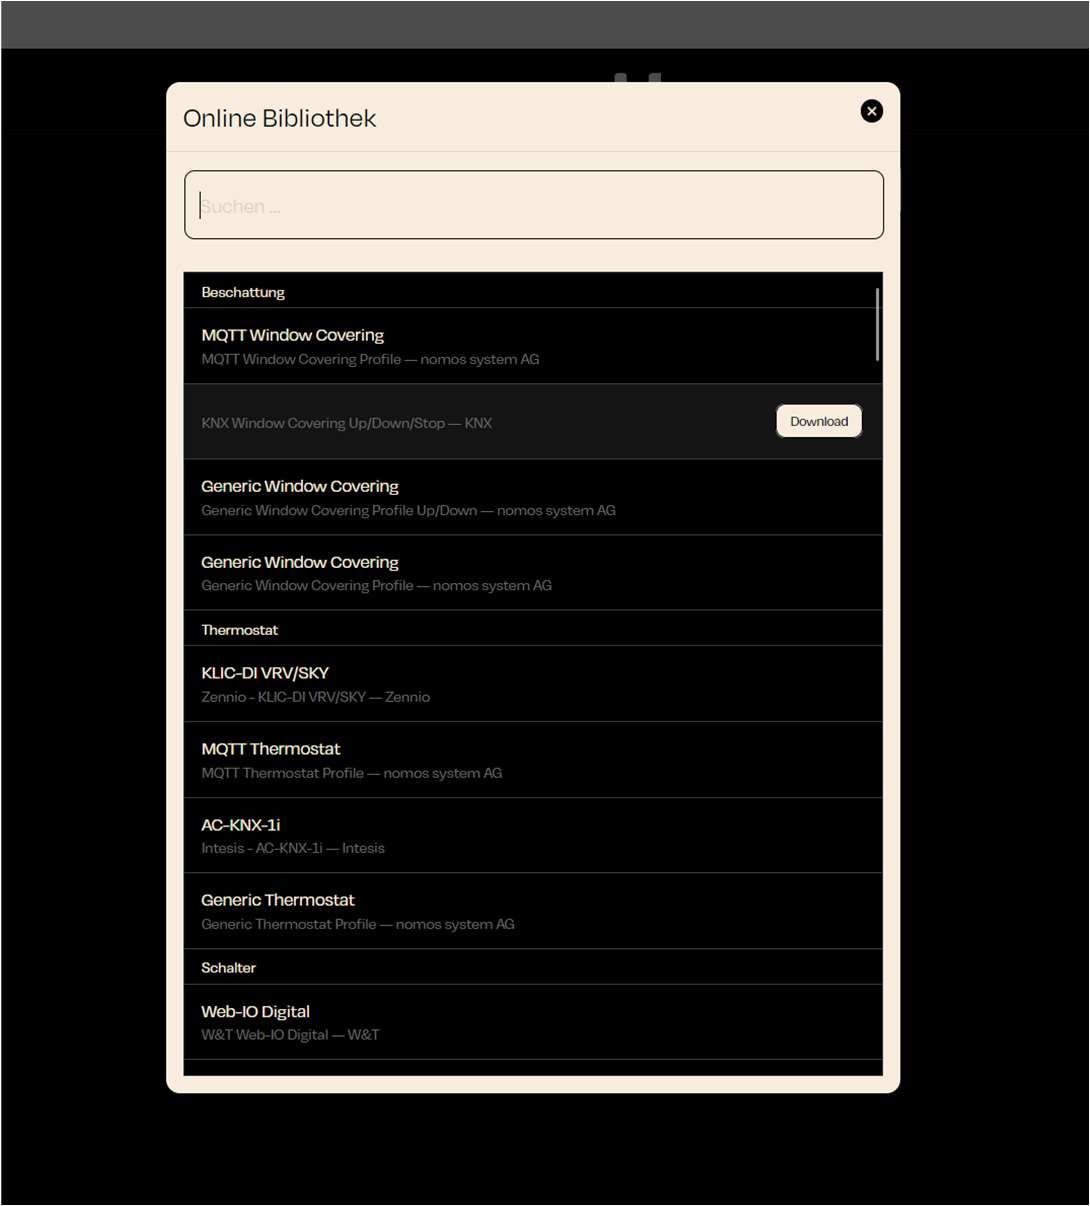
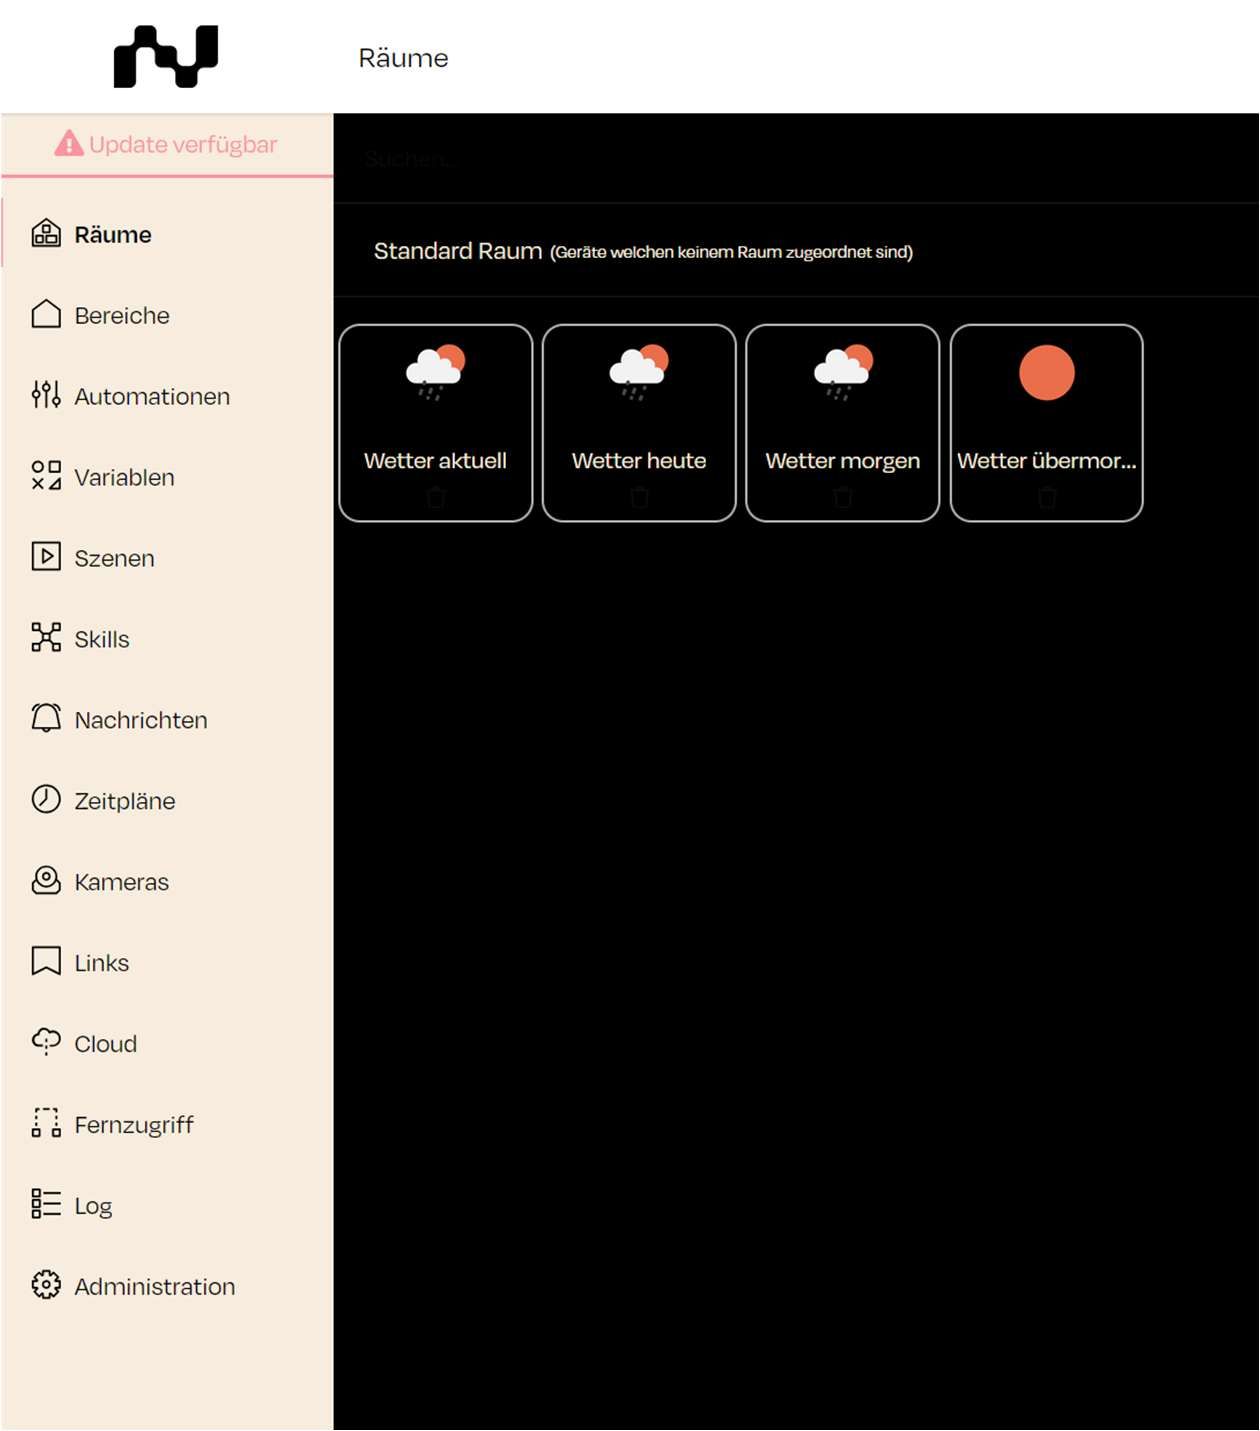
Longitude: 9
Step: Determine the controller's location either manually or using the map display. Adjust the latitude and longitude as needed.
Next Step: Click "Next" to confirm the settings and proceed.
The location information helps the nomos Controller to determine geo-data related to your project/object, such as calculating precise sunrise and sunset times for certain control elements.
Static IP: If you have assigned a new or static IP address to the controller, it is essential to reload the browser using this new IP address.
nomos App: Use this button to log in directly to the app view.
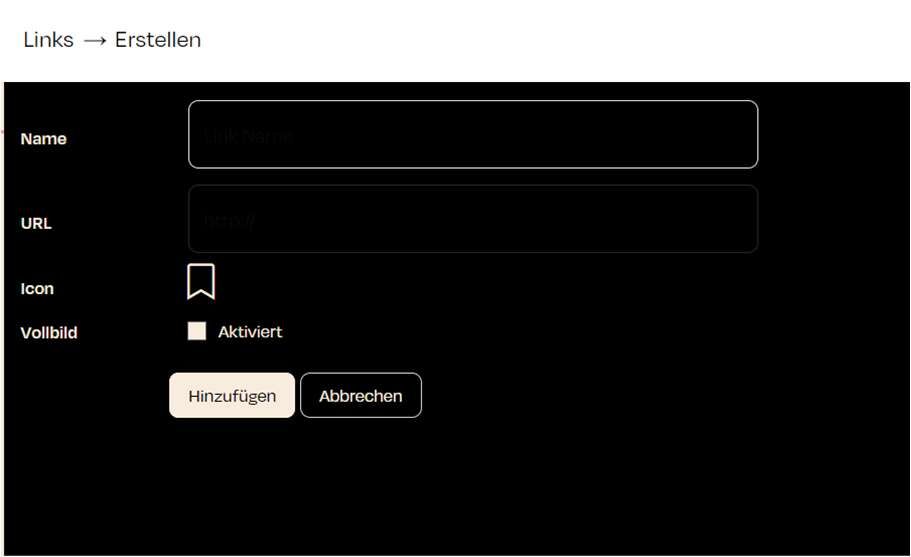
Use the Add Device button to integrate KNX devices into the nomos Controller.
Steps to Create a New KNX Device:
Add Device:
Click on the Add Device button. A window will open for setting up the device.
Name of the Device:
Enter the desired name for the device, for example, "Licht Test".
Select Room:
Choose the room where the device is located. In this example, it is the "Test" room.
Select Device Type:
Click on the drop-down menu labeled Type to select the device type.
Various device categories are available:
Lighting: Dimmer, Light, RGB
Enter Group Addresses:
After selecting the device type, the columns for the group addresses available for this device will appear.
In the individual fields, you can now add your desired group addresses.
It is not necessary to fill in all states or values for the desired device to appear in the app/Visio. You can also enter only individual group addresses (e.g., ON/OFF), and only this function will be available in the app/Visio.
Final Steps:
After filling in all the fields, click on Create Device. The device will then be integrated into your nomos Controller.
Functions:
Left and right windows: wo file directories used for managing and editing project and configuration files.
Directories:
Config: Contains configuration files that determine how the system behaves.
Projects: This is where projects are stored that have been developed for specific automation tasks.
File Management: Users can perform basic file management functions like copying, deleting, or editing using the bottom keys (F1 to F9).
Note:
Important Note: The project editor is intended only for integrators who are familiar with file and project management in the nomos system environment. It is not suitable for novices, as incorrect changes can lead to disturbances in the system.

Here you can see how to manage mobile devices in the nomos app and set them up for push notifications.
Setting Up Push Notifications on Mobile Devices
Download iOS App: Click on the “Download iOS App” button to install the app from the Apple App Store.
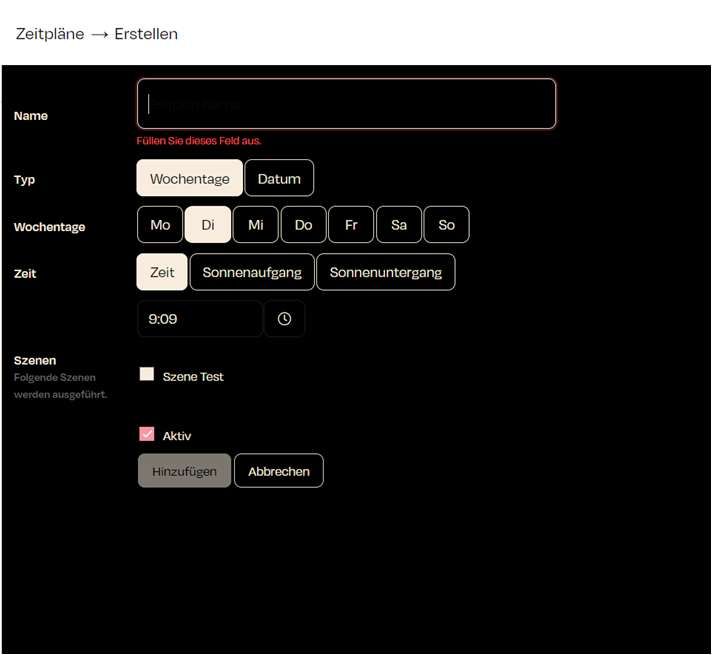
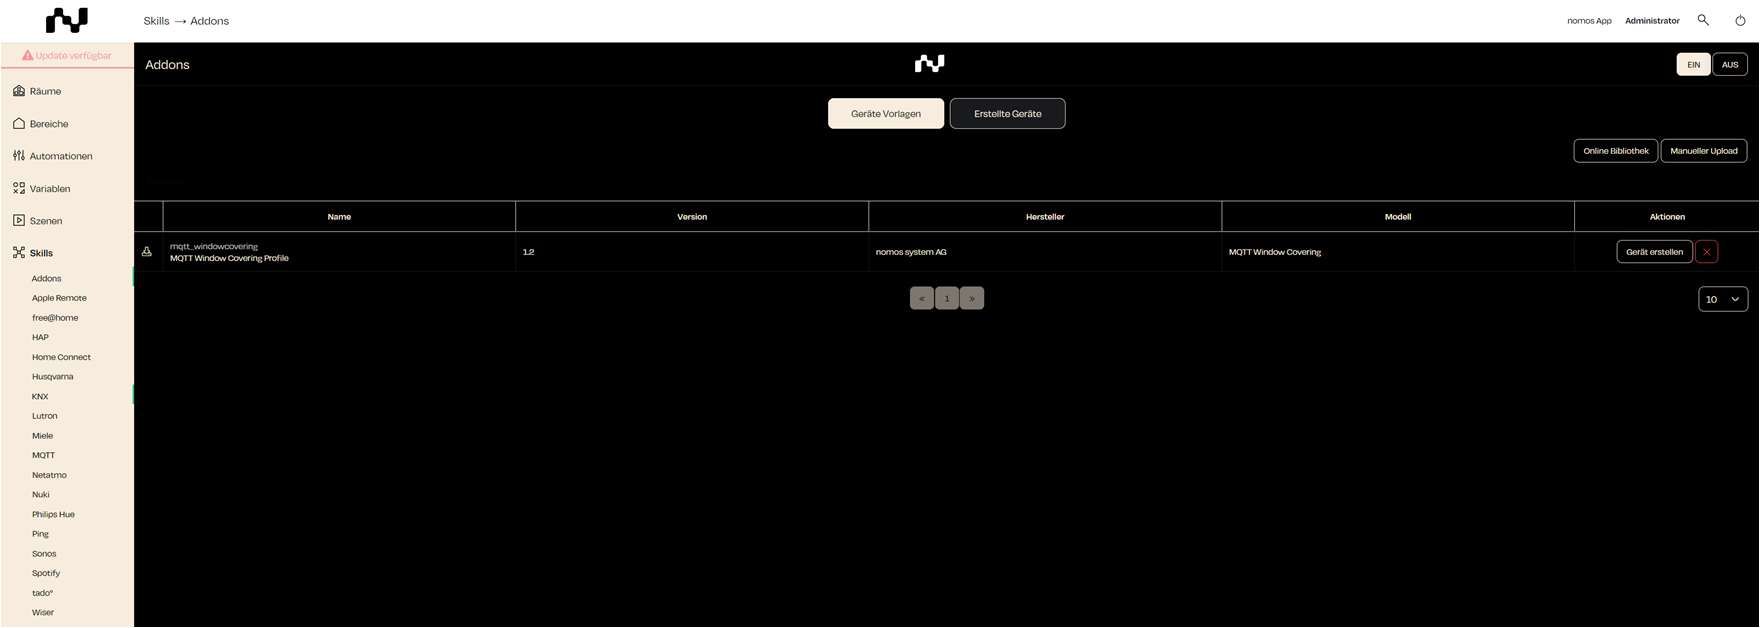


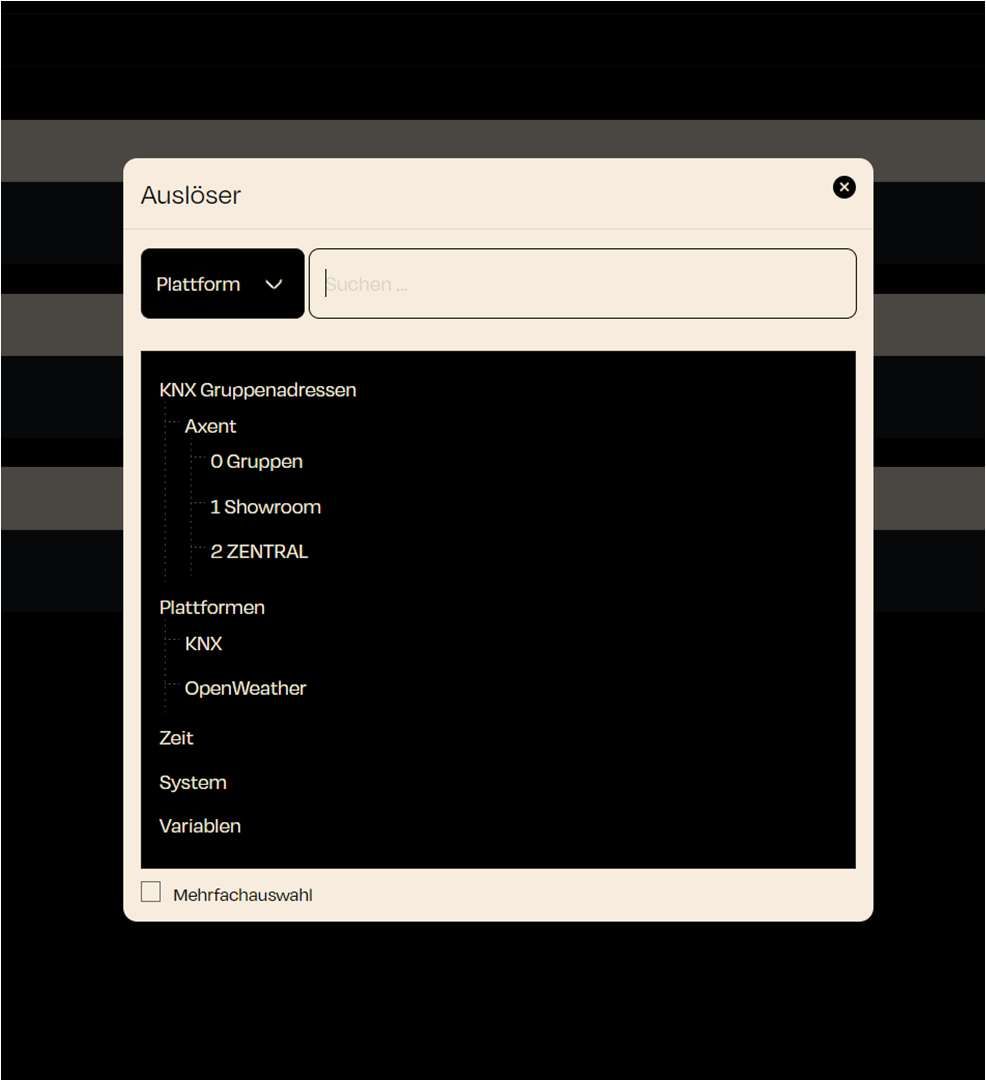
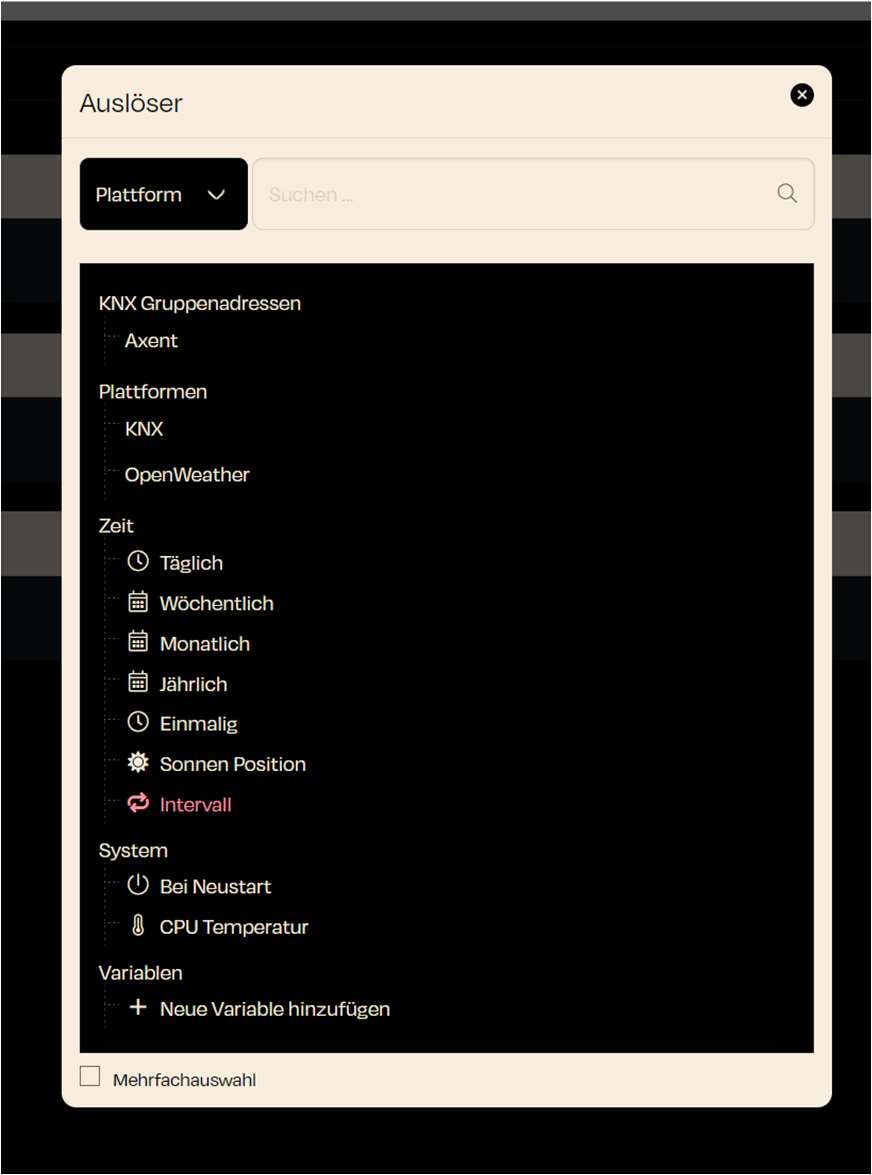


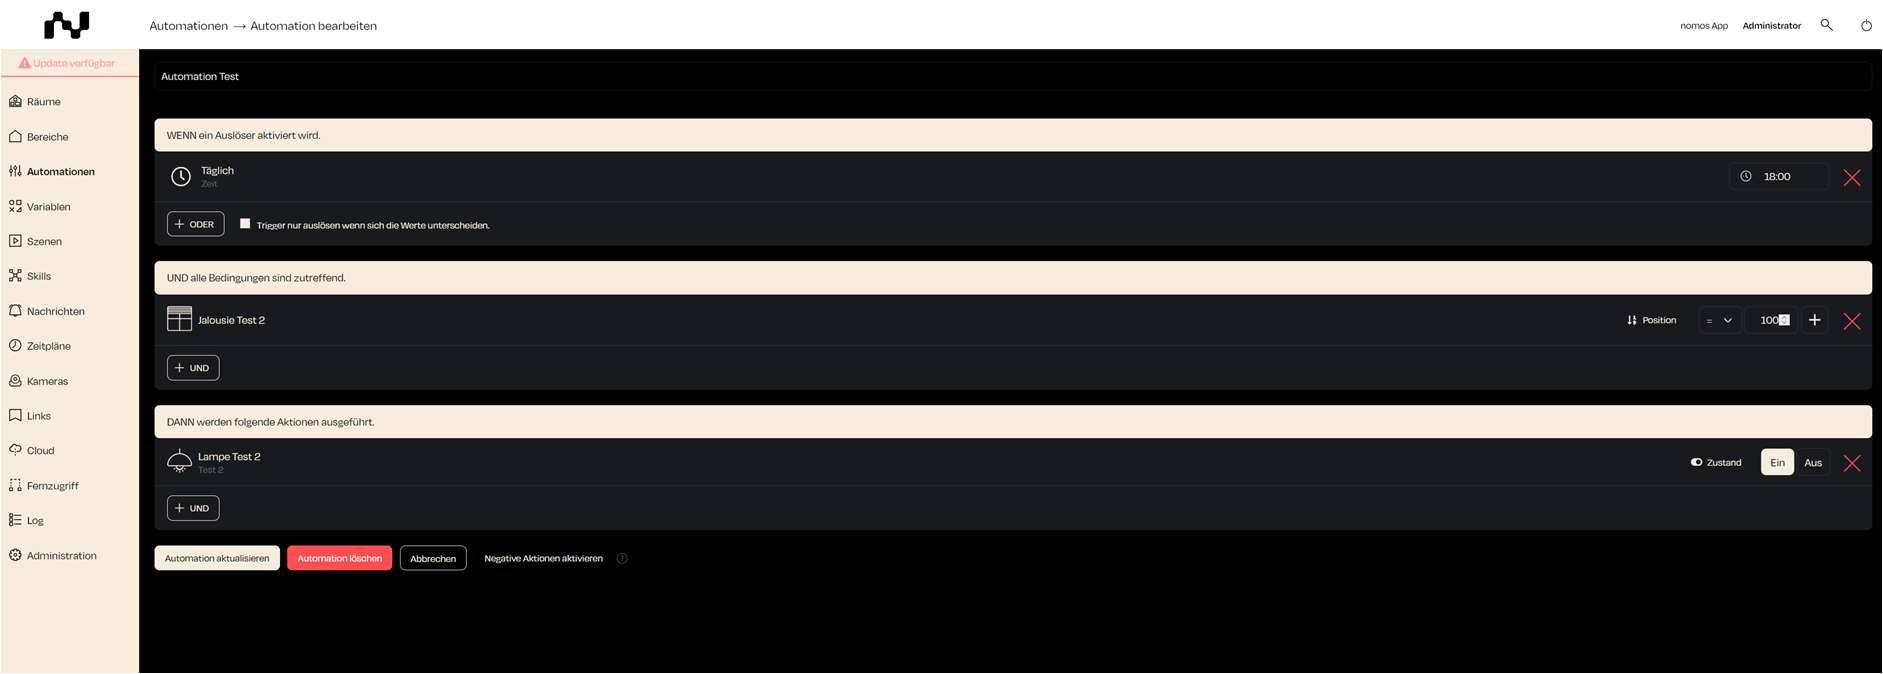
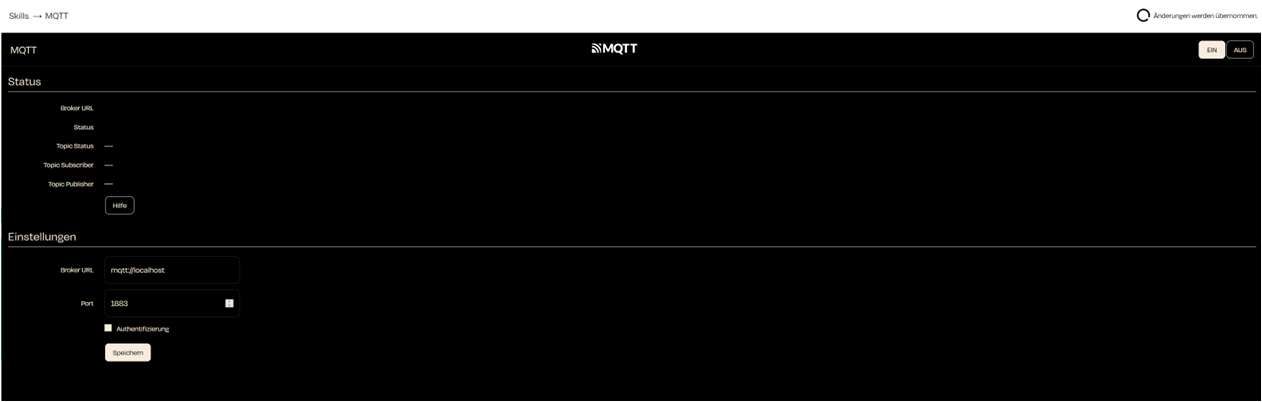
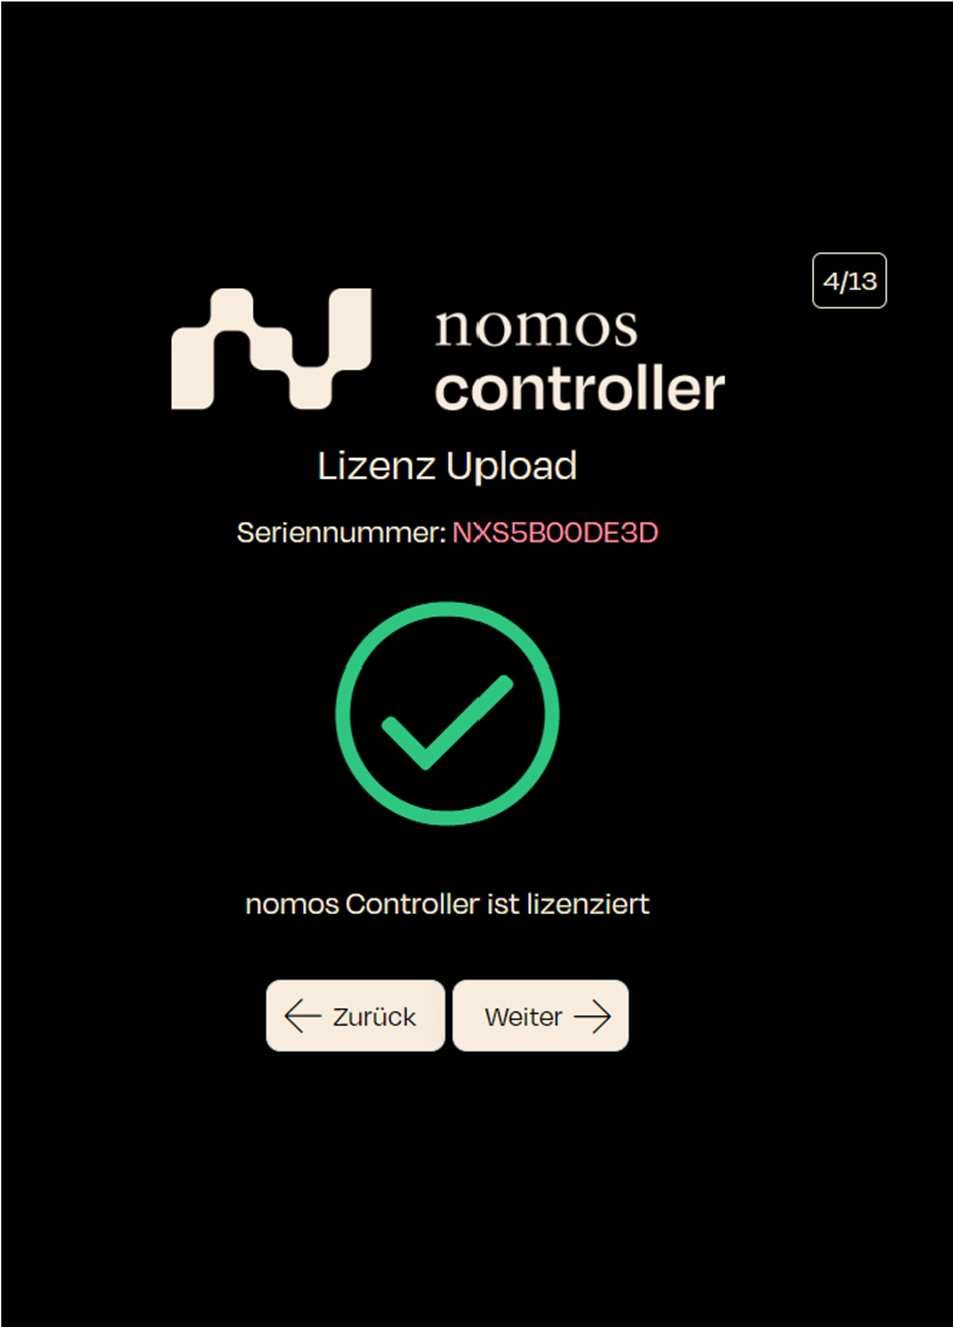


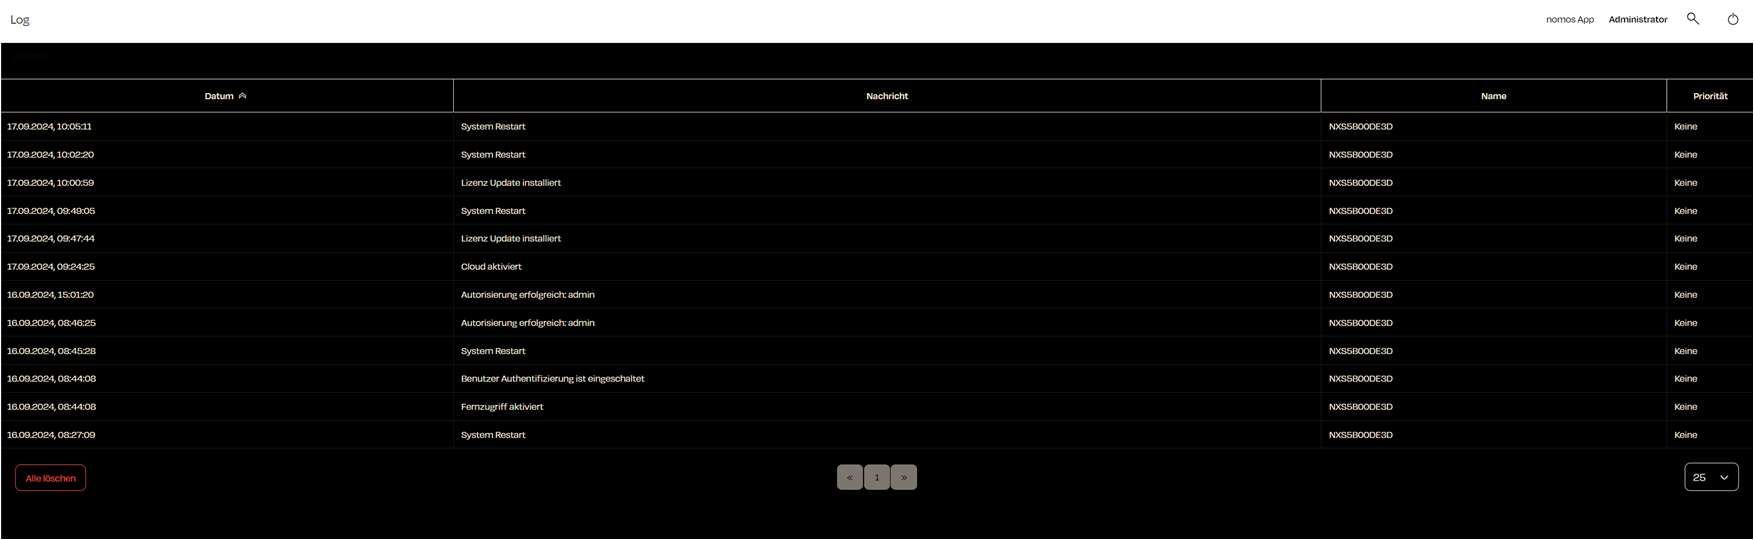
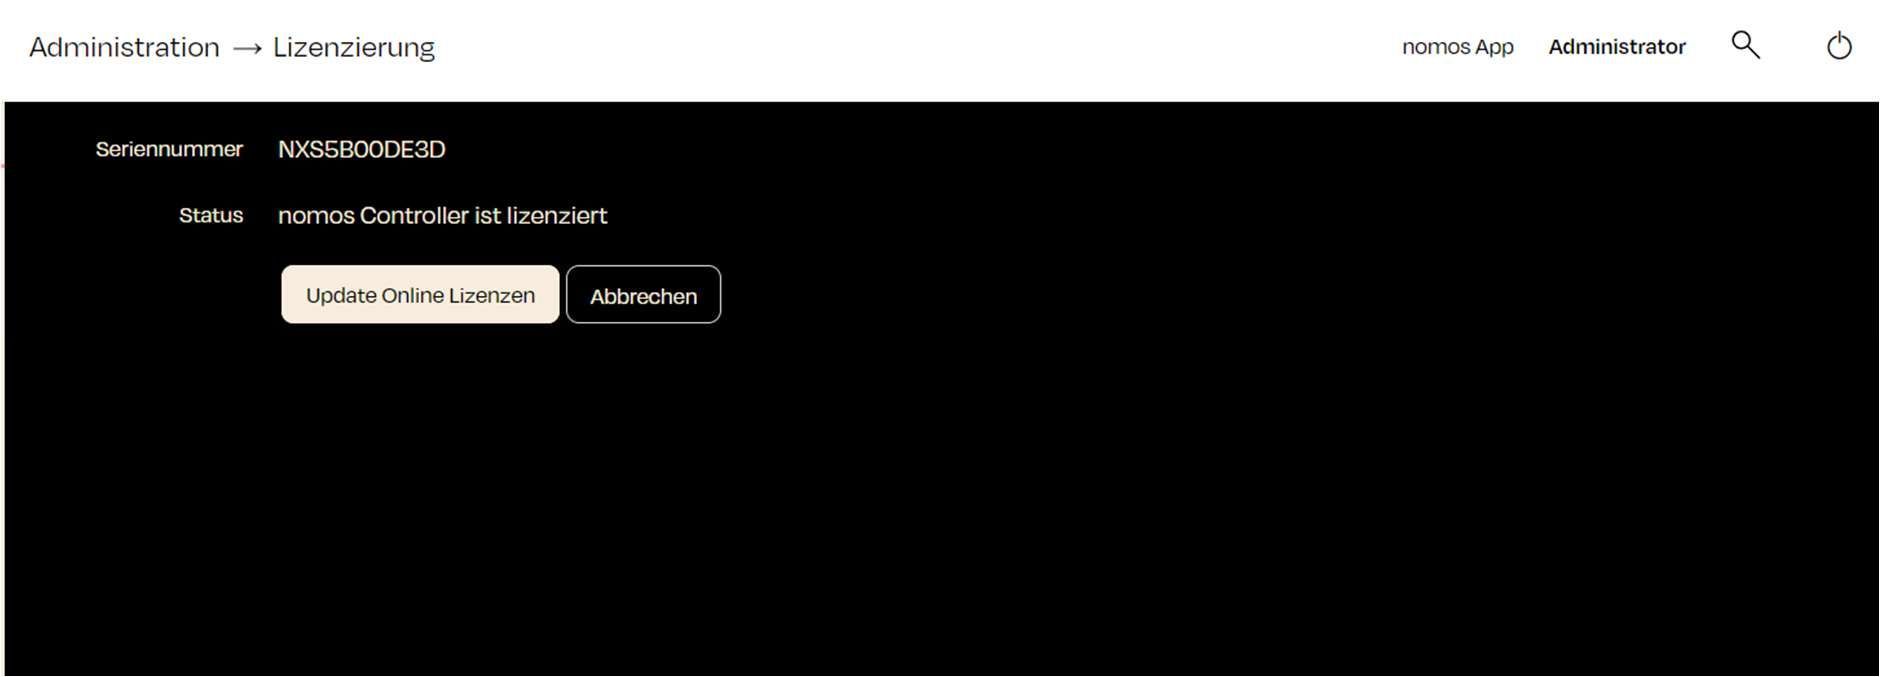
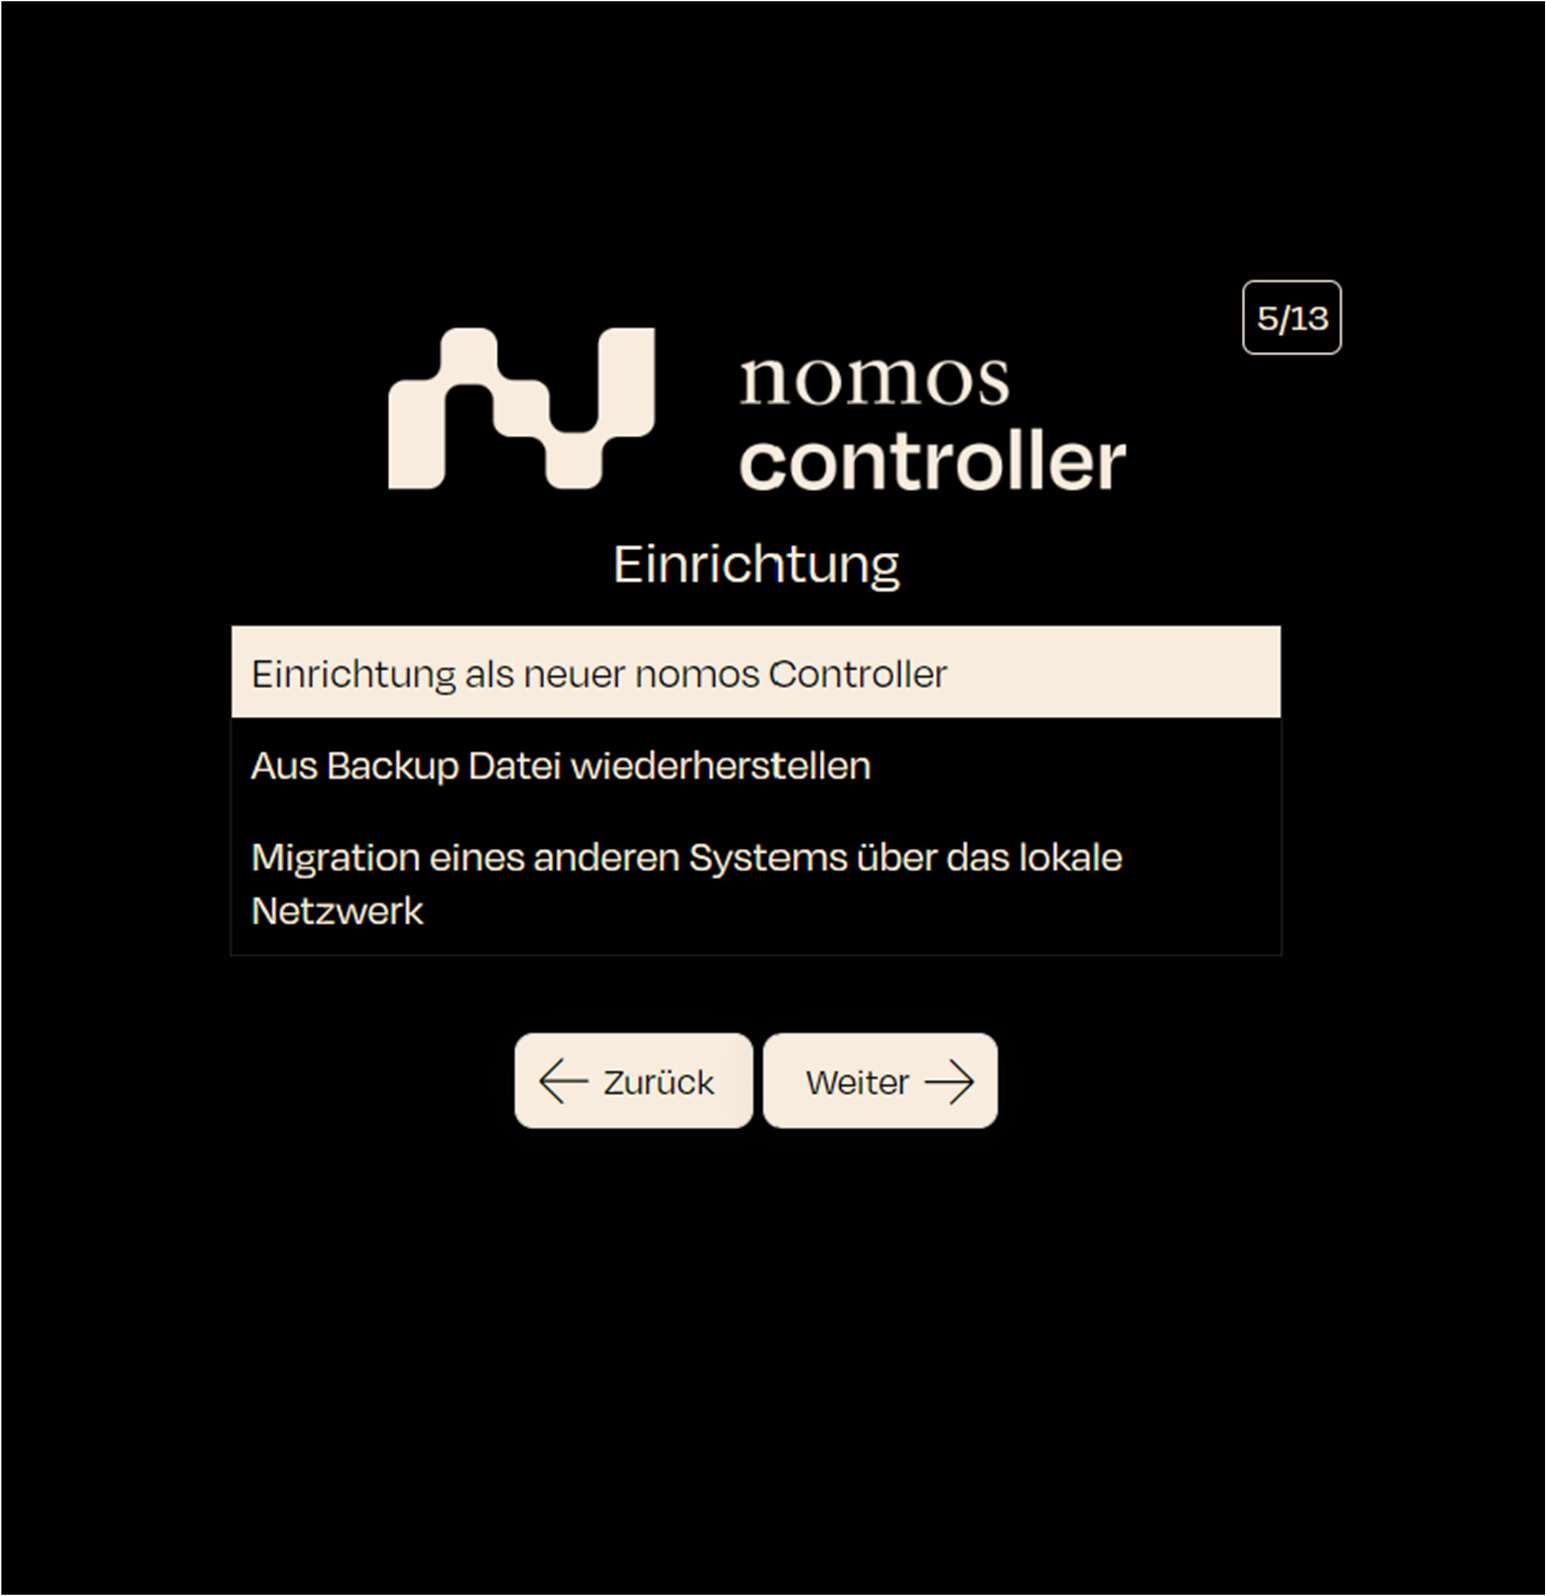
Ventilation: Fan, Fan with Speed Control
Window Shading: Shading, Shading without Position, Shading without Angle
Heating & Cooling: Heating, Heating (Setpoint Offset), Air Conditioner, Thermostat Variant TA
Switches: Trigger, Switch, Scene
Sensors: Alarm, Motion, CO2, Brightness, Contact, Temperature, etc.
Sun Protection: Sun Protection
Doors: Garage Door
Note that the correct data types for the desired group addresses must be set in the ETS. If they have an incorrect DPT rate, it will be transferred to your nomos Controller, and the function of this group address may not work correctly.
Once the app is installed, you can start receiving push notifications..
List of Connected Devices In the table, you will see an overview of the mobile devices that are already connected and can receive push notifications.
Device Name: The name of the mobile device (e.g., iPhone, Android).
Platform: Indicates the platform of the device (e.g., iOS, Android).
Last seen: Shows when the device was last connected to the system.
Actions For each connected device, there are two actions available:
Test: Click on “Test” to send a test message to the connected device.
Delete: Removes the device from the list of connected devices. It will no longer receive push notifications.