> For the complete documentation index, see [llms.txt](https://documentation.nomos-system.com/nomos-system/llms.txt). Markdown versions of documentation pages are available by appending `.md` to page URLs; this page is available as [Markdown](https://documentation.nomos-system.com/nomos-system/integrator-nl/skills/knx/knx-apparaat-toevoegen.md).
# KNX-apparaat toevoegen
Via de knop "**Apparaat toevoegen**" kunnen **KNX-apparaten** in de **nomos controller** geïntegreerd worden.
**Stappen voor het aanmaken van een nieuw KNX-apparaat:**
1. **Apparaat toevoegen:**
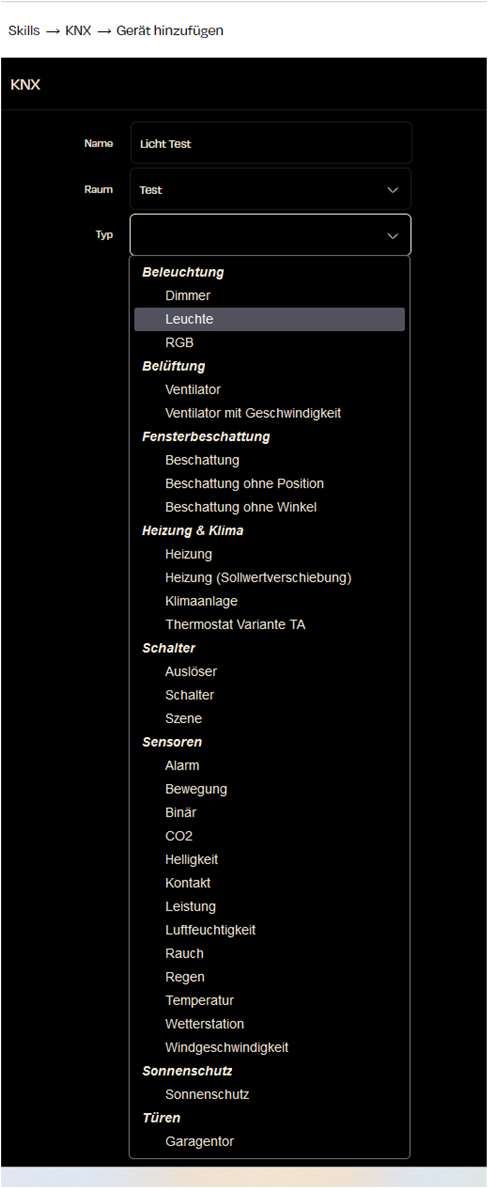
* Klik op de knop "**Apparaat toevoegen**". Er opent een venster voor de instelling van de apparaten.
2. **Naam van het apparaat:**
* Vul de gewenste **naam** voor het apparaat in, bijvoorbeeld "**Licht Test**".
3. **Kamer selecteren:**
* Kies de **kamer** waarin het apparaat zich bevindt. In dit voorbeeld is dat de kamer "**Test**".
4. **Apparaattype selecteren:**
* Klik op het dropdownmenu **Type** om het apparaattype te kiezen.
* Er zijn verschillende **apparaatcategorieën** beschikbaar:
* **Verlichting:** Dimmer, Licht, RGB
* **Ventilatie:** Ventilator, Ventilator met snelheid
* **Raambekleding:** Schaduw, Schaduw zonder positie, Schaduw zonder hoek
* **Verwarming & airconditioning:** Verwarming, Verwarming (doelwaarde verschuiving), Airconditioning, Thermostaat variant TA
* **Schakelaars:** Trigger, Schakelaar, Scène
* **Sensoren:** Alarm, Beweging, CO2, Helderheid, Contact, Temperatuur, enz.
* **Zonwering:** Zonnewering
* **Deuren:** Garagedeur
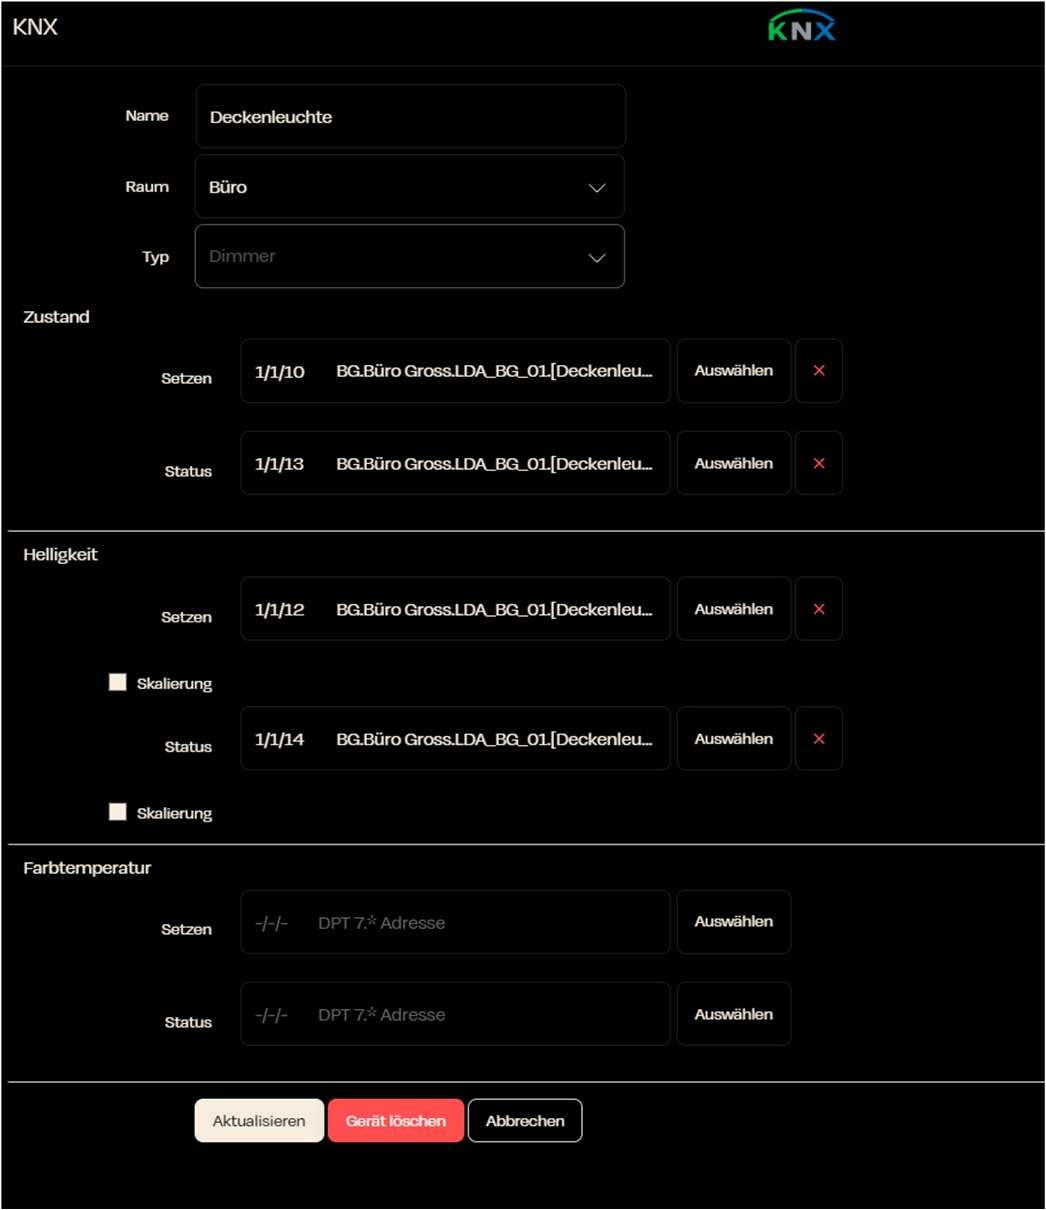
5. **Groepadressen invoeren:**
* Nadat u het apparaattype hebt geselecteerd, verschijnen de kolommen van de groepadressen die voor dit apparaat beschikbaar zijn.
* In de afzonderlijke velden kunt u nu uw gewenste groepadressen toevoegen.
* Het is niet noodzakelijk om alle staten of waarden in te vullen, zodat het gewenste apparaat in de app/Visio verschijnt. Ook kunnen alleen enkele groepadressen worden toegevoegd (bijvoorbeeld AAN/UIT) en daarmee alleen deze functie in de app/Visio beschikbaar worden gesteld.
* Houd er rekening mee dat in de ETS de juiste datatypes bij de gewenste groepadressen zijn geregistreerd. Als deze een onjuiste DPT-rate hebben, wordt dit ook zo in uw nomos system Controller overgenomen en zal de functie van dit groepadres verkeerd worden overgedragen.
6. **Afsluitende stappen:**
* Nadat u alle velden hebt ingevuld, klikt u op **Toevoegen**. Het apparaat wordt dan in uw nomos system Controller geïntegreerd.
---
# Agent Instructions
This documentation is published with GitBook. GitBook is the documentation platform designed so that both humans and AI agents can read, navigate, and reason over technical content effectively. Learn more at gitbook.com.
## Querying This Documentation
If you need additional information that is not directly available in this page, you can query the documentation dynamically by asking a question.
Perform an HTTP GET request on the current page URL with the `ask` query parameter, and the optional `goal` query parameter:
```
GET https://documentation.nomos-system.com/nomos-system/integrator-nl/skills/knx/knx-apparaat-toevoegen.md?ask=&goal=
```
`ask` is the immediate question: it should be specific, self-contained, and written in natural language.
`goal` is optional and describes the broader end goal you are ultimately trying to accomplish on behalf of the user. GitBook uses it to tailor the answer towards what is most useful for that goal.
The response will contain a direct answer to the question and relevant excerpts and sources from the documentation.
Use this mechanism when the answer is not explicitly present in the current page, you need clarification or additional context, or you want to retrieve related documentation sections.